WEATHER GUARD Model 8503-3-01 Shelf Door, 15 in x 51 in User Manual
Page 3
PAGE 3
IF YOU HAVE ANY QUESTIONS, PLEASE CONTACT US TOLL-FREE AT .800.456.7865
WEATHER GUARD
®
products are protected by one or more of the following trademarks: U.S. 842268, 1661625, 1663369, 2228051, 2362167; Canada - 282725; U.K. - 1400720; N.Z. - 296049; Aus.- 761964
2
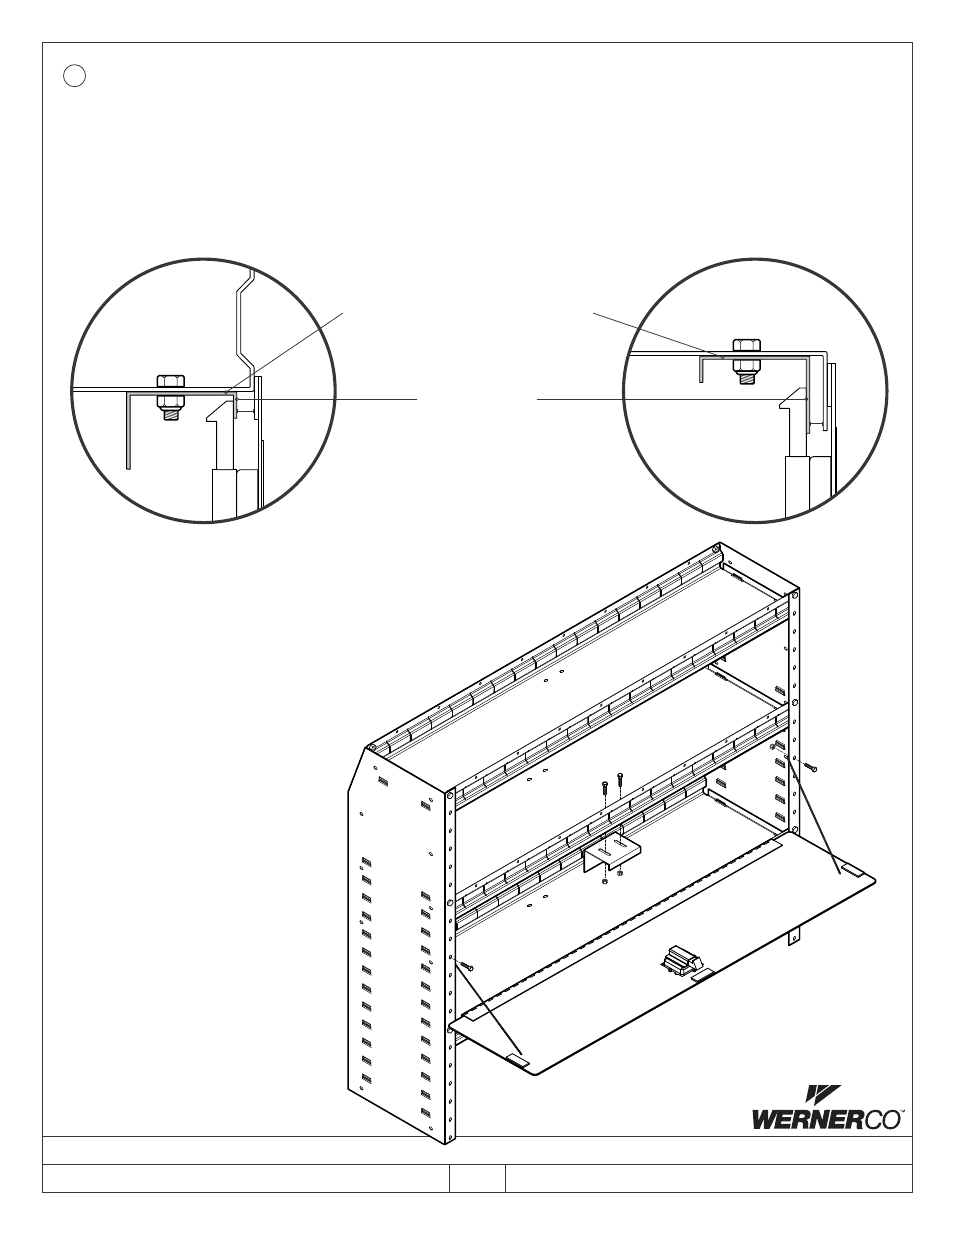
DOOR ASSEMBLY INSTALL OPTIONS.
Standard Van Shelf Installation
(with bends up).
Fasten the Latch Plate to the bottom of the shelf 1/2" in from
the front of the shelf using two (2) 1/4-20 x 5/8" Hex Head
Bolts and 1/4-20 Nylon Lock Nuts. Close the Door. If the door
doesn't latch, or is too loose when latched, adjust the latch
plate in or out until the Door latches properly.
Flat Shelf and Welded Shelf Installation
(with bends down).
If installing the Door on a Flat Shelf or Welded Shelf with the shelf
flanges facing down, it will be necessary to mount the Latch Plate
with the long bend facing front. Fasten the Latch Plate to the bottom
of the shelf 1/2" in from the front of the shelf using two (2) 1/4-20 x
5/8" Hex Head Bolts and 1/4-20 Nylon Lock Nuts. Close the Door. If
the door doesn't latch, or is too loose when latched, adjust the latch
plate in or out until the Door latches properly.
Latch Plate
installed with
short leg to the
front of the unit
Latch Plate
installed with
long leg to the
front of the unit
1/2" front of shelf to
front of Latch Plate
1/2"
1/2"
Count four holes up from hinge and attach
cables from door panel to the inside of the
End Panel flange using two (2) 1/4-20 x
5/8" Hex Head Bolts and 1/4-20 Nylon Lock
Nuts. This will create a 90º angle when
door is down.
INSTALLATION IS NOW COMPLETE.
Part No. 24-0241 REV. B ECN 5305 04/13