Thetford 19621 - Seal Replacement Package User Manual
Aria deluxe ii, Rv toilet service parts for, Fig. b
Rev. 01/22/08
Form #19639B
Seal Replacement Package
Part #19621
To Remove Toilet From Floor
1. Turn off RV water supply per RV Owner’s Manual.
2. Press both keypad buttons at the same time, twice, to open blade
and drain bowl of water.
3. Pry off Bolt Caps with Flat-blade screwdriver. Use wrench to
remove 1/2-inch Lag Screws.
4. Swivel Toilet to gain access to back.
5. Turn off RV’s power supply to the Toilet.
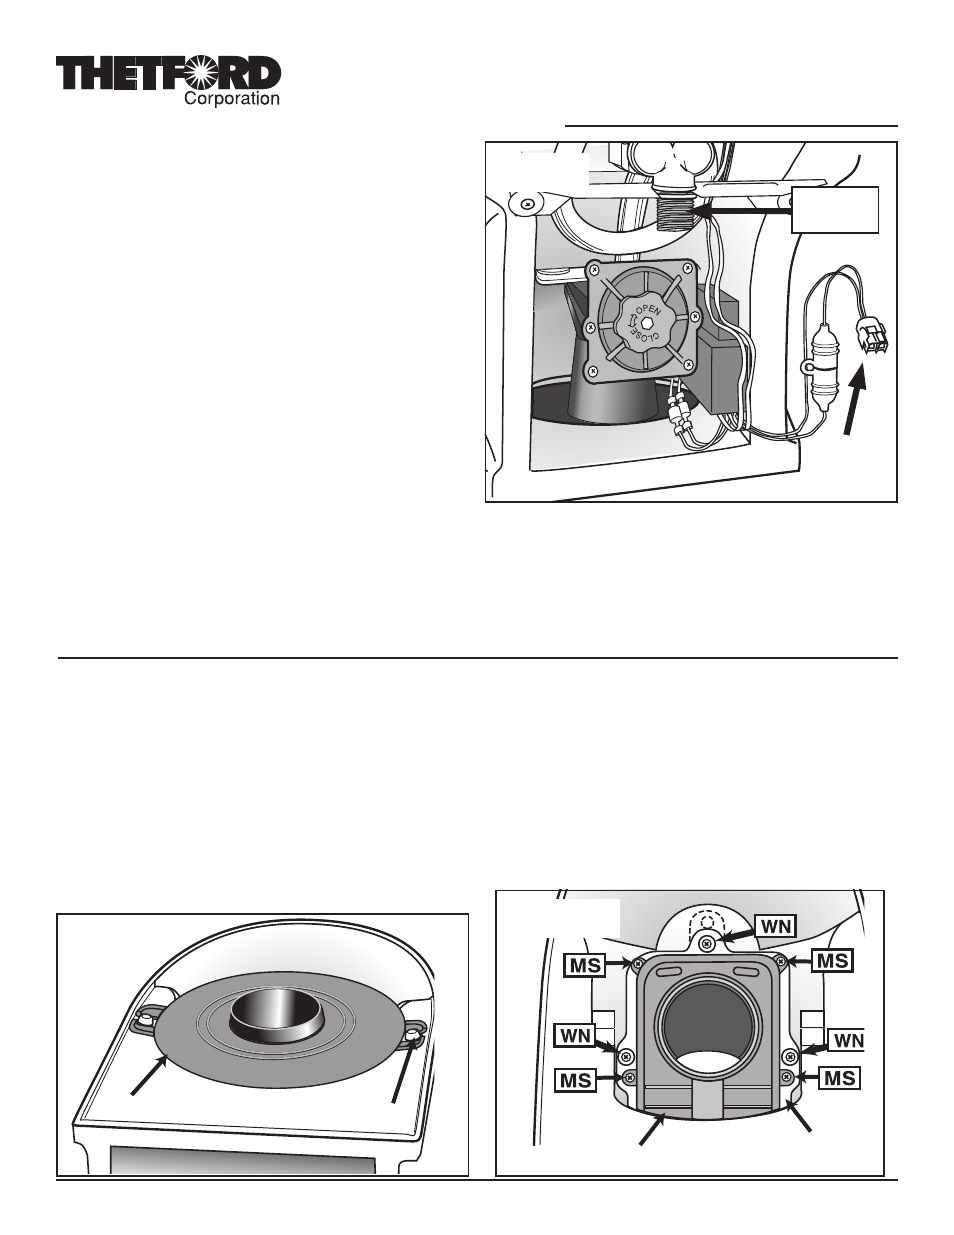
6. Disconnect Water Supply Line with Adjustable Wrench (Fig. A).
7. Disconnect Toilet’s 12-volt power hookup to RV.
8. Place an old towel or soft cloth on work surface. Remove Toilet from floor
and place upside down on work surface.
9. Remove old Closet Flange Seal (may be found in toilet or in floor
at Closet Flange). Discard.
10. Cover Holding Tank opening to contain odor.
Tools needed
• Flat-blade screwdriver
• Pliers
• Adjustable Wrench
• DAP Dynaflex Caulk or equivalent (available at most hardware
stores)
Note:
• Read all instructions before beginning work.
• You may not need to replace all the Seals in this package.
• All replacements will require removing toilet from floor.
• Use gloves when handling parts that may have come in contact
with waste.
To Remove Parts
1. Tap out 2 Mounting Bushings (Fig. B).
2. Remove Mounting Flange and Flange Seal.
3.
High Profile models only: Remove Extension Tube. It may
be found connected to Mounting Flange or to the Mechanism.
Remove Tube Seal.
4. if you need to replace the Blade Seal, remove 4 Mechanism Screws
without Washers (MS, Fig. C). If not, remove the three screws shown
with washers (no arrows).
5. Lift Mechanism Assembly off Seal. Pull out carefully through back
of toilet, just far enough to gain access to the seal(s) to be replaced.
(No need to disconnect/remove motor wiring, Overflow Tube or
Sound Deadening Insulation – if present – from Mechanism.)
To Replace Blade Seal
1. Remove Blade Seal (may be attached to white Mechanism Plate).
Discard. Fit new seal in its place.
Replacement of Blade Seal, O Ring Seal and Hopper Seal
RV Toilet
Service Parts for
Aria Deluxe II
Power supply
connector
Water supply
hookup
Fig. B
Mounting Bushing
White Mechanism Plate
Mechanism
Mounting Flange
Fig. C
Fig. A