Thetford 34117 - Waste Ball User Manual
Style ii, Waste ball kit
Kit Contains
4
Waste ball drive arm (PN 34326)
4
Screw (PN 31053)
4
Closet flange seal (PN 02125)
4
Instruction sheet (PN 34103)
Needed
4
Towel(s)
4
Plastic trash bag
4
Pliers
4
Phillips-head screwdriver
4
3/8" Socket and wrench
4
1/2-inch wrench
Before Beginning
4
Read all instructions completely.
4
Reduce holding tank odor: Rinse toilet
with water, drain holding tank, and add
Thetford Holding Tank Deodorant.
4
Wear protective gloves, glasses, long
sleeves, and nose/face mask to avoid
contact with human waste.
4
Wash entire toilet thoroughly.
4
Refer to Figures 1 and 2 for component
locations.
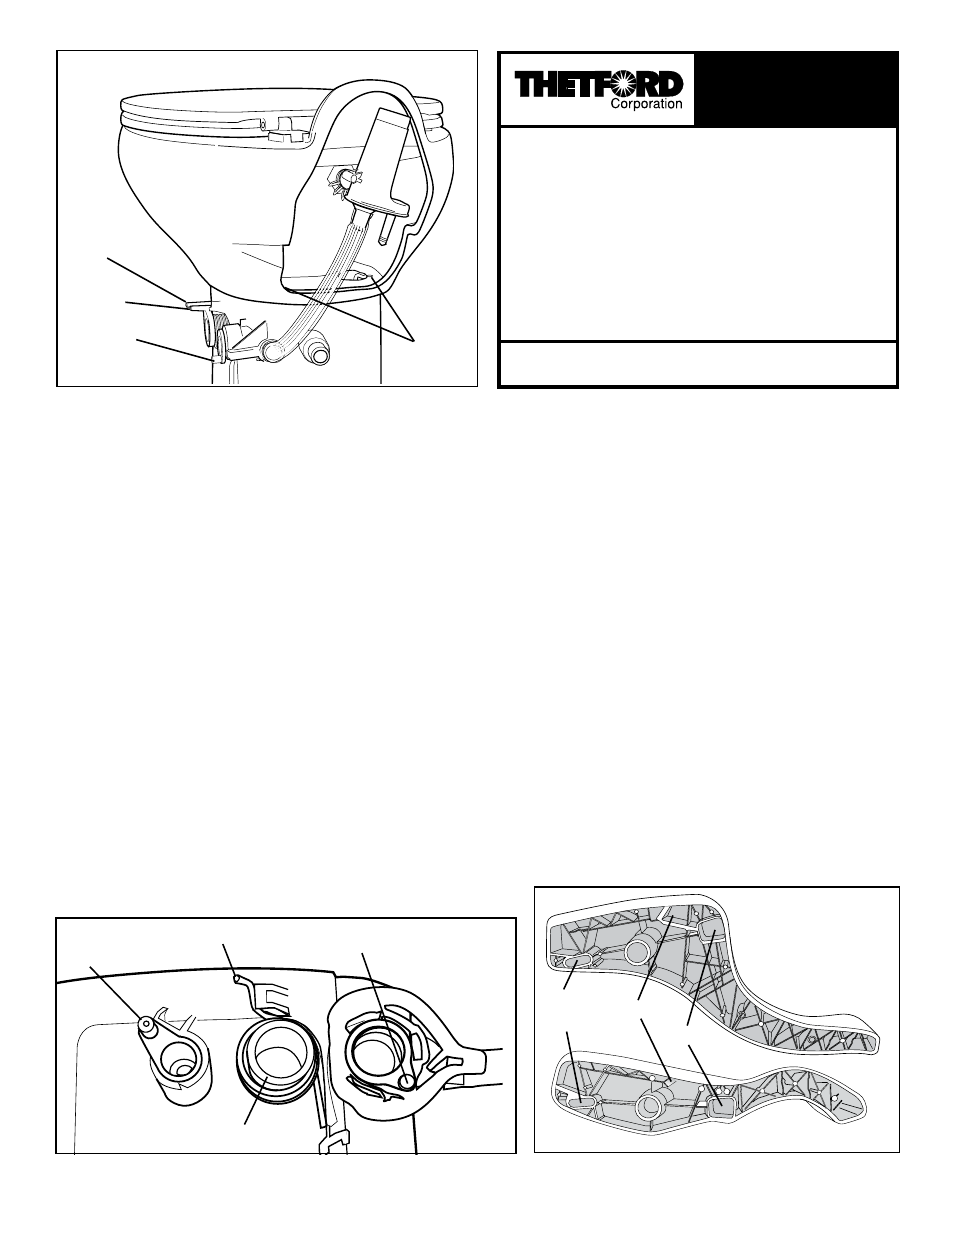
Figure 1
Mounting
screw
holes
Return
spring
Water valve
drive arm
Waste ball
drive arm
Part No.
34117
Style II
®
Waste Ball Kit
RV Toilets
Made in the USA
Thetford Corporation
Ann Arbor, MI 1-800-521-3032 www.thetford.com
F# 421
13 12/06
Remove Toilet
1. Turn off RV water supply per RV
Owner’s Manual.
2. Flush toilet to drain.
3. Place towel(s) behind toilet under
water connection to catch water.
4. Disconnect RV water supply from
toilet.
5. Remove Closet Flange Bolt Covers (if
present) and Nuts.
6. Lift Toilet from floor and place on trash bag.
7. Cover holding tank opening with a towel.
8. Remove old Closet Flange Seal. Discard.
Remove old Waste Ball
1. Lay Toilet on its side on floor with pedal
facing upward.
2. Holding Bowl, grab front underside
of Pedal. Pull Pedal up and off with a
quick motion.
3. Remove Drive Arm Screw. Pull out
Waste Ball Drive Arm.
4. Turn toilet upright. Remove Bowl-to-
Base Screws with a 3/8-inch socket.
5. Securing Base, rotate Bowl counter-
clockwise until free and lift off base.
6. Remove Waste Ball Seal. Discard.
7. Remove Seal Retainer.
8. Push out Waste Ball (end opposite of
Drive Arm) and remove from Base.
Discard.
Install new Waste Ball
1. Install U-Cup Seal onto key tab side of
new Waste Ball. (Tapered side of U-
Cup Seal faces out.)
2. Squeeze ends of new Waste Ball to-
gether and install into Base, seating the
Waste Ball in the closed position. Note:
U-Cup Seal should point toward Pedal
side.
3. Rotate Waste Ball Drive Arm counter-
clockwise to align key way on Drive
Arm with tab key on Waste Ball. Install
Waste Ball Drive Arm.
4. Install Drive Arm Screw. Do not over-
tighten.
5. Pull Waste Ball Drive Arm up against
stop.
6. (Fig. 3) Align Pedal onto Pedal Pivot.
Align Pedal Return Spring Tab with
Pocket A and rotate Pedal slightly until
Drive Arm Pin aligns with Pocket B.
Holding Pedal down, firmly hit button
on outside of Pedal until Pedal snaps in
place.
Figure 2 - PeDAL removeD
Figure 3 - PeDAL reATTAChmeNT
Pocket B
Parts on toilet fit into
pockets indicated:
Pocket A
Water
Valve
Arm
Waste ball drive
arm
Water valve drive arm
Return spring
High Profile
Low Profile