Installation instructions – Qmark CWH1000 Series - Small Room Fan-Forced Wall Heaters User Manual
Page 2
INSTALLATION
INSTRUCTIONS
General
Theheaterisdesignedforrecessedinstallationin2”X4”
(50mmX101mm)studorlargerwallorceilingsectionsusing
thewallboxprovided.Theheatermayalsobesurfacemounted
byusingtheSurfaceMountingFrame,ModelCWHSMorsemi-
recessmountedbyusingaCWHS1(for1”(25mm)recess
frame)oraCWHS2(for2”(50mm)recessframe).Allthree
accessoriesareorderedseparately.Theheatermaybewired
withstandardbuildingwire(60°C).Refertospecificationchart
forcorrectsupplyvoltageandwiresize.
Forsurfaceorsemi-recessmounting,consultInstallation
InstructionspackedwithCWHSM,CWHS1,CWHS2.
Installation of Back Box in New Construction
NOTE: Ifthefinishedwallsurfaceisalreadyup,follow
instructionsfor“InstallationofBackBoxinExisting
Construction”.
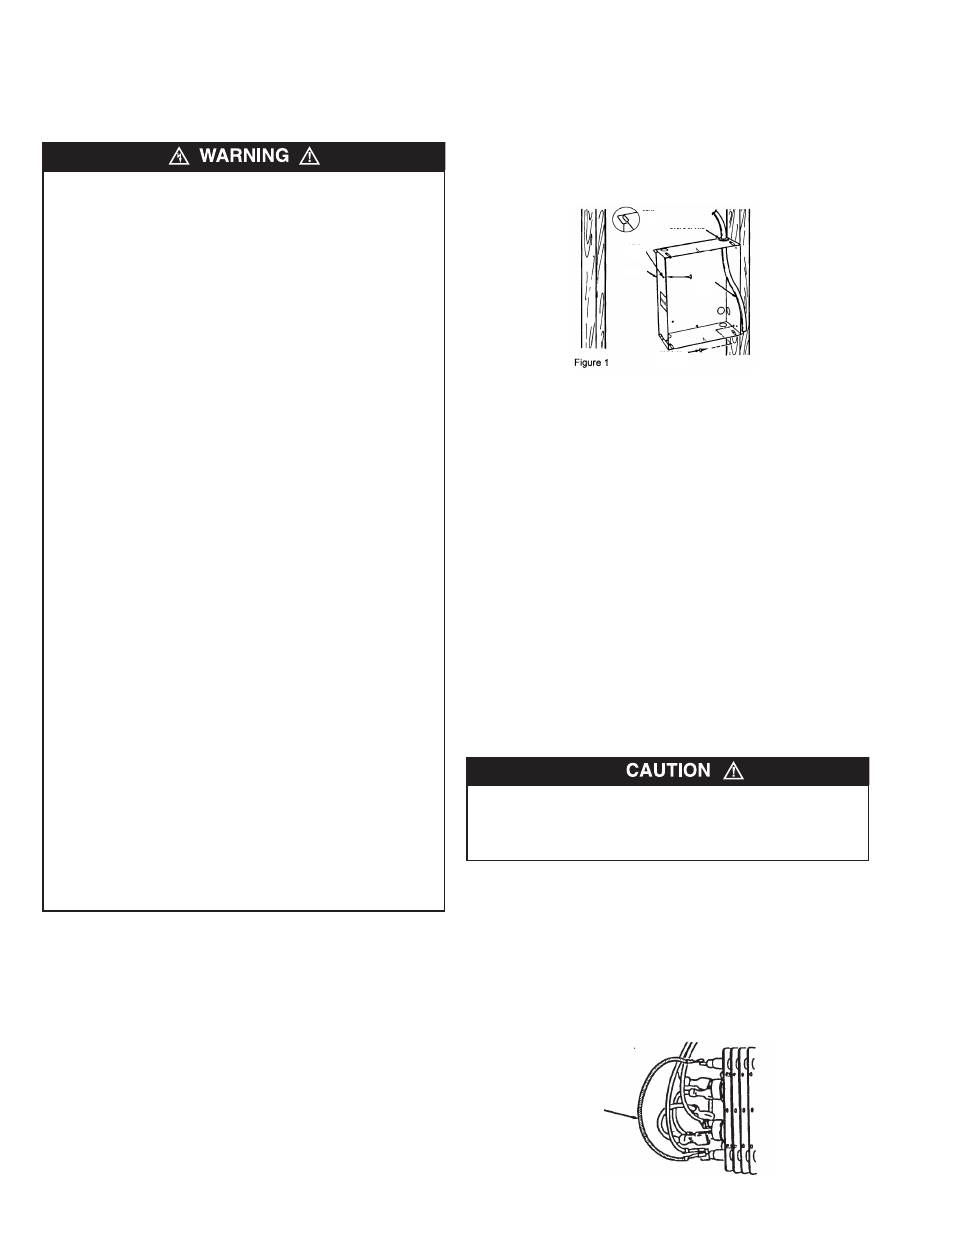
1. Determinewhichsideofthebackboxistobemounted
againstastudandbendthetabsattherearcornersout90
degreessothatthebackboxwillbesquarewiththestud
afterinstallation.(SeeFigure1).
2. Removeoneoftheknockoutsonsocketsideofthebackbox
andinstallacableorconduitconnector.
3. Positionbackboxagainstsideofstudsandsecureusing
nailsorscrewsasshowninFigure1.
NOTE: Thebackboxmustbeinstalledwiththefrontedgeflush
withthefinishedsurface.
4. Runpowersupplycablethroughtheconnector,leavingabout
8”ofwireinsidethebox.
5. Connectthesupplycablegroundwiretogreengroundscrew
provided.
NOTE: Leadholesfora#8sheetmetalscrewhavebeen
providedinthesidesofthebackbox.Afterthefinishedwallor
ceilinghasbeenputup,drivea#8(m4)sheetmetalscrew
(recommended1”long)throughthesideoftheboxnotmounted
tothestud.Thiswillpreventthebackboxfrompullingoutwhen
installingtheheaterassembly.(SeeFigure1)
Installation of Back Box in Existing Construction
1. Carefullymarkandcutaholemeasuring9-3/8"(235mm)
wideby11-1/8"(283mm)long.Oneedgeoftheholemust
becutalongtheedgeofastud.
2. RefertoINSTALLATIONOFBACKBOXINNEW
CONSTRUCTIONsectionandproceedwithsteps1through5.
FIELD CONVERSION FOR LOWER WATTAGE RATING
NOTE: Refertospecificationchartforlowerwattageratings
whichareavailable.
Toconvertheatertolowerwattagerating,completelyremove
redjumperwirefrombothheatingelements(SeeFigure2).
Discardthisjumper.Besureremainingwiresaresecurely
connected.
Topreventapossiblefire,injurytopersonsordamagetothe
heater,adheretothefollowing:
1. Disconnect all power coming to heater at main service
panelbeforewiringorservicing.
2. All wiring procedures and connections must be in
accordance with the National and Local Codes having
jurisdictionandtheheatermustbegrounded.
3. Powersupplymustenterbackboxthroughtheknockouts.
4. Verifythepowersupplyvoltagecomingtoheatermatches
theratingsasshownontheheaternameplate.
CAUTION: ENERGIzINGHEATERATAVOLTAGEGREATER
THANTHEVOLTAGEPRINTEDONTHENAMEPLATEWILL
DAMAGETHEHEATERANDVOIDTHEWARRANTYAND
COULDCAUSEAFIRE.
5.
CAUTION - High temperature, risk of fire, keep electrical
cords,drapery,furnishings,andothercombustiblesatleast
3 feet (0.9 m) from front of heater. Do not install heater
behinddoors,belowtowelracks,orinanareawhereitis
subject to being blocked by furniture, curtains or storage
materials. Hot air from the heater may damage certain
fabricsandplastics.
6. To reduce the risk of fire, do not store or use gasoline or
other flammable vapors and liquids in the vicinity of the
heater.
7. Thisheateristobemountedonlyusingbackboxandmay
beinstalledwiththebackboxrecessedorsurfacemounted
asdescribedwithinthismanual.
ONLY model
WHB1101FC
rated1000wattsorlessmaybemountedintheceiling.
8. Thefollowingminimumclearancesmustbemaintained:
Bottomofheatertofloor-4”(102mm)-optimumheight
is18”to24”.
Sides of heater to adjacent wall - 4-1/2” (114 mm) -
optimumminimum12”(305mm).
Topofheatertoceiling-12”(305mm)-recommended
atleast36”(915mm).
Ceilingmounting(
WHB1101FCONLY)
-12”(305mm)to
adjacentwalls.
9. Donotoperatetheheaterwithoutthegrilleinstalled.
10. Do not use this heater for dry out as the paint, plaster,
sawdustanddrywallsandingdustwillpermanentlydamage
theheaterandmustbekeptoutoftheheater.
AN ELECTRICAL SHOCK, FIRE OR WATER DAMAGE
COULD RESULT IF WIRING OR PIPING IS DAMAGED
DURINGCUTTING.MAKESUREALLWIRINGANDPIPING
ARECLEAROFAREABEFORECUTTING.
2
Figure 2
Figure 1
Remove red jumper
for lower wattage
rating
BEND
OUT
TAB
CABLECLAMP
BACKBOX
LEAD
HOLES
SUPPLY
WIRING
CABLE
NAILSOR
SCREWS(2)