Dell OptiPlex GX150 User Manual
Page 60
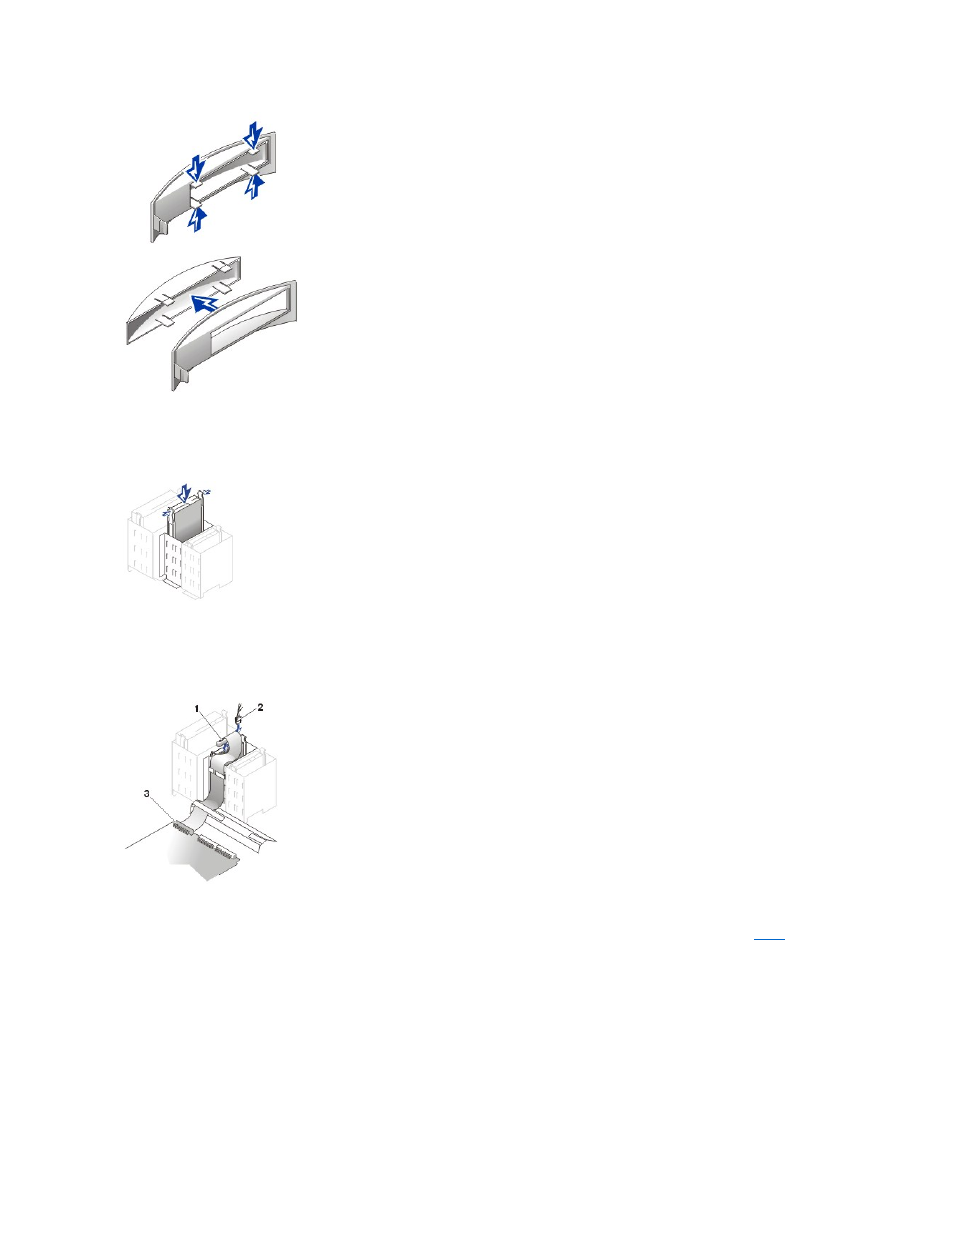
7. Install the 3.5-inch floppy drive and bracket assembly in the chassis by gently sliding the bracket into place until the tabs securely click into
position.
Installing the 3.5 Inch Drive in the Small Mini-Tower System
8. Connect the power cable to the power input connector on the back of the drive.
9. Connect the appropriate interface cable to the interface connector on the back of the drive.
Attaching Floppy Drive Cables in the Small Mini-Tower System
To remove and install a 5.25-inch drive in a small mini-tower system, perform the following steps:
1. If you are replacing a 5.25-inch drive and bracket assembly, follow these instructions. If you are installing a new drive, skip to
a. Press inward on the two tabs on the sides of the drive bay to disengage the bracket from the chassis.
b. Slide the bracket upward, and remove it from the chassis.
Removing the 5.25-Inch Drive in the Small Mini-Tower System
1 DC power cable
2 Floppy drive connector
3 System board floppy connector (DSKT)
- Inspiron 530 (2 pages)
- OptiPlex 755 (45 pages)
- OptiPlex 755 (248 pages)
- OptiPlex 755 (622 pages)
- OptiPlex 755 (528 pages)
- OptiPlex 755 (82 pages)
- OptiPlex 760 (76 pages)
- OptiPlex 760 (203 pages)
- OptiPlex 745 (212 pages)
- OptiPlex 745 (360 pages)
- OptiPlex 745 (428 pages)
- OptiPlex 780 (80 pages)
- OptiPlex 780 (73 pages)
- OptiPlex 780 (40 pages)
- OptiPlex 780 (14 pages)
- OptiPlex 780 (89 pages)
- OptiPlex 780 (10 pages)
- OptiPlex 780 (74 pages)
- OptiPlex GX620 (221 pages)
- OptiPlex GX620 (294 pages)
- OptiPlex GX620 (338 pages)
- Inspiron 530 (226 pages)
- OptiPlex 960 (Late 2008) (16 pages)
- OptiPlex GX260 (100 pages)
- OptiPlex GX260 (235 pages)
- OptiPlex FX160 (Late 2008) (20 pages)
- OptiPlex FX160 (Late 2008) (132 pages)
- OptiPlex FX160 (20 pages)
- OptiPlex 210L (130 pages)
- OptiPlex 210L (128 pages)
- OptiPlex 210L (300 pages)
- OptiPlex 210L (258 pages)
- OptiPlex 210L (150 pages)
- OptiPlex 320 (312 pages)
- OptiPlex 320 (266 pages)
- OptiPlex 320 (356 pages)
- OptiPlex 320 (44 pages)
- OptiPlex 320 (140 pages)
- OptiPlex 320 (132 pages)
- OptiPlex GX240 (182 pages)
- OptiPlex GX240 (144 pages)
- OptiPlex GX240 (121 pages)
- OptiPlex GX240 (86 pages)
- OptiPlex GX240 (283 pages)
- OptiPlex GX240 (298 pages)