Removing and replacing a blower or fan assembly, Figure 5, Removing a blower or fan assembly – Dell PowerVault 725N (Rackmount NAS Appliance) User Manual
Page 39
10.
Unpack the new processor.
If any of the pins on the processor appear bent, see "
Getting Help
."
11.
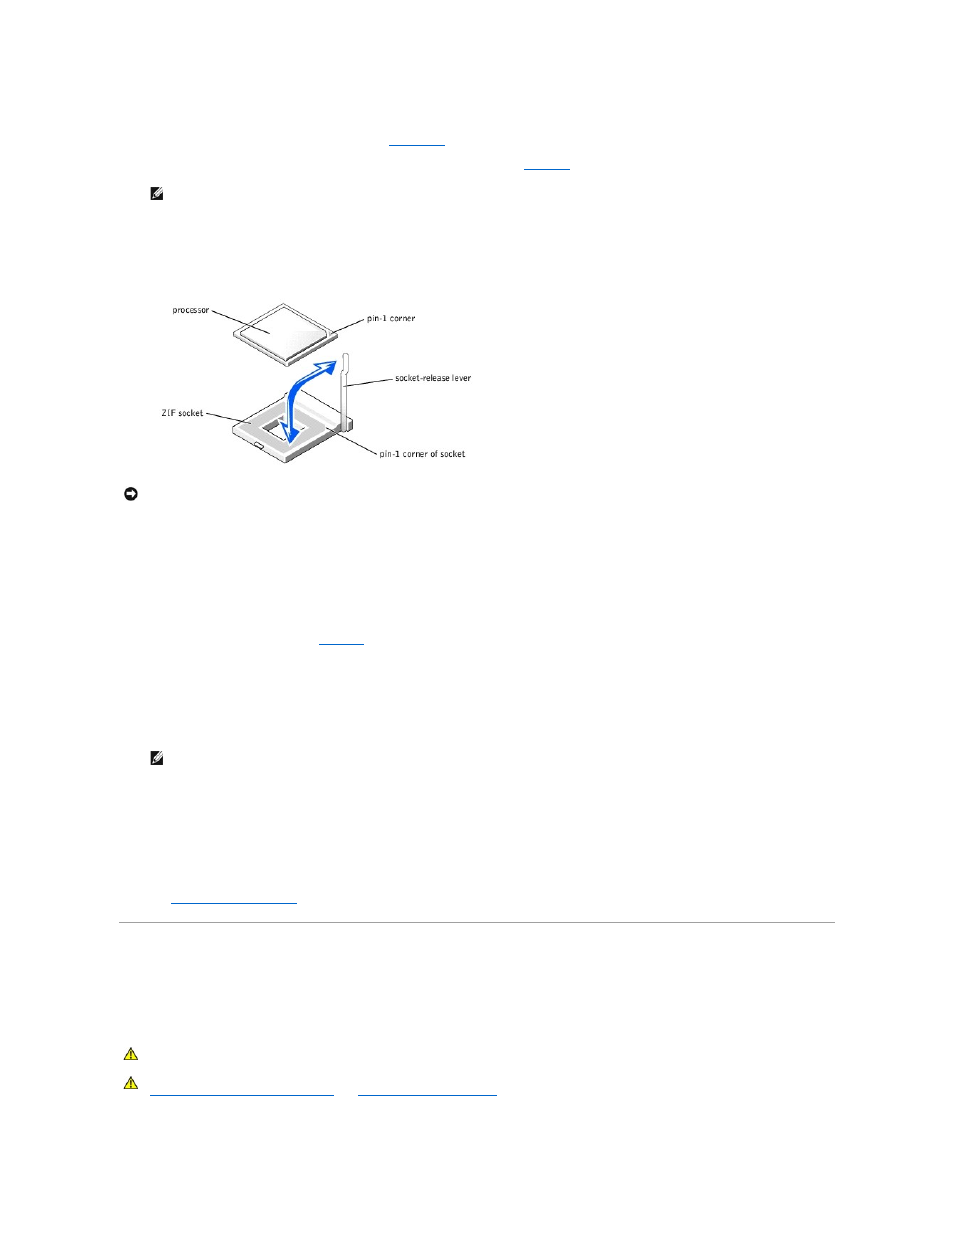
Align the pin-1 corner of the processor with the pin-1 corner of the ZIF socket. See
Identify the pin-1 corner of the processor by locating the tiny gold triangle on one corner of the processor. Place this corner in the same corner of the ZIF
socket identified by a corresponding triangle.
12.
Install the processor in the socket.
Figure 5-7. Installing the Processor in the Socket
If the release lever on the processor socket is not positioned all the way up, move it to that position.
With the pin-1 corners of the processor and socket aligned, set the processor lightly in the socket, making sure all pins are matched with the correct
holes in the socket. Because the system uses a ZIF processor socket, do not use force, which could bend the pins if the processor is misaligned. When
the processor is positioned correctly, it drops down into the socket with minimal pressure.
When the processor is fully seated in the socket, rotate the socket release lever back down until it snaps into place, securing the processor.
13.
Place the new heat sink on top of the processor, aligning the holes on both sides of the heat sink with the heat-sink posts on the system chassis.
14.
Orient the securing clips as shown in
.
15.
Position each securing clip over the heat-sink posts, then snap them onto the posts.
16.
While holding down the rubber-coated tab with one hand, push the latch on the securing clip on the right until it locks the clip onto the post. While
pressing the heat sink down, repeat this step for the securing clip on the left.
17.
Replace the cooling shrouds.
18.
Replace the system cover, and then reconnect the system and peripherals to the power source and turn on the system.
As the system boots, it detects the presence of the new processor and automatically changes the system configuration information in the System Setup
utility.
19.
Press
See your User's Guide for instructions on using the System Setup utility.
20.
Run the System Diagnostics to verify that the new processor operates correctly.
See "
Running System Diagnostics
" for information about running the diagnostics and troubleshooting processor problems.
Removing and Replacing a Blower or Fan Assembly
The blower assembly, which is located behind IDE hard drive 1, contains one fan. In addition, two smaller fan assemblies are located near the processor and
heat sink.
Removing a Blower or Fan Assembly
NOTE:
Identifying the pin-1 corners is critical to positioning the processor correctly.
NOTICE:
Positioning the processor incorrectly can permanently damage the processor and the system when you turn it on. When placing the processor
in the socket, be sure that all of the pins on the processor enter the corresponding holes. Be careful not to bend the pins.
NOTE:
When you turn on the system, press the power button for less than two seconds. If you press the power button for longer than 3 seconds,
the NAS system shuts down and automatically rebuilds its RAID arrays, which could impact system performance for several hours.
CAUTION:
See your System Information Guide for complete information about safety precautions, working inside the computer, and protecting
against electrostatic discharge.
CAUTION:
Before you perform this procedure, you must turn off the system and disconnect it from the power source. For more information, see
"
Safety First—For You and Your System
" in "
Troubleshooting Your System
."