Photoflex, 6 year warranty, Attaching rear flaps (optional) – Photoflex XT-20XTXS LiteDome: Extra Small User Manual
Page 2: Installing the internal baffle and diffusion face
PROFESSIONAL PHOTOGEAR
Visit photoflex
lightingschool
.com® for the best free learning resource!
For detailed specifications,
product tutorial videos
and more, please visit
www.photoflex
®
.com
Rev 10/28/13
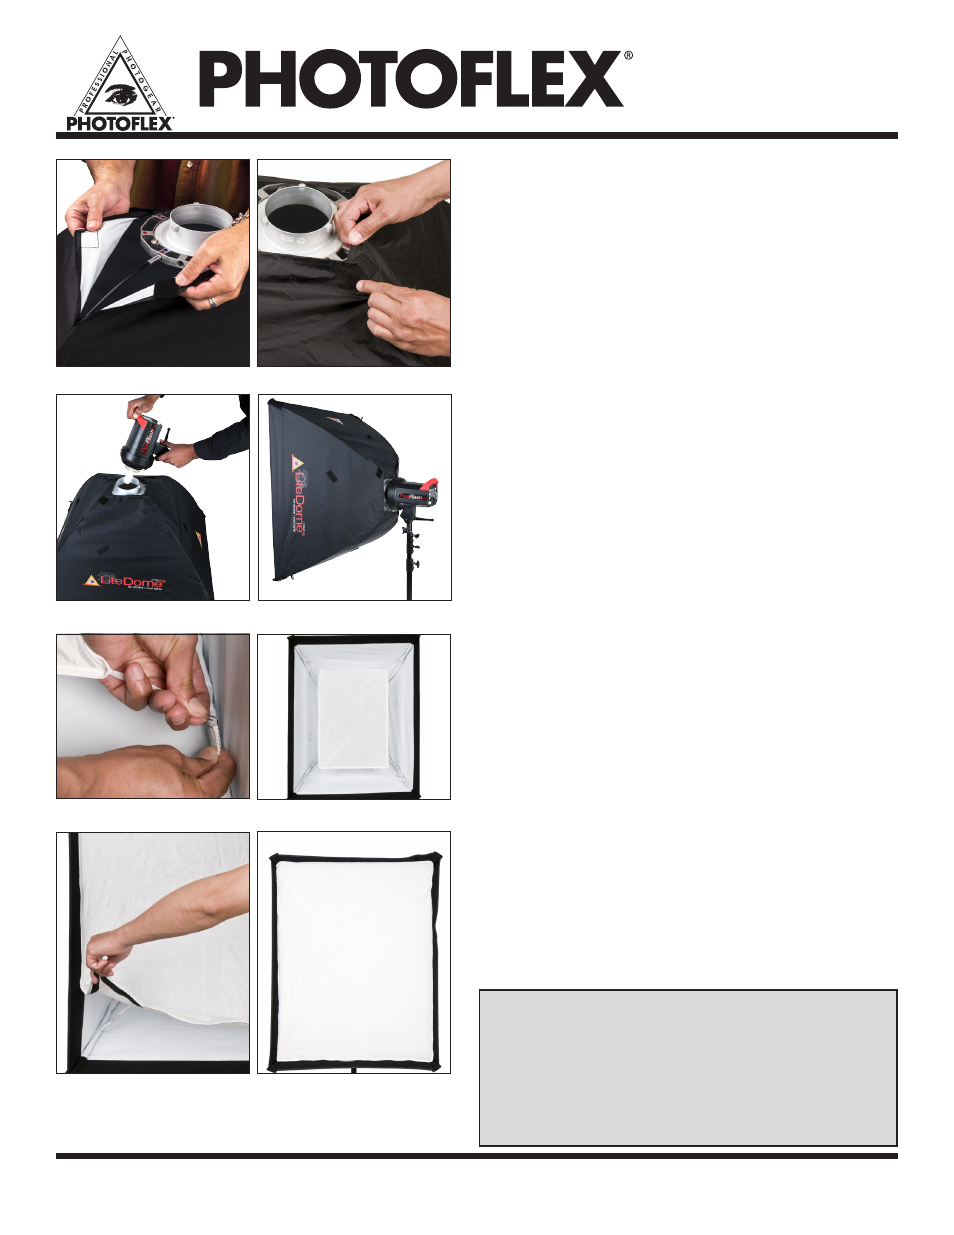
Attaching Rear Flaps (optional)
Figure 10-11
10. The rear flaps can be closed by pulling them toward the
connector and attaching with the Velcro that is sewn into each
flap. The softbox is built and ready to attach to your strobe
light head. Finally, with the softbox face down, press firmly on
the connector to be sure that all the rods are seated properly.
Attaching Your Light Head to the Connector and
LiteStand
®
Figures 12-13
In most cases, the softbox connector is designed to connect
with your strobe light head in the same manner as your light
head's accessories.
11. Connect the light to the softbox connector making sure that your
lights locking mechanism is securely attached.
Figure 12
12. Carefully lift the softbox and light assembly and position it over
your LiteStand. Line up the LiteStand's riser (stud) with the
stand receptacle hole on your light head. Place the light head
on the LiteStand and secure the light's tilt bracket to securely
attach the light to the stand.
Figure 13
Installing the Internal Baffle and Diffusion Face
Figures 14-17
13. The inner baffle has elastic bands with metal clips at each of
the four corners. The interior of the LiteDome softbox has four
white Nylon loops. Secure one metal clip to each of these loops
(Not available on the extra small or small LiteDomes)
Figure 14
14. Here is an example of the inner baffle correctly installed.
Figure 15
15. The face diffuser is rimmed with Velcro that attaches to its
counterpart lining the front of the LiteDome. Find the long edge
of the diffuser and line it up with the long edge of the LiteDome
front. Starting at one corner, press the face diffuser into place.
Work your way around the rim of the softbox until the diffuser is
in place.
Figure 16
16. Congratulations! Your softbox is now fully constructed!
Figure 17
PHOTOFLEX
®
6 YEAR WARRANTY
•
Warranties only cover manufacturer’s defects and workmanship.
• We reserve the right to inspect all merchandise returned (end users and
dealers) for warranty fulfillment.
• For returns contact Photoflex first to obtain a return authorization
number and instructions for return.
• Freight must be paid both ways by the customer or dealer.
• Warranties are valid only from date of original purchase.
• Warranties are cannot cover damage caused by accidents, improper care
or use.
Customer Support (800) 486-2674
E-mail: [email protected]
Corporate Office (831) 786-1370 • FAX (831) 786-1372
97 Hangar Way, Watsonville, CA 95076
©2013 Photoflex, Inc. ALL RIGHTS RESERVED. LiteDome
®
, QRC
®
, LiteStand
®
, Photoflex
®
and the
Photoflex logo are trademarks or registered trademarks of Photoflex and/or its affiliates in the U.S. and
other countries. Third party trademarks are the property of their respective owners.
Figure 12.
Figure 11.
Figure 10.
Figure 14.
Figure 13.
Figure 16.
Figure 15.
Figure 17.