12 i – Bose VIRTUALLY INVISIBLE 191 User Manual
Page 40
12
I
NSTALLATION
English
Français
Nederlands
Deutsch
Italiano
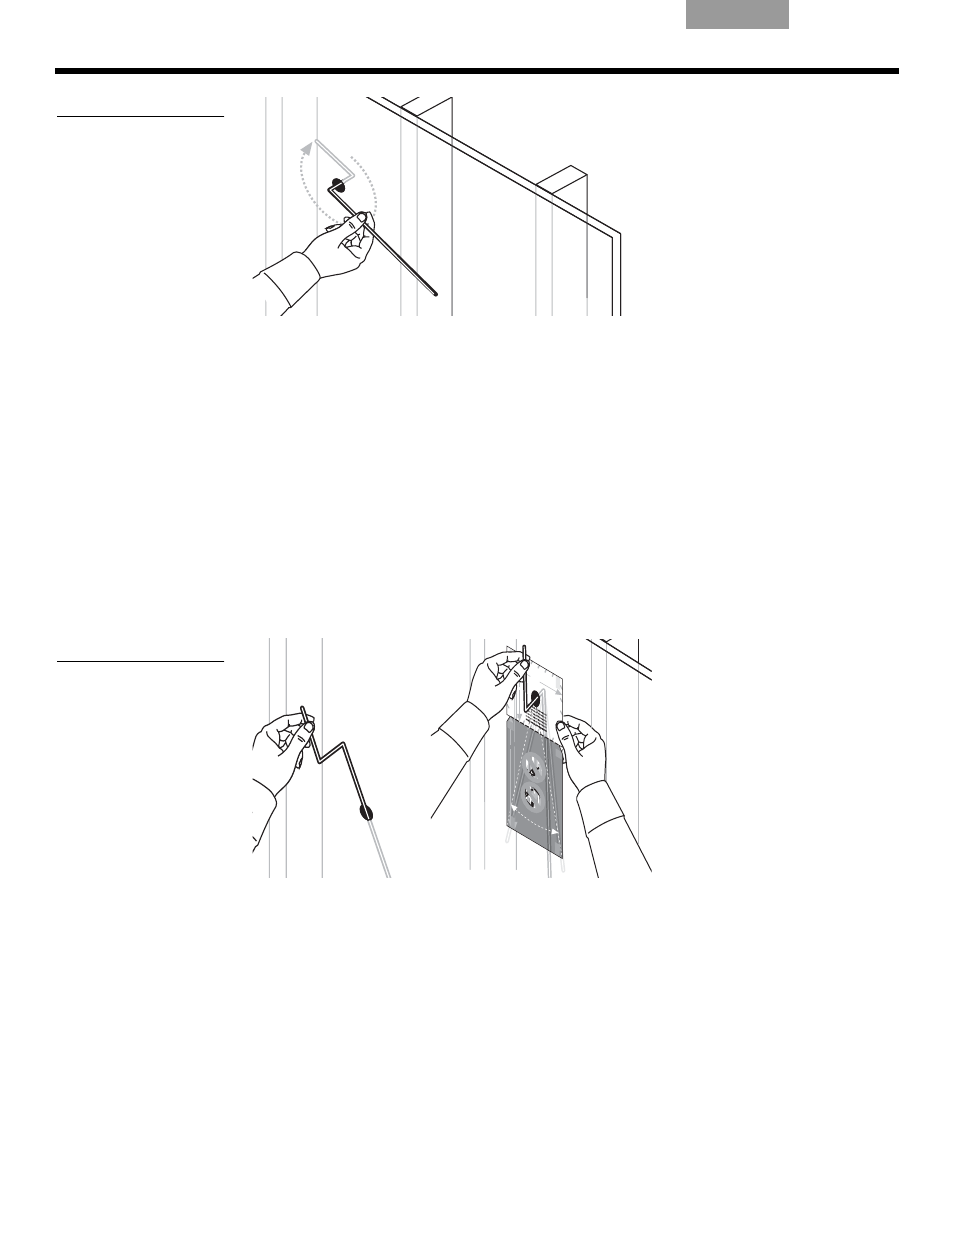
Abbildung 12
Prüfung des Freiraums für
die Lautsprecherbreite
• Wenn sich der Draht problemlos um 360° drehen lässt, fahren Sie mit Schritt 5 fort.
• Wenn Sie den Draht nicht mit der ganzen Länge des kurzen Endes um 360° drehen
können, müssen Sie an anderer Stelle erneut eine Probebohrung setzen. Wiederholen
Sie dann die Schritte 3 und 4.
5.
So prüfen Sie mit dem Draht, ob genügend Freiraum unterhalb der Probebohrung
vorhanden ist:
Halten Sie den Draht am kurzen Ende. Führen Sie das lange Ende vom Loch aus
senkrecht nach unten in den Hohlraum hinter der Oberfläche ein (Abbildung 13a).
7LSSVerwenden Sie hierfür ggf. die Schablone wie in Abbildung 13b gezeigt.
• Schwenken Sie den Draht in der Bohrung, und überstreichen Sie dabei den Winkel von
links nach rechts wie auf der Schablone abgebildet. Damit stellen Sie sicher, dass der
Hohlraum am unteren Ende sowohl lang genug als auch breit genug ist.
7LSSBewegen Sie den Draht beim Prüfen der Länge einmal nahe an der Oberfläche und
einmal etwas davon entfernt (wie in Abbildung 13a, unten).
Abbildung 13
Einführen des langen
Drahtendes (a) und
seitliches Schwenken, um
die Länge zu prüfen (b)
• Wenn Sie den Draht problemlos einführen und von einer Seite zur anderen schwenken
können, fahren Sie mit dem nächsten Schritt fort: „Wand für den Einbau der Lautsprecher
vorbereiten“ auf Seite 13.
• Wenn Sie unter der Oberfläche einer Innenwand auf ein Hindernis stoßen, führen Sie den
Draht nach oben gerichtet ein. Wenn der Raum oberhalb der Probebohrung frei ist, können
Sie den Lautsprecher mit dem Gehäuse nach oben installieren. Bei einer Außenwand wird
von der Installation mit dem Gehäuse nach oben abgeraten. Wenn Sie in diesem Fall auf ein
Hindernis stoßen, müssen Sie an anderer Stelle erneut eine Probebohrung setzen.
Wiederholen Sie dann die Schritte 3, 4 und 5.
360°
(a)
5
1
/
2
" (14
cm)
8
1
/
16
" (20.5
cm)
14
1
/
2
" (36
.9 cm
)
TAPE
HER
E
TAPE
HER
E
TAPE
HER
E
WHITE CUT OUT AREA
WHITE CUT OUT AREA
Pilot
Hole
WAR
NING
: Mak
e sure
the sp
ot cho
sen is
safe
for cu
tting
. Do
not cu
t thro
ugh
surfa
ces th
at ha
ve ha
zard
s, suc
h as
electr
ical w
iring,
condu
its or
plum
bing,
conce
aled
beh
ind th
em. If
you a
re no
t sure
, cons
ult a
profe
ssion
al ins
talle
r
befo
re yo
u pro
ceed.
DO
NOT
CUT
ARO
UND
GRAY
AREA
Engli
sh
& Tra
nsla
tions
WAR
NING
: Mak
e sure
the s
pot ch
ose
n is
safe
for cut
ting. D
o not
cut th
roug
h surfa
ces th
at hav
e haz
ards,
such
as ele
ctrica
l
wiring
, cond
uits
or plu
mbin
g, conc
ealed
behin
d them
. If y
ou ar
e not
sure,
consu
lt a pr
ofess
ional
insta
ller be
fore
you pr
oceed
.
WA
RNIN
G: M
ake s
ure
the s
pot ch
osen
is safe
for
drilling
. Don
ot cut
throug
h surfa
cestha
t have
hazard
s
conce
aled
behin
d them,
such as
elec
trical
wiring
,
condu
its or
plum
bing.
If you
are
not s
ure, c
onsult
a
profes
siona
l inst
aller
befor
e you
proce
ed.
WARN
ING: M
ake sur
e the s
pot ch
osen
is saf
e for
drilling.
Do no
t cutth
rough
surfac
es tha
t have
hazard
s
concea
led be
hind
them
, such
as ele
ctrical
wiring
,
cond
uits o
r plum
bing.
If you
are
not su
re, con
sult a
profe
ssion
al ins
taller
befo
re you
proce
ed.
WA
RNING
:Make
sure
the
spot c
hosen
is safe
for
drilling
. Do n
otcut th
rough
surfac
es th
at hav
e hazard
s
conce
aledb
ehind
them
,
such
asele
ctrical
wiring,
cond
uitsor
plumb
ing. If
you
areno
t sure,
consul
t a
profes
sional
installe
r befor
e
youpro
ceed.
WARNI
NG:
Make
sure th
e spo
t cho
sen
is sa
fe for
drilling
. Do
not cu
t throu
gh
surfac
es tha
t have
hazar
ds co
nceale
d
beh
ind them
, suc
h
as ele
ctric
al wi
ring,
condu
its or
plum
bing.
If you
are
not su
re, co
nsult
a
profes
siona
l insta
ller
befor
e you
proce
ed.
WAR
NING
: Make
surethe
spo
t chos
en iss
afe
fordrillin
g. Do
notcut
throug
hsurfa
cesth
athav
e
hazard
s concea
led be
hindth
em,su
ch as
electric
al wirin
g, con
duits
or plu
mbing
. If yo
u
areno
t sure,
cons
ult a
profess
ional
instal
ler
before
you
procee
d.
WAR
NING
: Mak
e sur
e the
spot
chose
n is sa
fe for
drillin
g. Do
not c
ut
throug
h surfa
ces th
at ha
ve ha
zards
conce
aled
behin
d them
, such
as
electric
al wiri
ng, co
nduits
or plu
mbing
.
If you
are
not su
re, co
nsult
a
profes
siona
l ins
taller
before
you
proce
ed.
9" (22
.9 cm
)
TAPE
HER
E
Transl
ation
s belo
w
TAPE
HER
E
TAPE
HER
E
DO
NOT
CUT
ARO
UND
GRAY
ARE
A
DO
NOT
CUT
ARO
UND
GRAY
ARE
A
DO
NOT
CUT
AROU
ND
GRAY
ARE
A
DO N
OT
CUT
ARO
UND
GR
AY A
RE
A
DO N
OT
CUT
ARO
UND
GRAY
ARE
A
DO N
OT
CUT
ARO
UND
GRAY
AR
EA
DO
NOT
CUT
ARO
UND
GRAY
ARE
A
(b)