12 s – Bose VIRTUALLY INVISIBLE 191 User Manual
Page 12
12
S
TEPS TO
I
NSTALLING
English
Français
Nederlands
Deutsch
Italiano
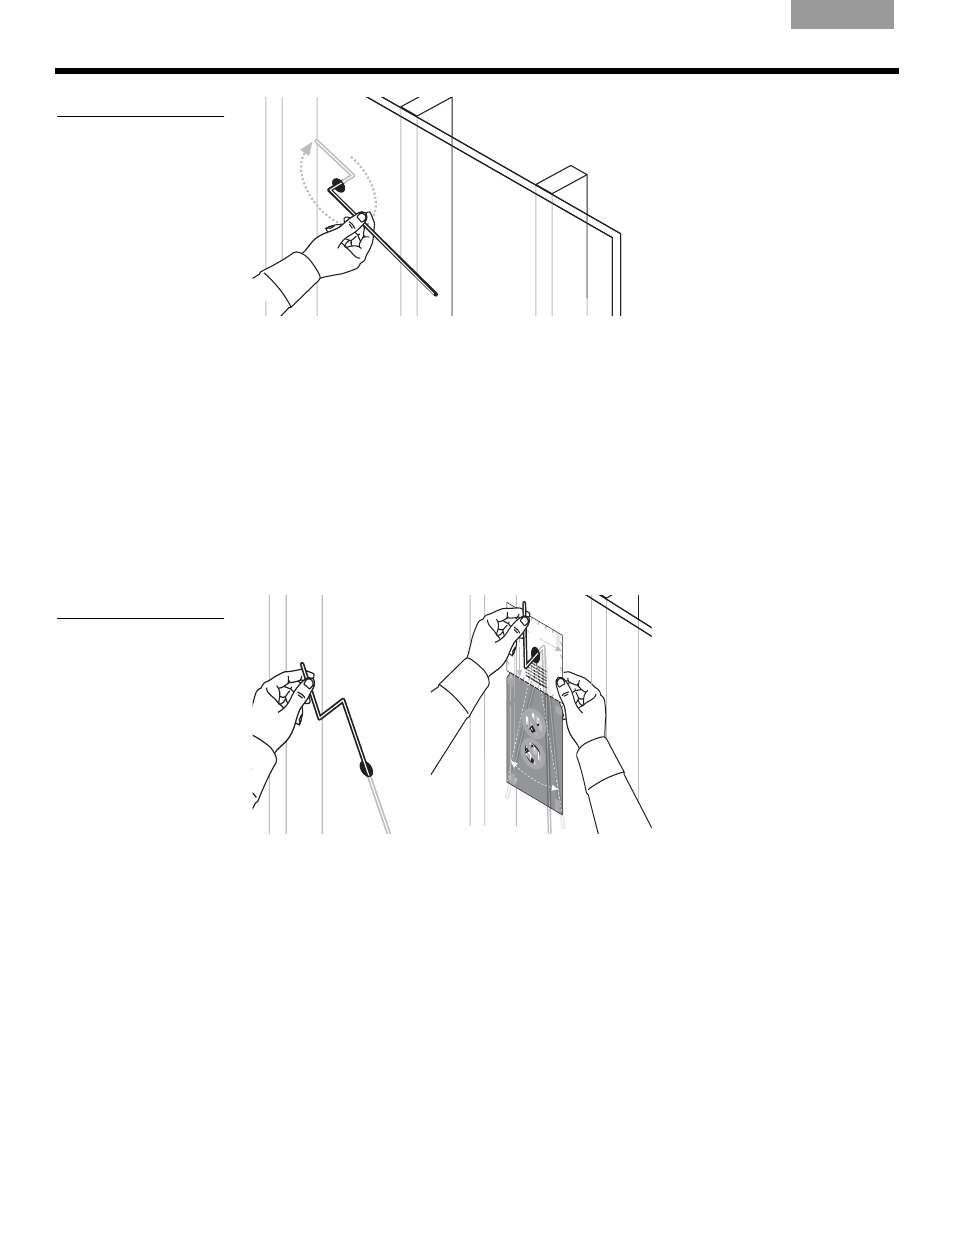
Figure 12
Checking the space for the
width of the speaker
360°
• If the wire goes around the 360° arc without a problem, proceed to step 5 below.
• If you cannot rotate the wire all the way around up to the first bend, you need to drill a
new pilot hole elsewhere. Then repeat the preceding steps 3 and 4.
5.
Use the bent wire to check for enough length below the hole:
Holding the short end of the wire, insert the long end into the wall or ceiling and straight
down from the hole (Figure 13a).
7LSYou may want to use the template for this step, as shown in Figure 13b.
• With the long end of the wire still in the hole, sweep it from side to side in a curve as
shown on the template. This indicates if the wall or ceiling space is long enough and
wide enough at the far end.
7LSWhen testing for length, move the wire near the wall or ceiling, then farther back from it
(as in Figure 13a, below).
Figure 13
Inserting the long end of the
wire (a) and sweeping from
side to side to check the
length (b)
(a)
5
1
/
2
" (14
cm)
8
1
/
16
" (20.5
cm)
14
1
/
2
" (36
.9 cm
)
TAPE
HER
E
TAPE
HER
E
TAPE
HER
E
WHITE CUT OUT AREA
WHITE CUT OUT AREA
Pilot
Hole
WAR
NING
: Mak
e sure
the sp
ot cho
sen is
safe
for cu
tting.
Do no
t cut th
rough
surfac
es tha
t ha
ve ha
zards,
such
as ele
ctrica
l wirin
g, con
duits
or plu
mbin
g,
conce
aled
beh
ind th
em. If
you a
re no
t sure
, cons
ult a
profe
ssion
al ins
talle
r
befo
re yo
u pro
ceed.
DO
NOT
CUT
ARO
UND
GRAY
AREA
Eng
lish
& Tra
nsla
tions
WAR
NING
: Mak
e sure
the spo
t chose
n is s
afe fo
r cutting
. Do
not cu
t thro
ugh s
urfaces
that hav
e haz
ards,
such
as ele
ctrica
l
wiring,
cond
uits o
r plum
bing,
conce
aled b
ehind
them
. If y
ou are n
ot sur
e, con
sult a
profe
ssion
al ins
taller
befo
re you
proc
eed.
WARN
ING:
Make
sure
the s
pot ch
osen
is safe
for
drilling
. Don
ot cut
throug
h surfac
es tha
t have
hazard
s
conce
aled
behin
d them,
such as
elec
trical
wiring
,
condu
its or
plum
bing.
If you
are
not sure
, cons
ult a
profe
ssiona
l inst
aller b
efor
e you
proce
ed.
WARN
ING: M
ake s
ure the
spot
chosen
is safe
for
drilling.
Do no
t cutth
rough
surfac
es tha
t have
hazard
s
concea
led be
hind
them
, such
as ele
ctrical
wiring
,
cond
uits o
r plum
bing.
If you a
re no
t sur
e, con
sult a
profe
ssion
al ins
taller
before
you
proc
eed.
WA
RNIN
G:Ma
ke sure
the
spot c
hosen
is safe
for
drilling
. Do n
otcut th
rough
surfac
es th
at hav
e haza
rds
conce
aledb
ehind
them
,
such
asele
ctrical
wiring
,
cond
uitsor
plumb
ing. If
you
areno
t sure,
consul
t a
profes
sional
installe
r befo
re
youpro
ceed.
WAR
NING:
Make
sure t
he s
potcho
sen
is safe f
or drilli
ng.D
o
not cu
t throug
h
surfac
es tha
t have
hazar
ds con
cealed
beh
ind th
em, s
uch
as ele
ctrical
wiring
,
condu
its or
plumbi
ng.
If you
are
not su
re, co
nsult
a
profes
siona
l insta
ller
befor
e you
proce
ed.
WAR
NING
: Make
surethe
spotc
hosen
is saf
e
fordrill
ing. D
onotc
utthro
ughsu
rfaces
thatha
ve
hazard
s con
cealed
behin
d them
, such
as
electric
al wirin
g, con
duits
or plu
mbing
. If yo
u
areno
t sure,
cons
ult a
profess
ional
installe
r
befor
e you
proce
ed.
WAR
NING
: Make s
ure th
e spo
t
chos
en is
safe
for dril
ling.D
o not c
ut
throug
h su
rfaces
that
have
hazar
ds
conce
aled
behin
d them
, such
as
electric
alwirin
g, co
nduits
orplu
mbing
.
If you
are
not su
re, co
nsult
a
profe
ssiona
l insta
ller be
fore y
ou
proce
ed.
9" (22
.9 cm
)
TAPE
HERE
Transl
ations
below
TAPE
HER
E
TAPE
HERE
DO
NOT
CUT
ARO
UND
GRAY
AREA
DO
NOT
CUT
ARO
UND
GRAY
ARE
A
DO
NOT
CUT
AROU
ND
GRAY
AREA
DO N
OT
CUT
ARO
UND
GR
AY A
REA
DO
NOT
CUT A
ROU
ND
GRAY
AREA
DO NO
T
CUT
ARO
UND
GRAY
AR
EA
DO
NOT
CUT
ARO
UND
GRAY
AREA
(b)
• If the wire goes in and sweeps from side to side at the far end without a problem, proceed
to the next major step: “Prepare the wall for inserting the speaker” on page 13.
• If you find an impediment below the pilot hole, and you are working in an interior wall,
insert the wire upward. If there are no impediments above the pilot hole, you can install the
speaker upside-down. If you are working in an exterior wall, installing the speaker
upside-down is not recommended. In this case, if you find an impediment you need to drill
a new pilot hole elsewhere. Then repeat the preceding steps 3, 4, and 5.