Prepare the wall for inserting the speaker, Passing the pilot hole test, Repairing a pilot hole – Bose VIRTUALLY INVISIBLE 191 User Manual
Page 13: Measure and mark the hole to be cut, 13 s, English français nederlands deutsch italiano
13
S
TEPS TO
I
NSTALLING
English
Français
Nederlands
Deutsch
Italiano
Passing the pilot hole test
If you have successfully determined that this location will work for one speaker, test the wall
or ceiling for the second speaker before making any larger holes. Refer to “Drill a pilot hole for
testing the wall space” on page 9 and repeat those steps.
If the first speaker location is fine, but the second is not, you may want to relocate both
speakers.
Repairing a pilot hole
To patch a pilot hole, fill it with spackle. Let the spackle dry, then add more until the hole is
slightly overfilled. When it is thoroughly dry, sand the area to make it flush with the wall.
Prepare the wall for inserting the speaker
Use care in the steps that follow to ensure satisfaction with the end result.
CAUTION: Now is a good time to reconsider your comfort level with this job. If you have doubts
about cutting into or running cord behind the wall, it is best to stop here. Contact a professional
installer, describe the job, and request a cost estimate before engaging the installer’s services.
WARNING: If you believe insulation in a wall may contain asbestos, do not cut into the wall. Find
a different location for installing the speakers instead.
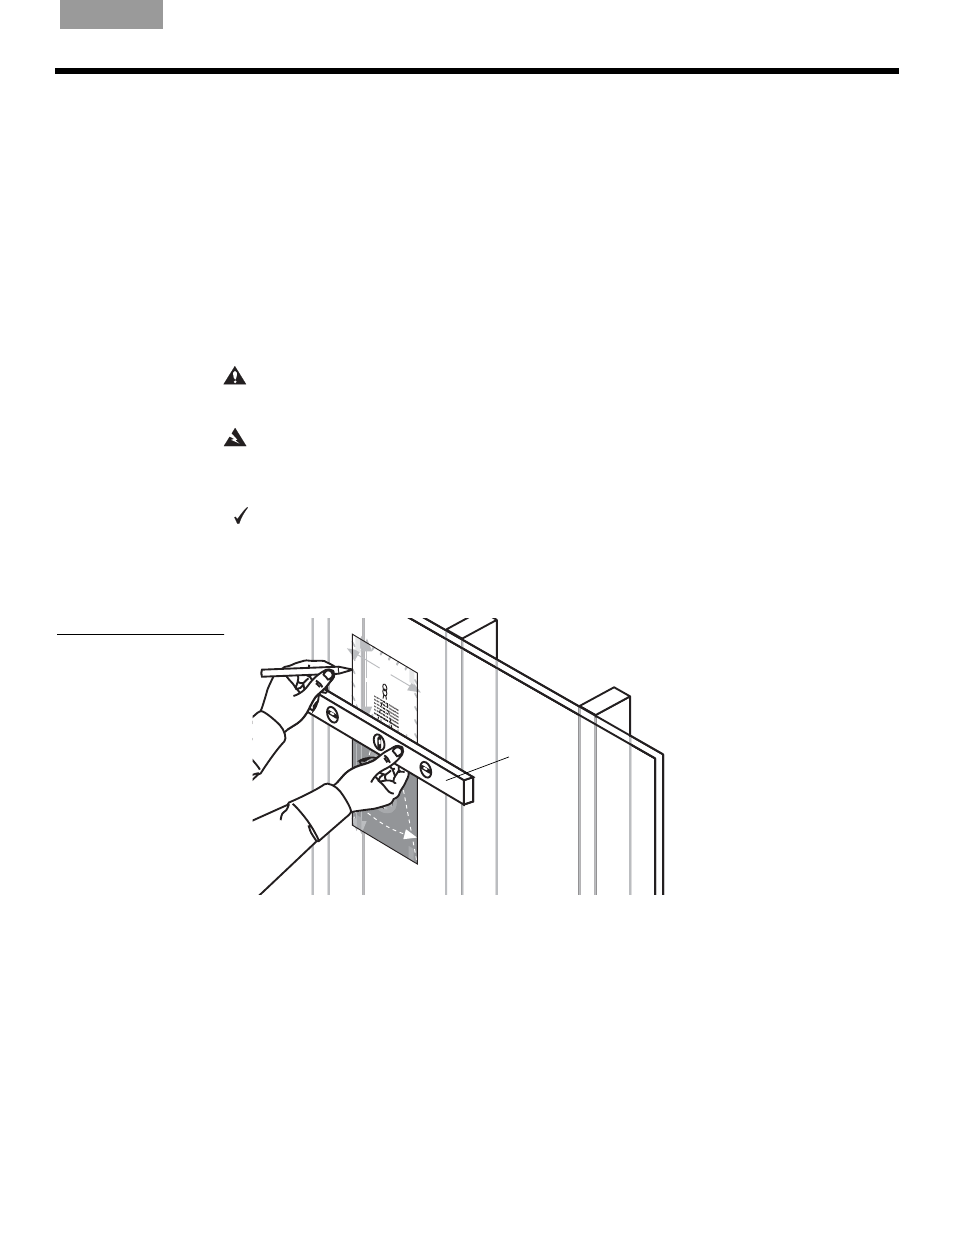
Measure and mark the hole to be cut
You need a carpenter’s level, a sharp pencil, and optional tape with the template to
complete this step.
1.
Position the template carefully over the pilot hole where you want to install one speaker.
2.
Make sure the template is level (Figure 14).
Figure 14
Making sure the template is
straight
5
1
/
2
" (1
4 cm
)
8
1
/
16
" (20
.5 c
m)
14
1
/
2
" (36.
9 cm
)
TAP
E
HER
E
TAPE
HER
E
TAPE
HER
E
WHITE CUT OUT AREA
WHITE CUT OUT AREA
Pilot
Hole
WA
RNIN
G: M
ake su
re the s
pot c
hos
en is
safe
for c
uttin
g. D
o no
t cut
through
surfac
es
that
hav
e haza
rds
, su
ch as
elec
trical
wiring,
conduit
s or p
lum
bin
g,
concea
led
behind
them. If
you
are
not s
ure,
con
sult
a pro
fess
ional
insta
ller
befor
e you
proc
eed.
DO
NOT
CUT
AROU
ND
GRA
Y A
REA
Eng
lish
& T
rans
latio
ns
WAR
NIN
G: Ma
ke s
ure
the
spot c
hosen
is sa
fe fo
r cu
tting.
Do n
ot cu
t thr
oug
h sur
faces
that h
ave
haza
rds, s
uch
as
elec
trical
wirin
g, co
nduit
s or
plum
bing,
conc
ealed
behin
d the
m.
If you
are
not s
ure,
con
sult a
profe
ssio
nal in
stalle
r bef
ore
you
proce
ed.
WAR
NING
: Mak
e sur
e the
spot
chos
en is
safe
for
drillin
g. Do
not
cutth
rough
surfa
ces tha
t hav
e haz
ards
conc
eale
d beh
ind
them
, suc
h as
electr
ical w
iring,
con
duits
or plu
mbin
g. If
you
are
not s
ure,
cons
ult a
profe
ssion
al ins
talle
r bef
ore
you
proce
ed.
WAR
NING:
Mak
e sur
e the
spot c
hose
n is
safe
for
drilling
. Do
not c
ut thr
ough
surfa
ces
that h
ave
hazar
ds
conc
eale
d beh
ind
them
, suc
h as
electr
ical w
iring,
cond
uits
or plum
bing.
If you
are
not s
ure,
con
sult
a
profe
ssio
nal in
stalle
r befo
re yo
u pro
ceed
.
WAR
NING
: Mak
e sure
the
spotc
hose
n issa
fe for
drilling.
Donot
cutth
roug
h
surfa
cesth
at have
hazar
ds
conce
aled
behin
d the
m,
such
as ele
ctrica
l wiring
,
condu
itsorp
lumbin
g. Ify
ou
are no
t sure
, cons
ulta
profe
ssion
al insta
llerbe
fore
youp
rocee
d.
WAR
NING
: Ma
ke
sure t
he sp
ot ch
osen
is sa
fe for
drillin
g. Do
not cu
t throu
gh
surfac
es th
at ha
ve
haza
rds c
once
aled
behind
them
, suc
h
as elec
trical
wiring
,
cond
uits
or
plum
bing.
If you
are
not su
re, co
nsult
a
profe
ssion
al ins
taller
befor
e you
procee
d.
WAR
NING:
Make
sure
thesp
ot ch
osen
is safe
for dril
ling
. Do
notcu
t throug
h sur
face
s tha
t hav
e
haza
rds co
ncea
led be
hind
them
, such
as
elec
trica
l wirin
g, con
duits
or plu
mbin
g. If
you
are n
ot sur
e, con
sulta
profe
ssion
al ins
taller
before
you p
rocee
d.
WAR
NING
: Mak
e sur
e the
spot
chos
en is
sa
fe fo
r drillin
g. Do
no
t cut
throu
gh
surfa
ces
that h
ave
haza
rds
conc
eale
d beh
ind th
em, su
ch as
electr
icalwiri
ng,co
nduits
or plu
mbin
g.
If you
are
not s
ure,
cons
ult a
profe
ssion
al ins
talle
r befo
re yo
u
proce
ed.
9" (2
2.9
cm)
TAP
E
HERE
Trans
lation
s belo
w
TAPE
HER
E
TAP
E
HER
E
DO
NOT
CUT
ARO
UND
GRA
Y A
REA
DO N
OT
CUT
ARO
UND
GRA
Y A
REA
DO
NOT
CUT
ARO
UND
GRA
Y ARE
A
DO
NO
T
CUT
ARO
UND
GRA
Y A
REA
DO
NOT
CUT
ARO
UND
GRA
Y A
REA
DO N
OT
CUT
ARO
UND
GRA
Y AR
EA
DO
NOT
CUT
ARO
UND
GRA
Y AR
EA
Carpenter’s level
3.
Tape or hold the template firmly in place as you trace around the sides and upper edge of
the WHITE CUT-OUT AREA portion.