12 i – Bose VIRTUALLY INVISIBLE 191 User Manual
Page 124
12
I
NSTALLATIESTAPPEN
English
Français
Nederlands
Deutsch
Italiano
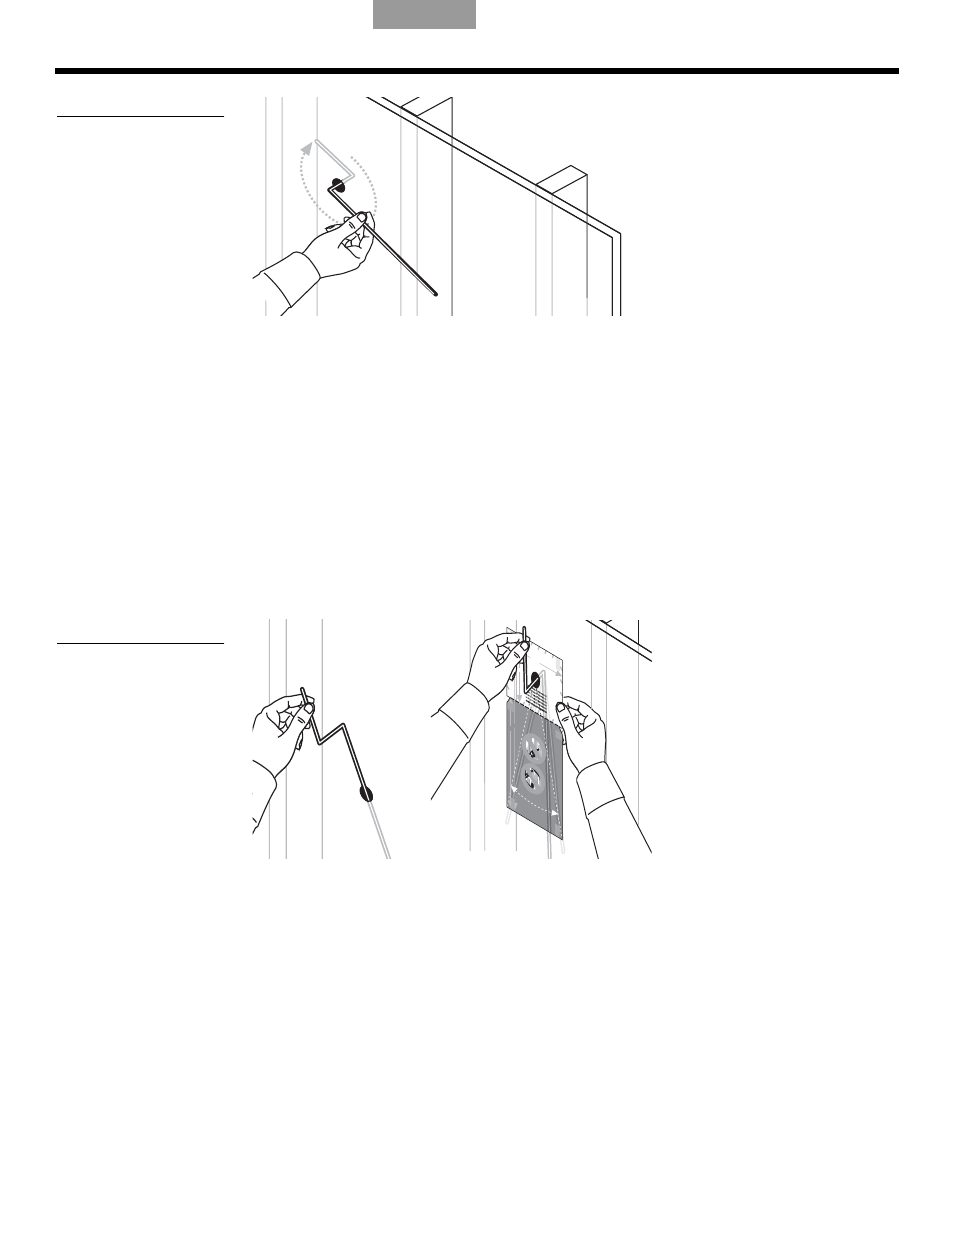
Figuur 12
De ruimte op de breedte
van de luidspreker
controleren
360°
• Als de draad zonder problemen rond de boog van 360 graden draait, gaat u door naar
stap 5.
• Als u de draad niet helemaal rond de eerste buiging kunt draaien, dient u ergens anders
een nieuwe geleidegat te boren. Herhaal vervolgens stappen 3 en 4.
5.
Gebruik de gebogen draad om te controleren de ruimte onder het gat lang genoeg is:
Houd het korte uiteinde van de draad vast en steek het lange uiteinde in de wand of het
plafond en recht omlaag vanuit het gat (Figuur 13a).
7LSU kunt de sjabloon voor deze stap gebruiken zoals getoond in Figuur 13b.
• Met het lange uiteinde van de draad in het gat zwaait u naar beide kanten in een boog
zoals getoond op de sjabloon. Dit geeft aan dat de wand of het plafond genoeg ruimte
bevat en breed genoeg is bij het verste uiteinde.
7LSBij het testen op de lengte plaatst u de draad eerst dichtbij de wand of het plafond en
vervolgens er verder vandaan (zoals in Figuur 13a, hierna).
Figuur 13
Het lange uiteinde van de
draad in het gat steken (a)
en heen en weer zwaaien
om de lengte te
controleren (b)
(a)
5
1
/
2
" (14
cm)
8
1
/
16
" (20.5
cm)
14
1
/
2
" (36
.9 cm
)
TAPE
HER
E
TAPE
HER
E
TAPE
HER
E
WHITE CUT OUT AREA
WHITE CUT OUT AREA
Pilot
Hole
WAR
NING
: Mak
e sure
the sp
ot cho
sen is
safe
for cu
tting
. Do
not cu
t thro
ugh
surfac
es tha
t have
hazar
ds, su
ch as
electr
ical w
iring,
condu
its or
plum
bing,
conce
aled
behin
d the
m. If
you a
re no
t sur
e, co
nsult
a pro
fession
al ins
talle
r
befo
re yo
u pro
ceed.
DO
NOT
CUT
ARO
UND
GRAY
ARE
A
Eng
lish
& Tra
nsla
tions
WAR
NING
: Mak
e sure
the s
pot
chose
n is
safe
for cut
ting. D
o not
cut th
roug
h su
rfaces th
at hav
e haz
ards,
such
as ele
ctrica
l
wirin
g, co
nduits
or plu
mbin
g, conc
ealed
behin
d them
. If y
ou ar
e not
sure,
consu
lt a pr
ofess
ional
insta
ller be
fore
you pr
oceed
.
WA
RNING:
Mak
e sure
the s
pot ch
osen
is safe
for
drilling
. Dono
t cut
throug
h sur
faces
thatha
ve haz
ards
conce
aled
behin
d them,
such a
s elec
trical
wiring
,
condu
its or
plum
bing.
If you
are
not su
re, co
nsult
a
profe
ssiona
l inst
aller
befo
re you
proce
ed.
WARN
ING:
Make
sure
the s
pot ch
osen
is saf
e for
drilling.
Do no
t cutth
rough
surfac
es tha
t have
haza
rds
concea
led beh
ind the
m, suc
h as e
lectric
al wir
ing,
condu
its or
plum
bing.
If you a
re no
t sur
e, con
sult a
profe
ssiona
l instal
ler befo
re you
proce
ed.
WA
RNING
:Make
sure
the
spot c
hosen
is safe
for
drilling
. Do n
otcut th
rough
surfac
es th
at hav
e haza
rds
concea
ledbe
hindth
em,
such
asele
ctrical
wiring
,
cond
uitsor
plumb
ing. If
you
areno
t sure,
consul
t a
profes
sional
installer
before
youproce
ed.
WAR
NING:
Mak
e
sure t
he s
potcho
sen
is safe
for dr
illing
. Do
not c
ut thro
ugh
surfac
es tha
t have
haz
ards
con
ceale
d
behin
d them
, suc
h
as ele
ctrica
l wir
ing,
condu
its or
plumbi
ng.
If you
are
not su
re, co
nsult
a
profes
siona
l insta
ller
before
you p
rocee
d.
WAR
NING
: Make
surethe
spotc
hose
n issaf
e
fordrilli
ng. D
onotc
utthro
ughsu
rfacest
hatha
ve
hazard
s conc
ealed
behin
d them
, such
as
electric
al wirin
g, con
duits
or plu
mbing
. If yo
u
arenot
sure,
consu
lt a pro
fessio
nal in
staller
before
you
proce
ed.
WAR
NING
: Mak
e sur
e the
spot
chosen
is safe
for dri
lling.D
o not
cut
throug
h su
rfaces th
at ha
ve ha
zards
conce
aled
behin
d them
, such
as
electric
al wirin
g, co
nduits
or plu
mbing
.
If you
are
not su
re, co
nsult
a
profe
ssiona
l instal
ler be
fore you
proce
ed.
9" (22
.9 cm
)
TAPE
HER
E
Transl
ations
below
TAPE
HER
E
TAPE
HER
E
DO
NOT
CUT
ARO
UND
GRAY
ARE
A
DO
NOT
CU
T AR
OUN
D
GRAY
AREA
DO
NOT
CUT
AROU
ND
GRAY
AREA
DO N
OT
CUT
ARO
UND
GR
AY A
REA
DO N
OT
CUT A
ROU
ND
GRAY
AREA
DO NO
T
CUT
ARO
UND
GRAY
AR
EA
DO
NOT
CUT
ARO
UND
GRAY
AREA
(b)
• Als de draad erin gaat en heen en weer zwaait tot het verste uiteinde zonder enige
problemen, gaat u door naar de volgende grote stap: “De wand voorbereiden op het
invoegen van de luidspreker” op pagina 13.
• Als u een hindernis onder het geleidegat aantreft en u in een binnenwand werkt, dient u de
draad er opwaarts in te steken. Als er geen hindernissen boven het geleidegat zijn, kunt u
de luidspreker ondersteboven monteren. Als u in een buitenwand werkt, raden we af de
luidspreker ondersteboven te installeren. In dit geval dient u een nieuw geleidegat te boren
als u een hindernis vindt. Herhaal vervolgens stappen 3, 4 en 5.