INCRA Wonder Fence User Manual
Page 3
attaching to your InCra Ts (Table saw Model)
3
IMPOrTanT: Your Incra Jig Ultra must be
mounted to a
3
⁄
4
" thick wooden base and the
carriage clamp must be in the locked position before
installing the Wonder Fence.
Fig. 2
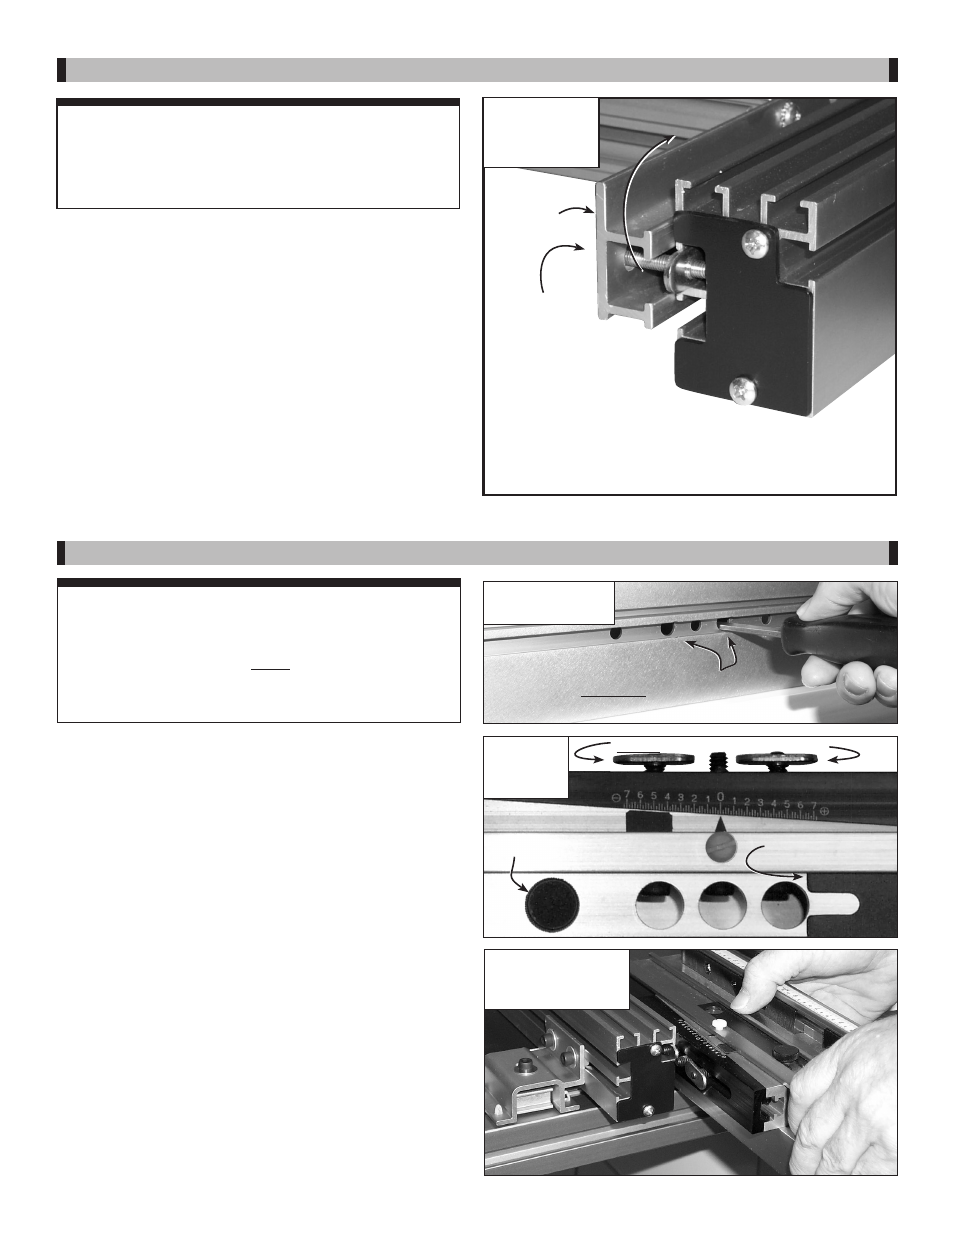
Attach Wonder
Fence to ULTRA
#10-32 x 1
1
⁄
8
"
phillips head
screw with
5
⁄
8
"
o.d. gold washer
#10 -32 rectangular nut
slides into upper T-slot on
rear of Wonder Fence
Fig. 4
Slide view
panel
Do not remove rectangular nuts
CauTIOn: When using the Wonder Fence in
conjunction with your INCRA TS table saw model,
ALWAYS remove the Wonder Fence before making cuts
with your table saw blade. Never attempt any cut with
your table saw blade with the Wonder Fence installed
on your TS Fence.
With a router table extension wing in place at your table saw,
you’ll find adding the TS-Wonder Fence table saw fence
upgrade kit to your INCRA TS fence creates a superior
workstation for routing, jointing and shaping . Combined with
the INCRA Right Angle Fixture, the INCRA Stop and the
INCRA Master Reference Guide and Template Library, you’ll
also be able to create all of the exciting INCRA joinery .
loosen attachment fasteners
Insert the supplied hex tool through the (2)
large diameter
access holes located in the front of each Wonder Fence half
and loosen the (2) socket head cap screws .
(Do not remove
the rectangular nuts.) For a better view of the fasteners,
loosen the thumbscrew and slide the black plastic view panel
located on the top of each fence half . See
Figs. 3 and 4 .
slide wonder Fence into position on Ts Fence
Slide the two rectangular nuts on each Wonder Fence half
into the T-slot located on the front face of the TS Fence .
Position the Wonder Fence so that your router collet is
centered in the opening between the fences, then tighten the
two socket head cap screws on each fence half . Slide the
view panel back in place and tighten the thumbscrew .
See
Fig. 5 .
Slide view panel to
see cap screws
Thumbscrew
attach wonder Fence to the ultra
Place a thick gold washer (
5
⁄
8
" o .d .) on each of the
(2) #10-32 x-1
1
⁄
8
" phillips head screws . Insert one
screw through each of the two slotted holes on the
fence mounting bracket and loosely thread on the #10-
32-rectangular nuts as shown in
Fig. 2.
Now slide the rectangular nuts into the upper T-slot
located on the rear of the Wonder Fence . Position the
opening between the two fence halves directly over
your router collet, then tighten mounting screws .
Fig. 5
Slide Wonder Fence
onto the TS Fence
Use hex tool to loosen fasteners
through the two larger holes
aTTaCHInG TO YOur InCra JIG ulTra (router Table Model, shown in Fig 12, page 6)
Fig. 3
Loosen fasteners
ULTRA Fence
mounting
bracket