INCRA Wonder Fence User Manual
Page 10
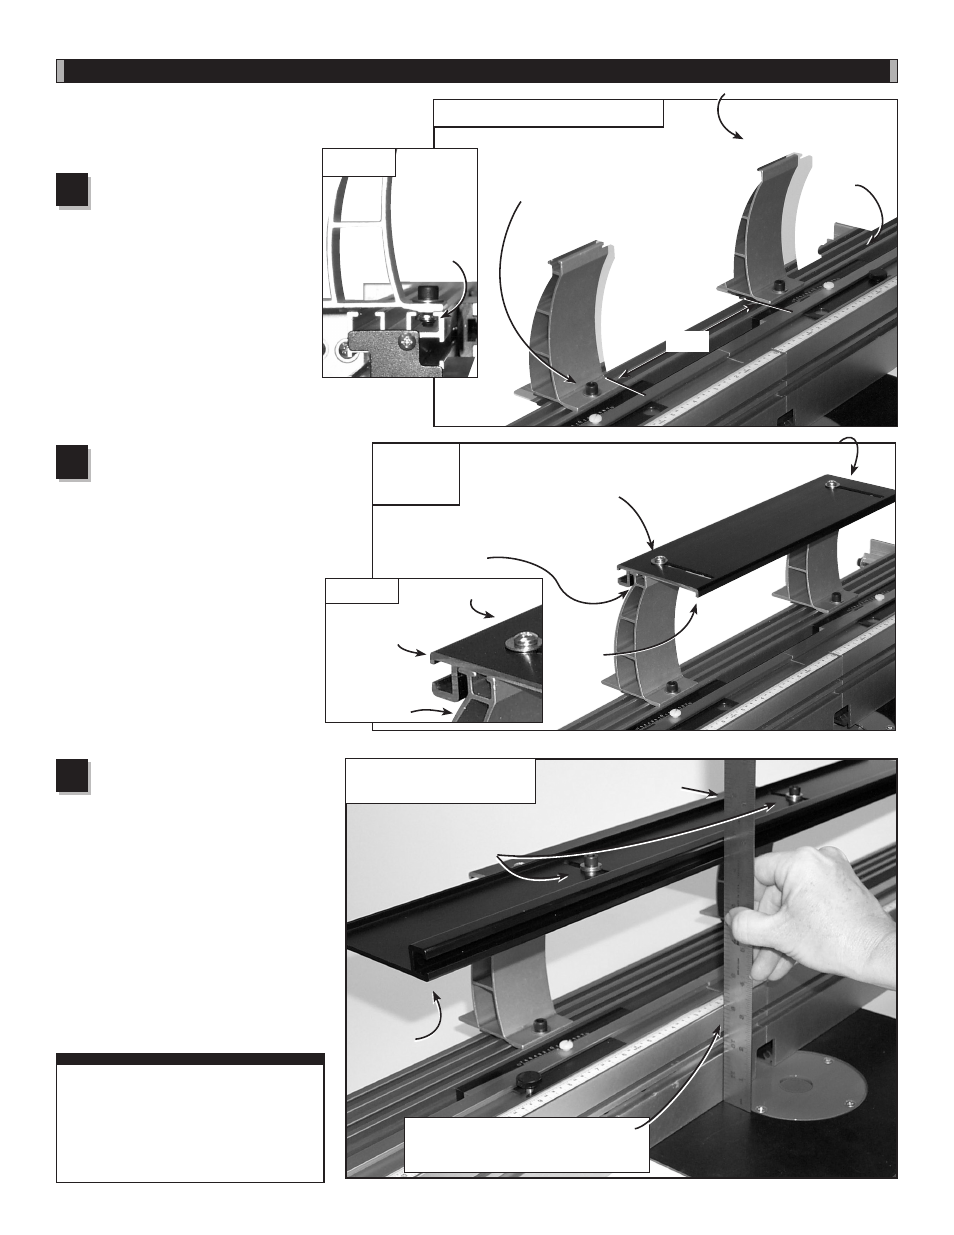
Hi-rise Fence Cap
You’ll find the Hi-Rise fence cap great for supporting
large vertical panel work . Here’s how to attach the
Fence Cap and braces .
attach the fence cap
braces
Place a
1
⁄
4
" washer on each of
(2)
1
⁄
4
-20 x
1
⁄
2
" socket head cap
screws and insert through the hole on
the front of each fence brace . Loosely
thread on a
1
⁄
4
-20 rectangular nut (the
raised rim on the nut should face away
from the brace), then slide the nut into
the forward T-slot located in the top
of the Wonder Fence assembly . See
Fig.-23 and Detail 23 . Locate the two
braces on the fence 7
5
⁄
8
" apart . Tighten the
fasteners with the supplied hex tool .
10
Fig. 23
Attach fence cap braces
Fence cap brace
1
Fig. 25
Attach and align fence cap
Extend fence cap out to
touch straight edge
FIRST: Attach fence cap to cap extender
with (2)
1
⁄
4
-20 x
5
⁄
8
" socket head
screws, washers and
lock nuts
Fence
cap
1
⁄
4
-20 x
1
⁄
2
" socket head
cap screw with
1
⁄
4
" washer
Detail 23
--Slide
rectangular
nut into
Forward T-
slot
Fig. 24
Attach cap
extender
First: Insert fasteners and slide
#10-32 hex nuts into T-slot on
top of braces
Second: Position cap extender to
allow future access to socket head
cap screws through
slotted hole.
#10-32 x
1
⁄
2
" phillips
screw with
1
⁄
4
" washer
attach and align fence
cap
Place the 24" long fence cap
on top of the cap extender and
attach using the (2)
1
⁄
4
-20 x
5
⁄
8
" socket
head cap screws with
1
⁄
4
" washers and
lock nuts . Use a straightedge to align
the leading edge of the fence cap with
the front face of the Wonder Fence and
tighten the two cap mounting screws .
See
Fig. 25 . To remove the fence cap
and braces, just loosen the two socket
head cap screws that secure the braces
and slide the entire assembly off of the
Wonder Fence .
3
attach the cap extender
Place a
1
⁄
4
" washer on each of the (2)
pan head phillips screws and insert
through the slotted holes located in the
fence cap extender . Loosely thread a #10-
32 hex nut onto each fastener, then slide the
hex nuts into the T-slot located on the top of
each fence cap brace . Position the cap
extender so you can later gain access
to the socket head fasteners on each
fence cap brace through the slotted
holes . Pull the cap extender forward
until it firmly contacts the back of each
brace and tighten the (2) phillips head
screws . See
Fig.-24 and Detail 24 .
2
Detail 24
nOTe: When removing the fence
cap assembly from the INCRA
TS Tablesaw Fence, loosen the
fasteners and tilt the assembly to
clear the fence mounting bracket.
SECOND: Use a straightedge to
align fence cap with Wonder Fence,
then tighten fasteners.
7
5
⁄
8
"
Third: Slide cap
extender forward to
contact
brace, then
tighten screws
Brace
Cap extender
Fence
cap
extender