Warning, Caution – COATS 5035 A/E Tire Changer User Manual
Page 16
MAINTENANCE INSTRUCTIONS
Read and follow all the maintenance instructions
provided in this manual to keep the machine in good
operating condition. Refer to the other materials
received with the unit and to the service bulletins
from the manufacturer for additional instructions on
proper maintenance and service. Regular
inspections and proper maintenance are essential to
preventing accidents and injuries.
Before making any
inspection, adjust-
ment, or repair, dis-
connect the power source and block out all mov-
ing parts to prevent injury.
Keep the machine
and the immediate
work are clean. Do
not use compressed air to remove dirt and
debris from the machine. Foreign material may
be propelled into the air and into operator or
bystander causing personal injury.
Wear protective cloth-
ing and use eye pro-
tection when making
any adjustments or repairs to the machine.
A. The vertical slide should be cleaned with a
vaporizing solvent and then lubricated with
chassis grease once a month.
B. Check the adjustment of the mount/demount
head once a month. See instructions this page.
C. Check the fluid level in the table top
transmission once every 3 months. If fluid
shows on dipstick, level is satisfactory. If no fluid
shows, add an SAE 80 gear lubricant until fluid
shows on dipstick.
D. The table top, clamps, mount/demount head,
and other working surfaces should be cleaned
with a vaporizing solvent every month.
E. The clamps should be inspected and metal
chips and dirt removed from the serrations once
a month.
F. Check the tire pressure gauge function daily,
and check the accuracy monthly. Use a
pressurized tire and a high quality stick-type
pressure gauge. If necessary, adjust the dial of
the machine gauge. If the gauge is defective,
replace it immediately (part number 107985).
Check function of the pressure limiter weekly.
G. Make sure all fasteners are securely tightened.
H. make certain that all guards and covers are in
place.
I.
Check for worn, damaged or missing parts
including grips and protective covers. Replace
them before allowing the unit to be used.
J.
On a daily basis, inspect the unit and check to
be certain that all systems are operating
normally. Detailed inspection and testing
procedures are specified for various
components at regular intervals. Set up a chart
and assign responsibility for these items.
Replace any damaged
or missing safety
decals.
IMPORTANT: These instructions will help you
service the unit. Instructions are for a person with
some mechanical ability and training. No attempt
has been made to describe all basic steps. For
example, how to loosen or tighten fasteners. Also
basic procedures such as cycling systems and
checking operation of the equipment are not fully
described since they are known to anyone who does
mechanical and service work. Do not attempt to
perform work beyond your ability or at which you
have no experience. If you need assistance, call an
authorized service center.
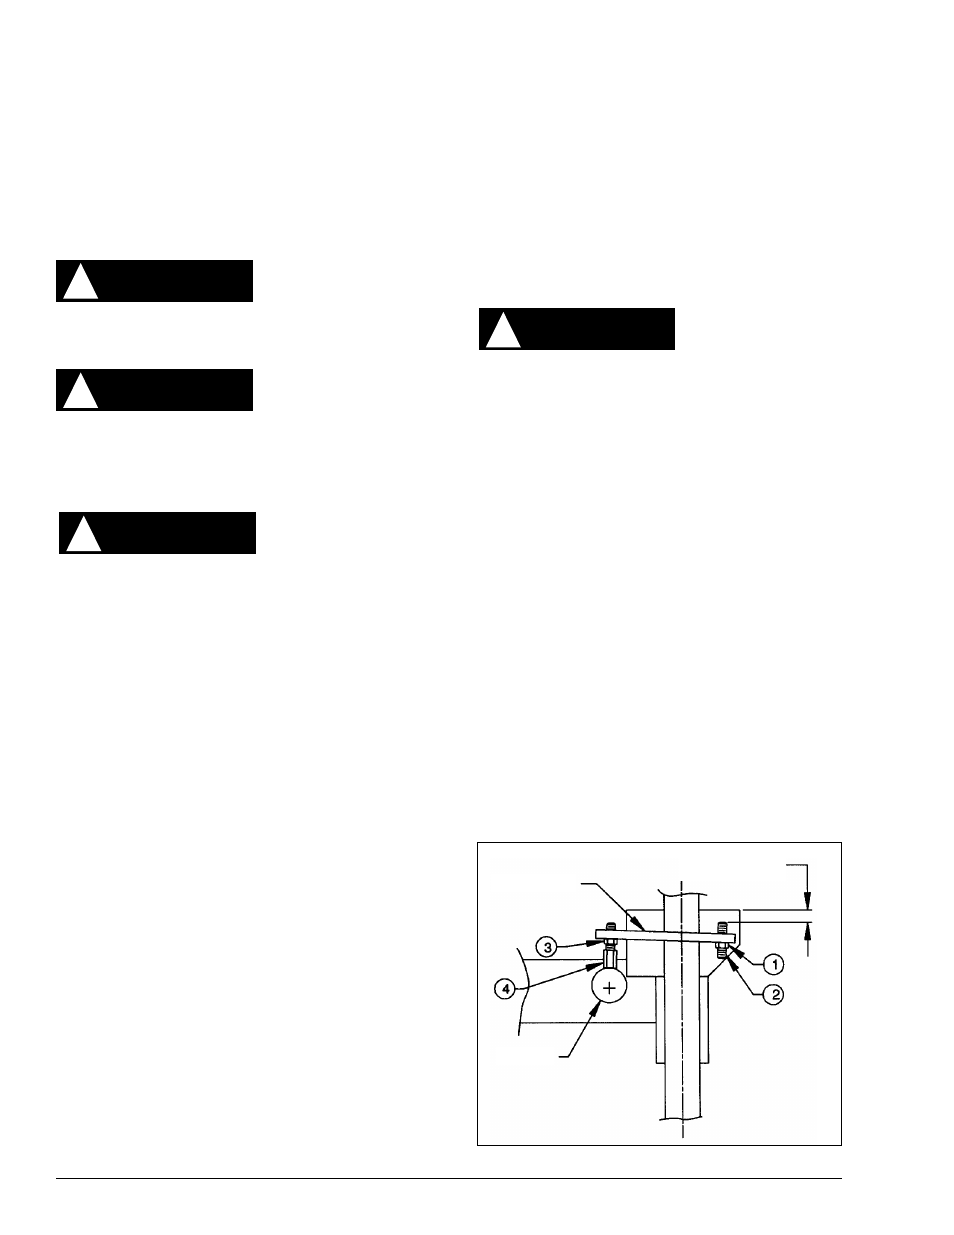
Mount/Demount Tool Head Adjustment
To Adjust Tool Head Lift
Loosen jam nut (ref. 1) and adjust screw (ref. 2) until
lift clearance is 1/8" to 3/16". Tighten jam nut and
check.
To Adjust Lock Tightness
With lock handle unlocked, loosen jam nut (ref. 3)
and adjust pin (ref. 4) until a slight firmness is
obtained, then tighten jam nut and check. Also
recheck tool head lift at this time.
14 • 5035 A/E Rim Clamp Tire Changer
WARNING
!
WARNING
!
CAUTION
!
CAUTION
!
Lock Plate
This will be the
same as tool head
Cam