Wheel lift installation instructions – COATS Wheel Lift for use with 9024E Rim Clamp Tire Changer User Manual
Page 2
2 • COATS Tire Changer Accessory
Wheel Lift Installation
Instructions
Important: Before proceeding with the
installation of the Wheel Lift, perform the
following pre-installation operations to
provide higher safety conditions both to
the operator and to the tire changer.
Failure to perform these pre-installation
operations may result in accidents com-
promising machine integrity, operator and
by-standers.
Pre-Installation Operations:
• Close the turntable clamps completely.
• Set the vertical arm in working position.
• Lower the operating arm completely and lock it.
• Turn OFF both electrical and pneumatic feeding.
• Let residual air out from pneumatic circuit by per-
forming some loadless bead-breaking operations.
Wheel Lift Components
Front Pedals Cover with built-in Wheel Lift
UP/DOWN Movement Control
Screws and Unions
-
Screws 6x12
-
Washers 6, 5 x 18 x 1, 5
-
T-union
-
Cable Tie
Wheel Lift Assembly
Installation Procedure
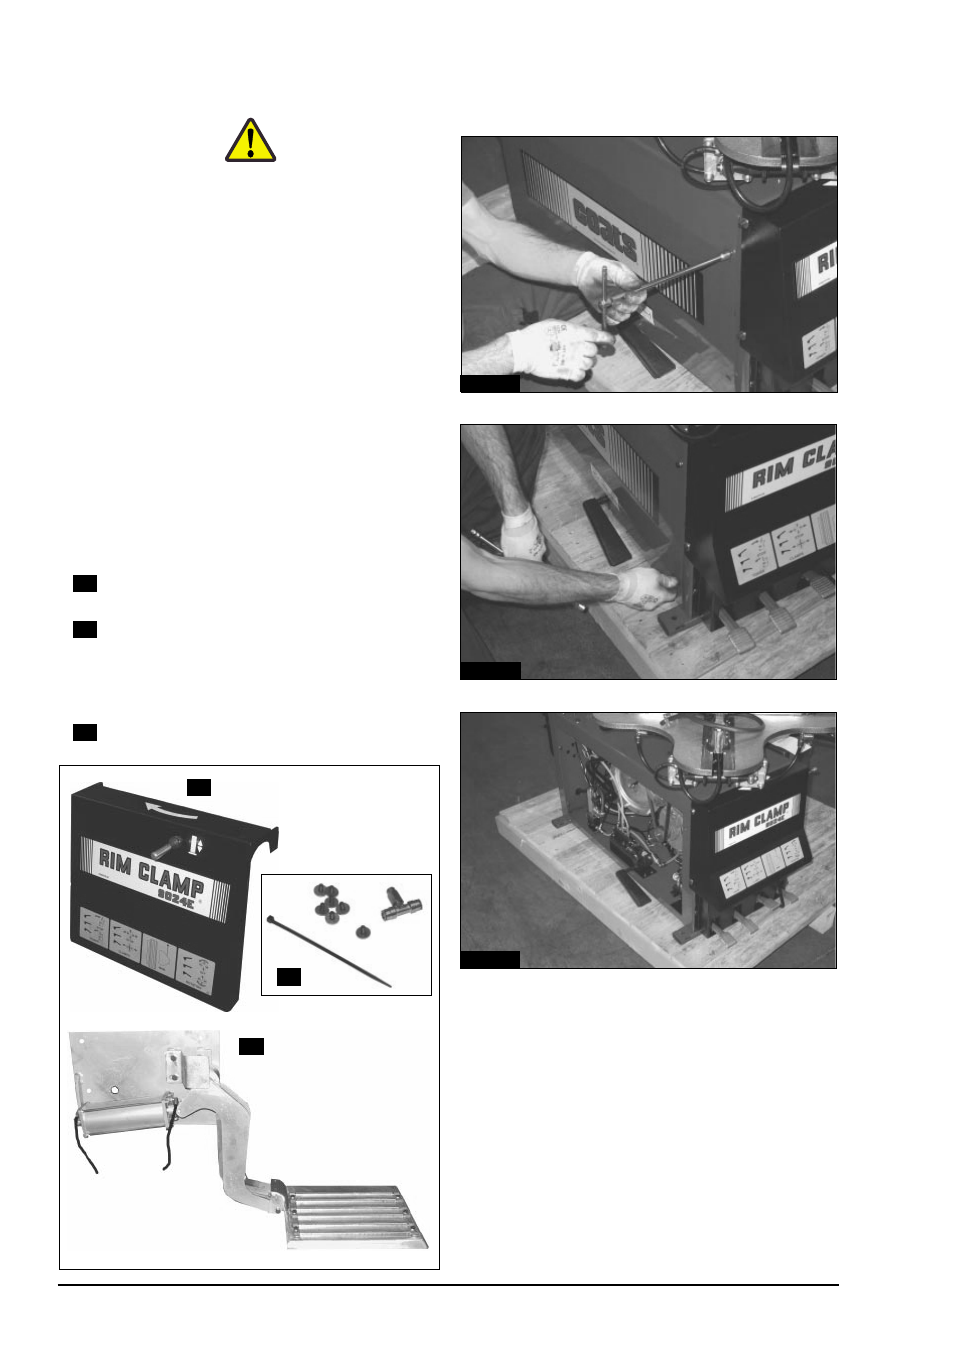
1. Unscrew the 4 screws and washers (set aside)
and remove the side cover. (Fig. 2, 3, & 4)
3
2
1
1
2
3
5
Fig. 4
5
Fig. 3
5
Fig. 2
- 16 Bit PCB & Metal Arm Temporary (4 pages)
- 520 Wheel Lift (12 pages)
- 700 Decal Location (1 page)
- AirNut (12 pages)
- Application Chart, Balancing Solutions (12 pages)
- Autoflate Nitrogen (1 page)
- Balancer Adapter Wall Storage Board Kit (1 page)
- Balancer Adapter, 5 lug x 135mm Bolt Pattern (1 page)
- Balancer Adapter, 5 lug x 150mm Bolt Pattern (1 page)
- Balancer Adapter, 5 lug x 4.750 Bolt Pattern (1 page)
- Balancer Adapter, 5 lug x 5.5 Bolt Pattern (1 page)
- Balancer Adapter, 6 lug x 150mm Bolt Pattern (1 page)
- Balancer Adapter, 6 lug x 5.5 Bolt Pattern (1 page)
- Balancer Adapter, 8 lug x 170mm Bolt Pattern (1 page)
- Balancer Adapter, 8 lug x 180mm Bolt Pattern (1 page)
- Balancer Adapter, 8 lug x 6.5 Bolt Pattern (1 page)
- Conversion Instructions (1 page)
- Extended Balancer Stub Shaft (1 page)
- Fixed Finger Plates (2 pages)
- Hood Installation (1 page)
- Hood Installation Instruction (1 page)
- Hood Installation Sheet (1 page)
- Hood Installation Tip (1 page)
- Hubnut Removal (1 page)
- Side Accessory Tray (1 page)
- Kit 1.125-inch, Kit 40 mm, Light Truck Cone (1 page)
- Kit 1.125-inch, Kit 40 mm, XL Pressure Drum (1 page)
- Kit 8111177 Three Phase to Single Phase Conversion (1 page)
- Kit 8111864 Motorcycle Wheel Adapter (4 pages)
- Kit 8111935 Light Truck Back Cone Spacer (1 page)
- Kit 8112877 Touch Panel Replacement (2 pages)
- Kit 8113082 40mm Conversion Shaft (1 page)
- Kit 8113223 (1.125-inch), Kit 8113228 (40 mm), VW/Porsche Adapter (1 page)
- Kit 8113592, Wheel Lift Link (1 page)
- Kit 8113645 Radial Runout Sensor Adjustment Kit (2 pages)
- Kit 8113860 Splash Guard (1 page)
- Kit 8113881 Printer Serive (1 page)
- Kit 8113883 Printer Bracket Serive (1 page)
- Kit 8113887 XR 1800 Upgrade to XR 1850 (2 pages)
- Kit 8113893 Lateral Run Out Service (1 page)
- Kit 8113900 Monitor Replacement (1 page)
- Kit 8113932 16 Bit PCB & Metal Arm (1 page)
- Kit 8114025 PCB Assembly (1 page)
- Kit 8114105 PCB Assembly Kit (1 page)
- Kit 8114155 Serial Loader (4 pages)