Direct drive – COATS 1055 Balancer User Manual
Page 21
14. Replace the valve core and inflate the tire. Follow the tire
changer manufacturer's instructions for inflation.
Remember:
If another operator memory has been select-
ed, reselect the memory being used for the Match Mount
procedure. The balancer will return to the point in the pro-
cedure where the other memory was selected.
15. Remount the wheel on the balancer.
16. Press (2) on the control panel. 3 is now displayed in the weight
display.
17. Lower the hood and press START.
18. Wait for the wheel to stop. Raise the hood and rotate the
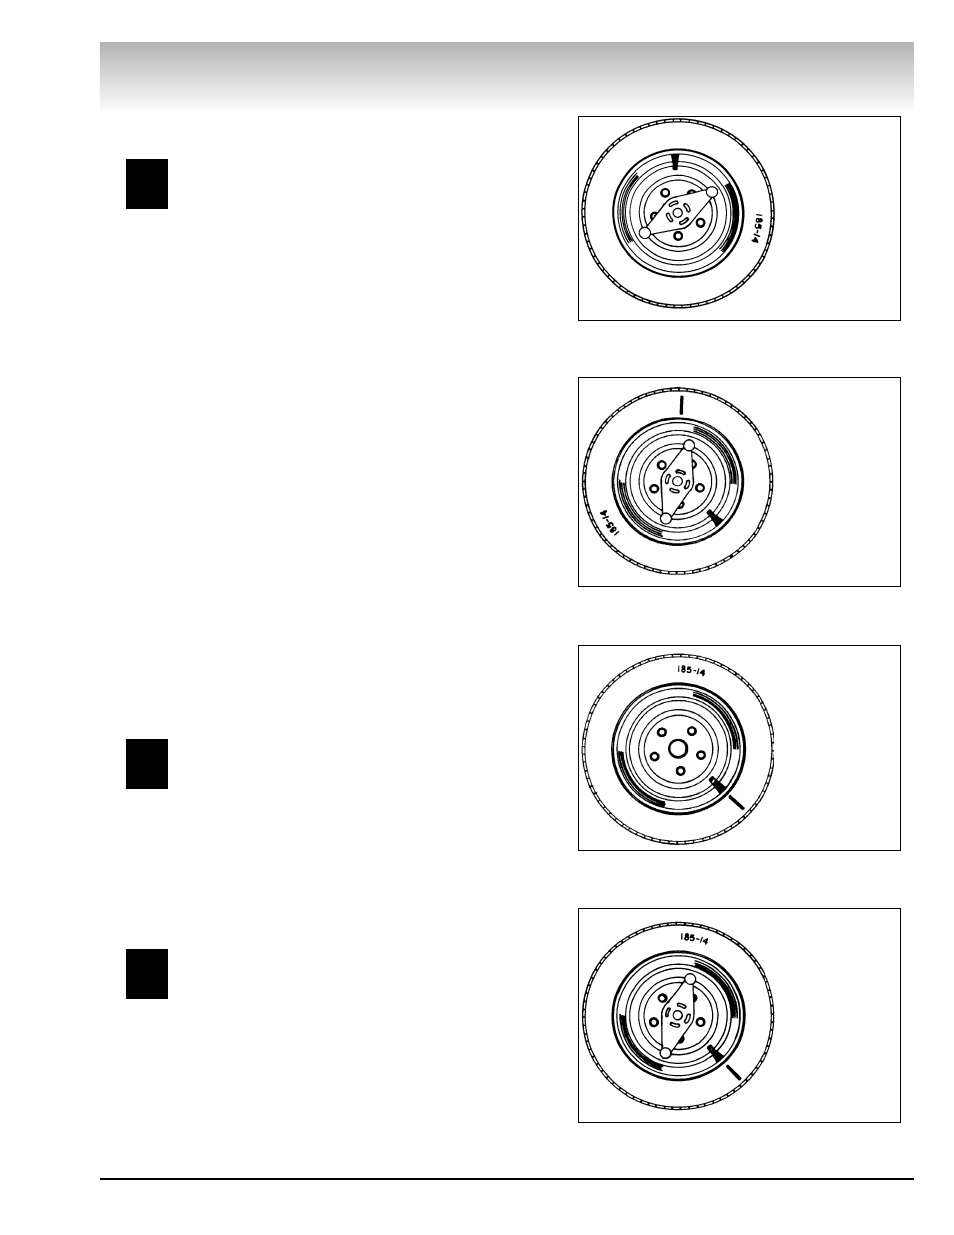
wheel until the valve stem is at top dead center.
19. Press 4 on the control panel.
Weights will now be displayed on the control panel. The weight in
the left display is the weight imbalance for the rim (as indicated by
the RIM light below the display). The weight in the right display is the
weight imbalance for the tire (as indicated by the TIRE light below the
display).
Use these weights to determine the suitability of the rim or tire.
High imbalance may indicate a rim that is out-of-round or misformed,
or a tire with a bubble or other problem. If the imbalance is exces-
sive, it may be prudent to replace the rim, the tire, or both. If either
is replaced do not continue this procedure. Balance the new tire and
rim and evaluate the readings for Match Mount suitability.
20. Rotate the wheel until the weight position LEDs flash. Mark
the tire at top-dead-center.
21. Remove the wheel from the balancer. Completely deflate the
tire by removing the valve core. After all the air pressure is
exhausted, follow the tire changer manufacturer's instruction for
loosening the tire beads.
A second operator can use the balancer while the Match
Mount operator continues with Steps 22, 23, and 24.
Remember:
All data for the Match Mount procedure will
be kept in the Match Mount operator's memory.
22. Lubricate both tire beads and wheel to aid in rotating the tire
and bead sealing and seating. Always use the tire manufacturer's
approved rubber lubricant.
23. Rotate the tire until the mark is aligned with the valve stem.
24. Replace the valve core and inflate the tire. Follow the tire
changer manufacturer's instructions for inflation.
Remember:
If another operator memory has been select-
ed, return the balancer to the memory being used for this
Match Mount procedure. The balancer will return to the
exact point in the procedure where the other memory was selected.
25. Remount the wheel on the balancer.
26. Use the MODE key to select the desired balance mode and
balance the wheel.
1025
1050
1055
1025
1050
1055
1025
1050
1055
Direct Drive
COATS 950/1025/1050/1055 Wheel Balancer • 15
Figure 19 - Rotate the Wheel
Figure 20 - Rotate the wheel
Tire/wheel
assembly rotated
until valve stem
is at top-dead-
center
Tire/wheel
assembly rotated
until weight posi-
tion lights
flashed. Tire
marked at top-
dead-center.
Figure 21 - Rotate Tire on Wheel
Figure 22 - Match Mount Completed
Tire rotated so
mark is aligned
with valve stem.
Wheel ready for
balancing