B&W Trailer Hitches 1316R User Manual
Page 4
Copyright 2014
B&W Custom Truck Beds, Inc.
ALL RIGHTS RESERVED
1316R - 05 01 2014
STEP 10
Retract the latch pin by pulling the handle out until it stops and then rotating it. Place the 2-5/16” ball in the hitch
receiver. Engage the latch pin by rotating the handle. Be certain the latch pin passes through the holes in the Turn-
overball™ and fully engages through the hitch receiver. Grease the square base of the Turnoverball™.
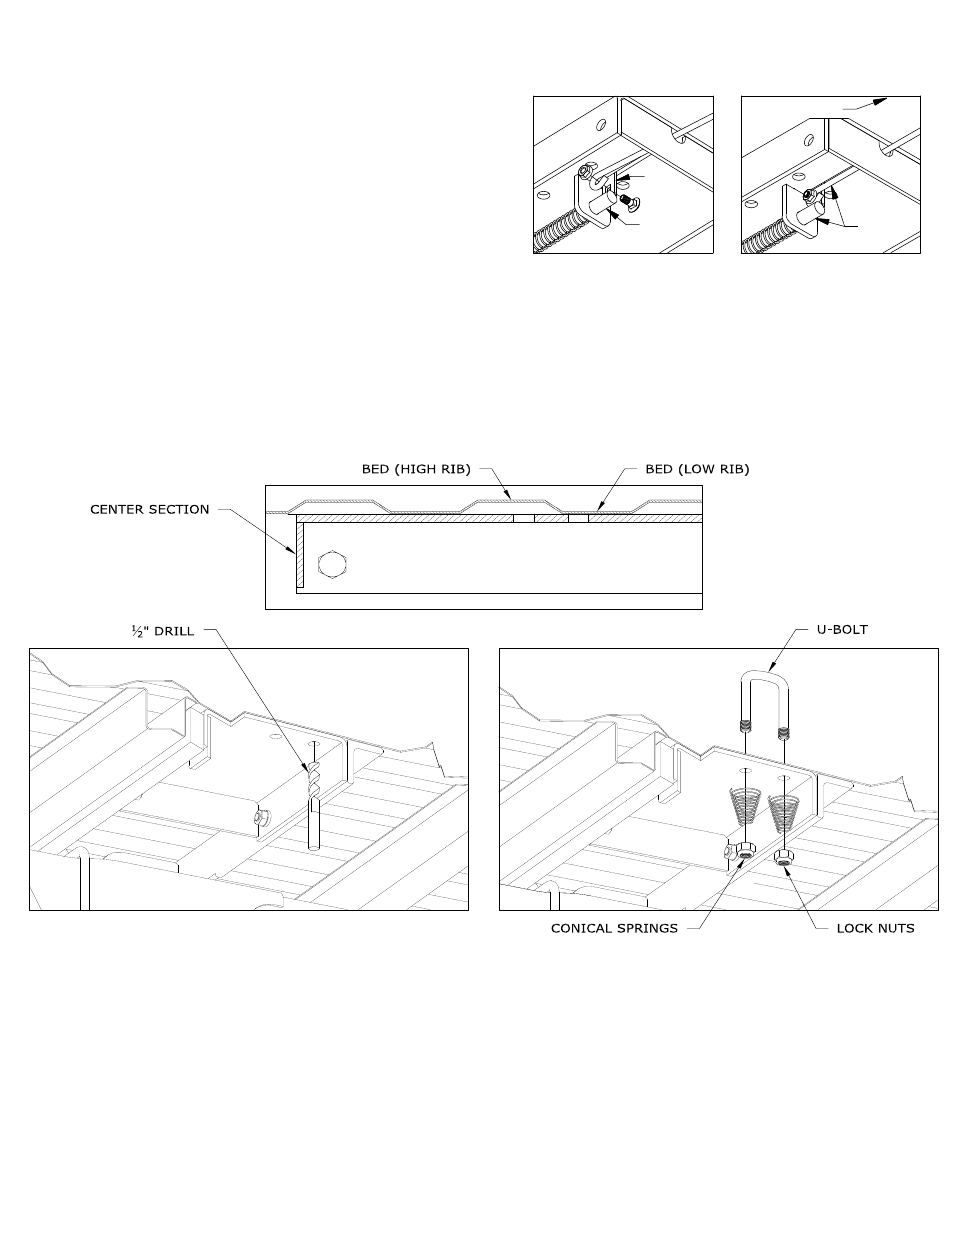
STEP 9
Install the safety chain U-bolts. The center section may have multiple safety chain holes. Only 4 holes (2 on
each side of the ball) will need to be drilled. Each U-bolt will need to rest in the low part of a bed rib. To deter-
mine which holes will need to be drilled, carefully examine the safety chain holes in the center section to deter-
mine which holes are under a low rib, See figure 9.1. Use a 1/2" Drill bit and drill through the bed in the 4 low rib
locations, See Figure 9.2. Drop a U-bolt through each pair of holes from the top side of the truck bed floor. Place
a conical spring and lock nut on each of the four legs. Tighten the lock nuts until flush with the bottom of the U-
Bolts, See Figure 9.3.
FIGURE 9.1: Cut away view of bed and center section.
FIGURE 9.2: Cut away view from under the bed.
FIGURE 9.3: Cut away view from under the bed.
LATCH
PIN
TAB
IN−LINE
DRIVER SIDE
STEP 8 – INSTALL LATCH PIN RELEASE HANDLE
WARNING: LATCH PIN WILL NOT FUNCTION PROPERLY IF HANDLE IS NOT INSTALLED CORRECTLY.
Install the latch pin release handle by inserting it through the
slot in the end of the center section on the driver’s side of the
truck. Align the handle eyelet with the square hole in the latch
pin so the handle is in line with the latch pin as shown. Secure
the handle to the pin with the 5/16 X 3/4” carriage bolt and 5/16”
locking flange nut as shown. Note: The included 5/16” cap screw
can replace the carriage bolt if wrench access on the “cab side”
of the handle is limited. Tighten the nut until it is secure. Do
not over-tighten and deform the handle eyelet.