MSI P1-109N-L70 User Manual
Page 43
2-23
Hardware Setup
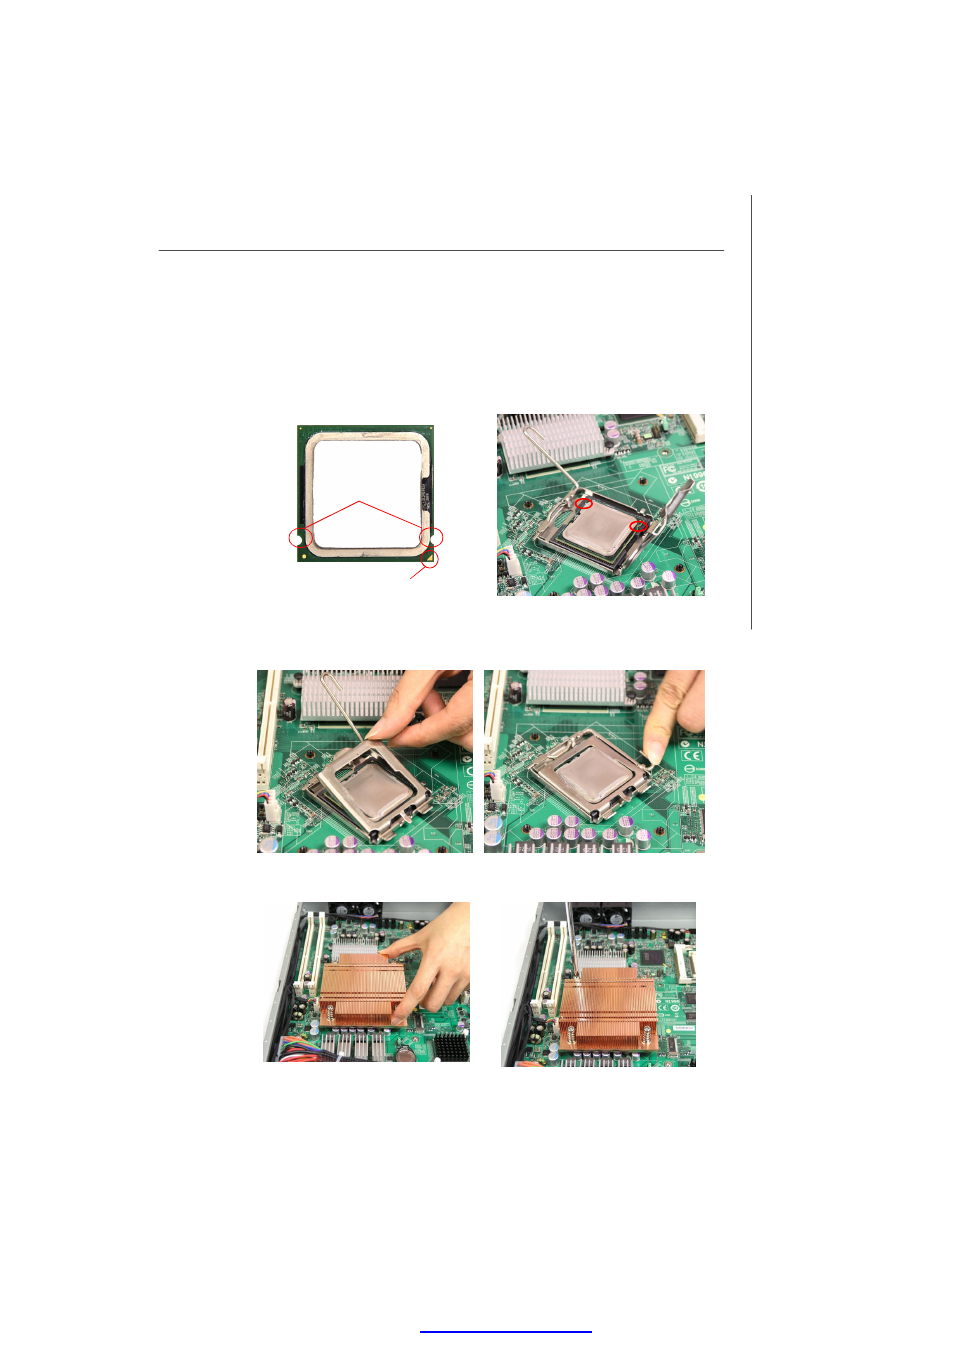
10. Place the heatsink on top of the CPU and secure the screws on both sides.
6.
After confirming the CPU direction (indicated below with red circles) for correct
mating, put down the CPU in the socket housing frame. Note that the alignment
keys are matched.
7.
Visually inspect if the CPU is seated well into the socket. If not, take out the CPU
with pure vertical motion and reinstall.
8.
Cover the load plate onto the package.
9.
Press down the load lever lightly onto the load plate and then secure the lever
with the hook under the retention tab.
Yellow triangle is the Pin 1 indicator
Alignment Key
PDF created with pdfFactory Pro trial versi
See also other documents in the category MSI Hardware:
- AM-690E (68 pages)
- IM-GM45 (73 pages)
- IM-GM45 (1 page)
- MS-7304 (52 pages)
- MS-6534 (109 pages)
- NVIDIA MS-7504PV (50 pages)
- G52-M6570XA-G22 (116 pages)
- RG300EX LITE (53 pages)
- MS-7242 (102 pages)
- CX700 (66 pages)
- GM965 (76 pages)
- G31M3 (96 pages)
- Fuzzy Mainboard GM965 (76 pages)
- 845 PRO2 (101 pages)
- FUZZY CX700 (82 pages)
- MS-7181 (107 pages)
- G45 (95 pages)
- FUZZY 945GM1 (83 pages)
- US54G (41 pages)
- MS-6566 (85 pages)
- MS-6380 (85 pages)
- MS-6575 (68 pages)
- IM-945GSE SERIES MS-9830 (83 pages)
- G52-S9617X1 (97 pages)
- G52-MA00628 (85 pages)
- MS-6523 (54 pages)
- ATX Motherboard G52-MA00362 (84 pages)
- N680GTX TWIN FROZR 4GD5/OC (1 page)
- N670 PE 2GD5/OC (1 page)
- N670GTX-PM2D2GD5/OC (1 page)
- N640GT-MD1GD3 (1 page)
- N630GT-MD4GD3 (1 page)
- N620GT-MD2GD3/LP (1 page)
- N610GT-MD2GD3/LP (1 page)
- N580GTX LIGHTNING XTREME EDITION (2 pages)
- N580GTX TWIN FROZR II/OC (2 pages)
- N560GTX-TI M2D1GD5/OC (2 pages)
- N560GTX-TI HAWK (2 pages)
- N560GTX-M2D1GD5 (2 pages)
- N460GTX-M2D1GD5/OC2 (2 pages)
- N460GTX HAWK TALON ATTACK (2 pages)
- N450GTS-MD1GD3 (2 pages)
- N440GT-MD1GD3/LP (2 pages)
- N430GT-MD1GD3/OC (2 pages)
- N220GT-MD1GD3/LP (2 pages)