CDN IN1022 - Infrared Gun EN User Manual
Page 3
4. Measurement continues as long as the
trigger is pressed or for 60 minutes in Lock
Mode. The MIN reading displays the lowest
temperature among multiple targets.
5. Difference Mode
1. Press the MODE button or trigger to turn the
thermometer on.
2. Press the MODE button repeatedly until
DIF
appears in the lower left portion of the display.
3. Aim the infrared lens at the target and press
the trigger to display the surface temperature.
4. Measurement continues as long as the trigger
is pressed or for 60 minutes in Lock Mode.
The DIF reading displays the difference
between the maximum and minimum
temperatures of multiple targets.
6. Average Mode
1. Press the MODE button or trigger to turn the
thermometer on.
2. Press the MODE button repeatedly until
AVG
appears in the lower left portion of the display.
3. Aim the infrared lens at the target and press
the trigger to display the surface temperature.
4. Measurement continues as long as the
trigger is pressed or for 60 minutes in Lock
Mode. The AVG reading displays the average
temperature of multiple targets.
7. Error Messages
The IN1022 incorporates visual diagnostic
messages as follows:
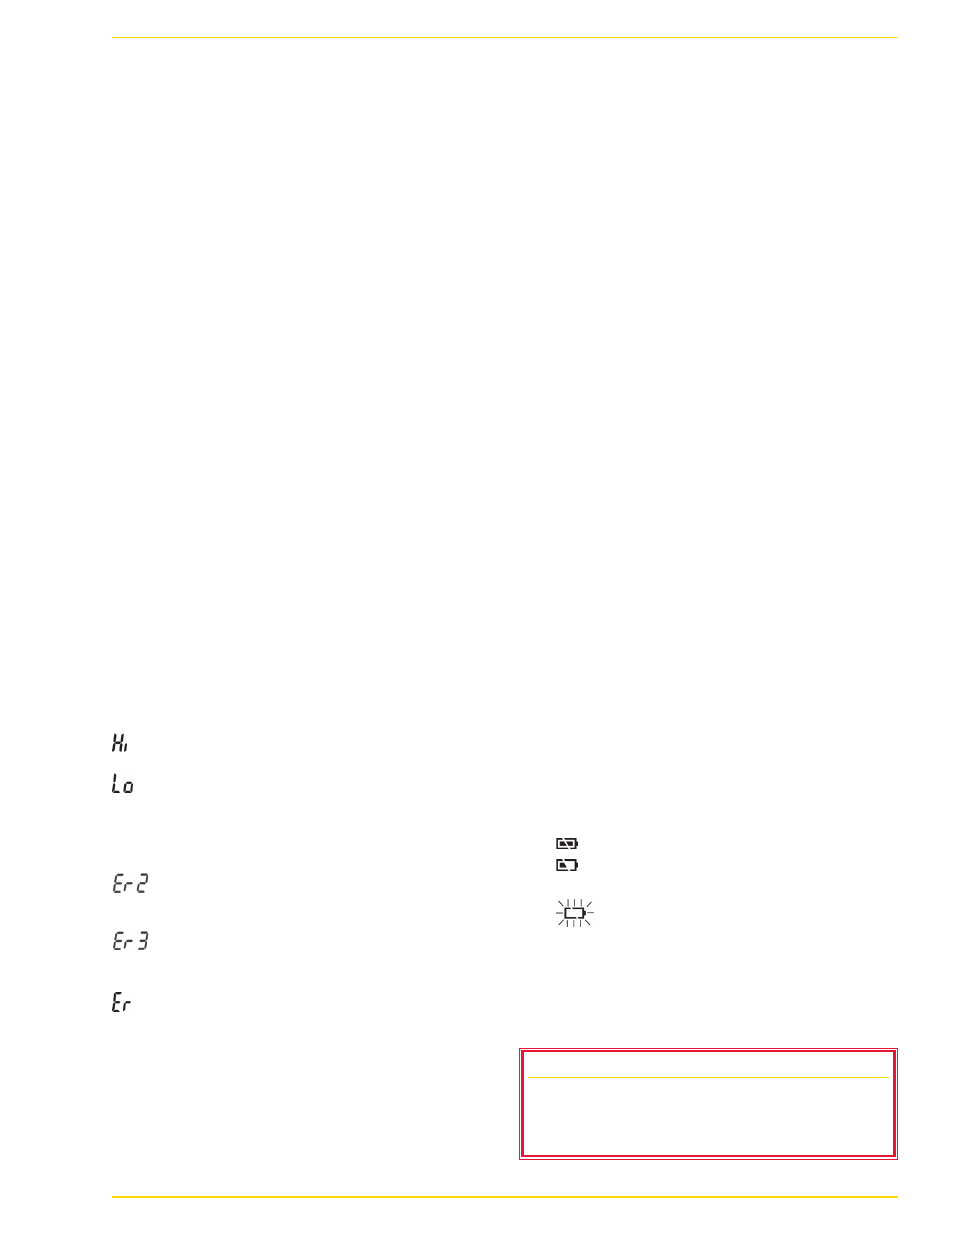
1.
HI or LO is displayed when the temperature
being measured is outside the infrared range
of the instrument.
a.
HI indicates that the temperature is
higher than +1022°F/+550°C.
b.
LO indicates that the temperature is lower
than -76°F/–60°C.
2. Allow a minimum 30 minutes for the
thermometer to stabilize to the working/
room temperature.
a.
ER2 is displayed when the thermometer is
exposed to rapid changes in the ambient
temperature.
b.
ER3 is displayed when the ambient
temperature exceeds 32°F/0°C OR
122°F/50°C.
3. For all other error messages it is necessary to
reset the thermometer.
a. Wait for the thermometer to power off.
b. Remove the battery and wait for a
minimum of one minute.
c. Reinstall the battery (see
Battery
Installation).
d. Press the MODE button or trigger to turn
the thermometer on.
e. If the error message remains, please
contact CDN for further assistance.
G. Temperature Alerts
1. High Alert
An alert will sound when the measured
temperature exceeds the alert temperature
setting.
1. Press the MODE button or trigger to turn the
thermometer on.
2. Press the MODE button repeatedly until
HAL appears in the lower left portion of the
display.
3. Press the °C/°F button to decrease the High
Alert temperature. Press the LOCK button to
increase the High Alert temperature. Press
and hold for fast advance.
4. Press the trigger to confirm the High Alert
temperature setting.
2. Low Alert
An alert will sound when the measured
temperature exceeds the alert temperature
setting.
1. Press the MODE button or trigger to turn the
thermometer on.
2. Press the MODE button repeatedly until
LAL appears in the lower left portion of the
display.
3. Press the °C/°F button to decrease the Low
Alert temperature. Press the LOCK button
to increase the Low Alert temperature. Press
and hold for fast advance.
4. Press the trigger to confirm the Low Alert
temperature setting.
H. Battery Status
The thermometer incorporates visual battery
status indication:
1.
Battery OK: measurements are possible
2.
Battery Low: replace battery with two 1.5V
AAA Alkaline cells; measurements are possible
3.
Battery Exhausted: replace battery;
measurements are not possible
EMC/RFI
Readings may be affected if the unit is operated within a radio
frequency electromagnetic field strength of approximately
3 volts per meter, but the performance of the instrument will
not be permanently affected.