Curing/drying process control – Red Lion Libra Timer User Manual
Page 8
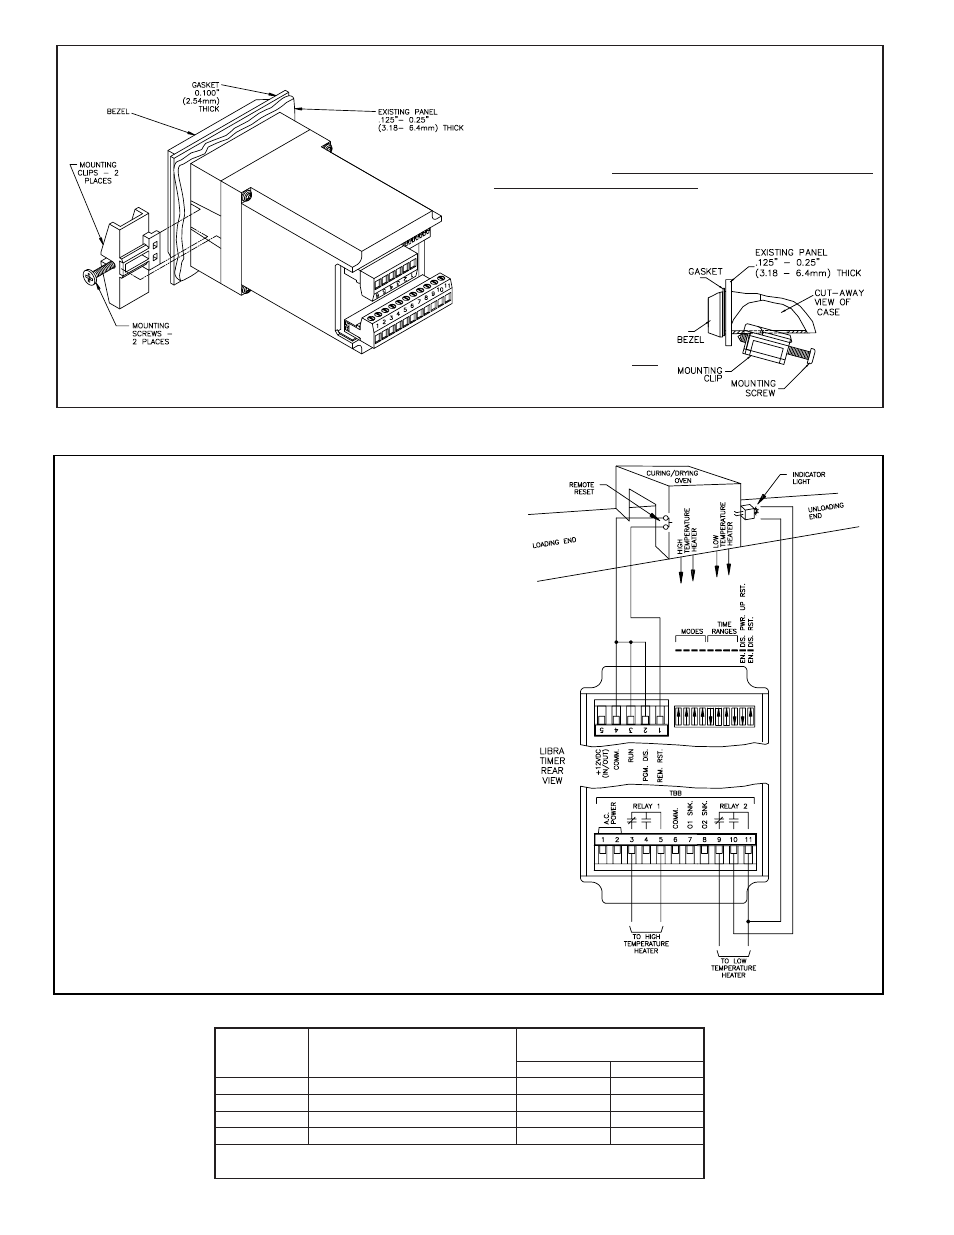
CURING/DRYING PROCESS CONTROL
In a typical manufacturing curing/drying process, it is required to control the
duration of time heat is applied to the items within an oven. These items are to
be heated at a high temperature for a long period of time (30 minutes). At the
end of the curing/drying process, the heat is turned off and an indicator light is
turned on, signaling the unloading attendant. The dual preset Libra timer will
satisfy all these requirements.
The Libra timer is first set to minutes time range, which is time range 9. Next,
the mode switches are set to Mode 0 (Latch Outputs at Presets, Manual Reset to
Zero, Time Stops at Preset 2). Mode 0 is used because the outputs must latch on
when the presets are reached (When the outputs latch on, the heaters de-
energize). Also, the time increments will stop at preset 2. The power-up reset
switch is set to “Enable”, which causes the unit to start the cycle over in the
event of an input power loss (when enabled, the unit will reset itself when input
power is restored). The front panel reset button “EN./DIS.” switch is “Disabled”
to prevent accidental resetting (restarting) of the cycle. The “REM. RST.”
terminal is connected to a remote reset button located at the loading end of the
oven. The “PGM. DIS.” and the “RUN” terminals are tied to the “COMMON”
terminal. With “PGM. DIS.” tied low (this is done after preset 1 is set to 3
minutes and preset 2 is set to 33 minutes), the heating time periods cannot be
changed. “RUN” is permanently tied low, which causes the unit to increment
time (when Preset 2 is reached, Mode 0 will cause time accumulation to stop).
The normally closed contact of Relay 1 is connected to the high temperature
heater and the normally closed contact of Relay 2 is connected to the low
temperature heater. The operation sequence is as follows:
The operator/attendant wheels a rack of items into the heating area (oven).
Once the oven doors are closed, the operator/attendant presses the remote reset
switch which starts the heating cycle (both high and low temperature heaters are
turned on at this time). After three minutes have elapsed, output 1 fires, which
opens the normally closed contact of Relay 1. (This turns off the high
temperature heater.) After 30 minutes have elapsed, output 2 fires, which stops
the time accumulation and opens the normally closed contact of Relay 2. (This
turns off the low temperature heater.) Also, the normally open contact of Relay
2 closes, which then turns on the indicator light. (This signals the unloading
attendant that the process is complete.)
ORDERING INFORMATION
APPLICATION FOR DUAL LEVEL PRESET LIBRA TIMER
INSTALLATION
The Libra counters and timers are designed to be panel-mounted with a
gasket to provide a water-tight seal. Two mounting clips and screws are
provided for easy installation. Consideration should be given to the thickness
of the panel. Too thin of a panel may distort and not provide a water-tight seal.
(Recommended minimum panel thickness is 1/8".)
After the panel cut-out has been completed and deburred, carefully apply
the gasket to the panel. DO NOT APPLY THE ADHESIVE SIDE OF THE
GASKET TO THE COUNTER BEZEL. Insert the unit into the panel. As
depicted in the drawing (at right), install the screws into the narrow end of the
mounting clips. Thread the screws into the clips until the pointed end just
protrudes through the other side. Install each of the two mounting clips by
inserting the wide lip of the clips
into the front end of the hole,
located on either side of the case.
Then snap the clip onto the case.
Tighten the screws evenly to
apply uniform compression, thus
providing a water-tight seal.
Caution: Only minimum pressure
is required to seal panel. Do NOT
over-tighten mounting screws.
MODEL NO.
DESCRIPTION
230 VAC
115 VAC
LIBT1
Single Preset LCD Libra Timer
LIBT1010
LIBT1000
LIBT2
Dual Preset LCD Libra Timer
LIBT2010
LIBT2000
LIBT1E
Single Preset LED Libra Timer
LIBT1E10
LIBT1E00
For more information on Pricing, Enclosures & Panel Mount Kits refer to the RLC Catalog or contact
your local RLC distributor.
LIBT2E
Dual Preset LED Libra Timer
LIBT2E10
LIBT2E00
PART NUMBERS FOR AVAILABLE
SUPPLY VOLTAGES