Lokar Cable Operated Shifter GM User Manual
Page 4
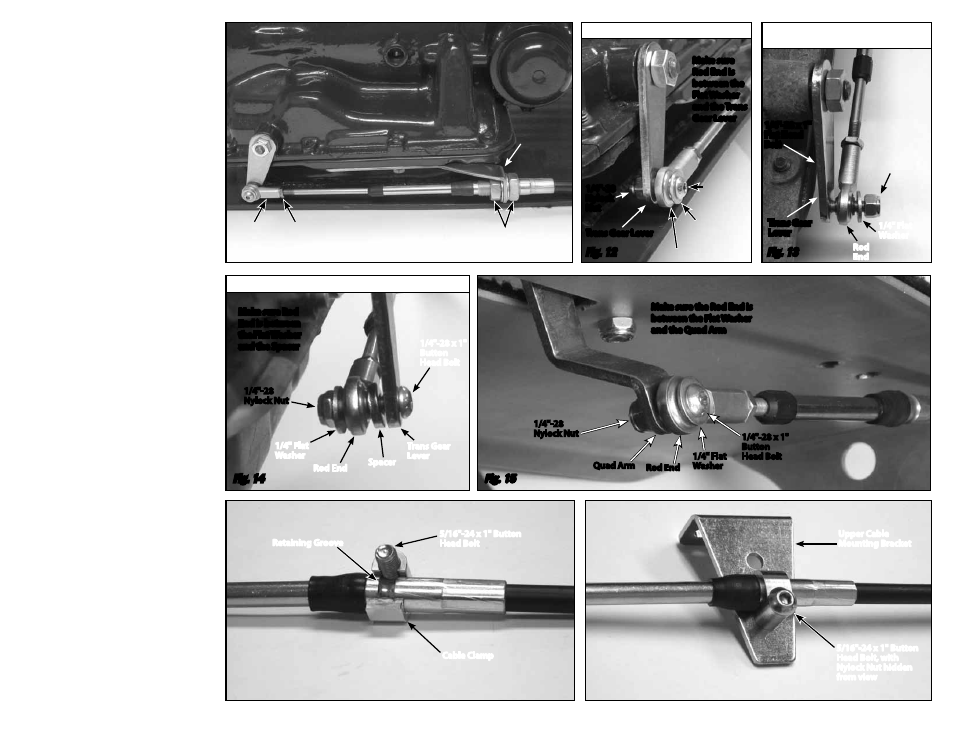
Fig. 11
Fig. 14
Fig. 15
Fig. 16
Fig. 17
Fig. 12
Fig. 13
INS0105 Rev. 06/24/14
Page 4
Step 13: (continued) Determine how the cable clamp
should be oriented on the upper cable mounting
bracket and which bolt hole should be used for
the best alignment with the quad arm. The cable
clamp can be installed with the bolt above or
below the cable. Insert the 5/16"-24 x 1" button
head bolt into the cable clamp, and position the
cable clamp on the cable, making sure that the
bolt is seated in the retaining groove.
Fig. 16
Install the cable clamp and 5/16"-24 x 1"
button head bolt on to the upper cable mounting
bracket and secure with a nylock nut.
Fig. 17
Step 14: Make sure that the location chosen for the cable
clamp on the upper cable mounting bracket
will allow the cable to go straight to the hole in
the quad arm without binding in any direction.
Before drilling the bolt holes in the floor, be sure
everything is mocked up correctly and if pos-
sible, clamp the upper cable mounting bracket
in place and check operation of the shifter. Mark
the center of the holes, center punch the marks,
and drill both holes using a 5/16” drill bit.
Step 15: Mount the upper cable mounting bracket to
the floor using the 5/16"-24 x 1/2" button head
bolts and nylock jam nuts.
Fig. 18
Step 16: Check the adjustment of the shifter by placing
the shifter lever all the way forward into the Park
position. Make sure that the release button still
moves up and down freely. The release but-
ton should be flush with the knob in Park and
Neutral. In the Reverse position, you cannot pull
the lever back into Neutral without depressing
the release button.
While the shifter is in the Park position, make
sure the transmission is firmly in the Park
detent, with no tension on the cable. You can
verify that there is no tension on the cable by
removing the 1/4"-28 x 1" bolt with nylock nut
that attaches the rod end to the quad lever or
trans gear lever at either end of the cable. Make
sure the hole in the rod end exactly aligns with
the hole in the quad lever or trans gear lever.
The bolt should pass freely through both holes at
the same time without binding. Do not force the
holes to line up.
If the holes are not aligned, use the 5/8"-18 jam
nuts at the lower cable mounting bracket to get
the adjustment close. Then you can fine-tune it
by adjusting the rod ends until you can slide the
bolt in and out without putting tension on the
cable. Make sure that the quad lever and trans
gear lever do not move during the adjustment
procedure. Use this adjustment routine until
the bolts will pass freely in and out of both of
the rod ends and the quad lever and trans gear
lever. Reinstall the 1/4"-28 nylock nuts and the
flat washers onto the bolts and tighten.
Once you have the shifter adjusted correctly,
tighten the 1/4"-28 jam nuts on the ends of the
cable, and the 5/8"-18 jam nuts at the lower
cable mounting bracket.
Make sure
Rod End is
between the
Flat Washer
and the Trans
Gear Lever
Make sure Rod
End is between
the Flat Washer
and the Spacer
Make sure the Rod End is
between the Flat Washer
and the Quad Arm
1/4"-28
Nylock
Nut
Trans Gear Lever
Rod End
1/4"-28 Jam Nut
5/8"-18 Jam Nuts with
Internal Tooth Lock Washers
Rod End
1/4" Flat
Washer
1/4"-28 x 1"
Button
Head Bolt
1/4"-28 x 1"
Flat Head
Bolt
1/4"-28
Nylock Nut
1/4"-28
Nylock Nut
1/4"-28
Nylock Nut
Quad Arm
1/4" Flat
Washer
1/4" Flat
Washer
1/4" Flat
Washer
Rod
End
Rod End
Rod End
Spacer
5/16"-24 x 1" Button
Head Bolt
Upper Cable
Mounting Bracket
5/16"-24 x 1" Button
Head Bolt, with
Nylock Nut hidden
from view
Retaining Groove
Cable Clamp
Trans Gear
Lever
1/4"-28 x 1"
Button
Head Bolt
1/4"-28 x 1"
Button
Head Bolt
Trans Gear
Lever
Lower Cable
Mounting
Bracket
TH350, TH400
Make sure the Bolt is seated in the Retaining Groove
700-R4, 200-4R, 4L60: Install Flat
Head Bolt from inside Trans Gear Lever
4L60E Only: Rod End goes on inside of Trans Gear Lever
© 2007 Lokar, Inc.