Lokar Automatic Trans Mount Shifter TH350 User Manual
Page 3
Step 8: (Continued) Transfer that measurement to the transmission (or to the engine/transmission assembly if the engine
is not installed in the vehicle). Mark that location on the shifter's main plate. The holes in the main plate that
are closest to your mark are where the FRONT banana bracket bolts will need to be installed.
Fig. 5
If you choose to install the shifter assembly where any of its mounting holes line up with the left, right, or rear
bracket mounting bolts, mount the shifter using the same bolts and lock washers that are already being used
to attach the left, right, or rear mounting brackets to the main plate. In this case, the bolts will go through the
banana bracket first, then the main plate, and finally into the mounting bracket below.
Any shifter mounting holes that do not line up with the side or rear mounting bracket bolts must use the
provided 5/16"-24 x 1/2" button head bolts and nylock nuts
(NO lock washers). Make sure the shifter assembly
is mounted using all four bolt holes.
Do not use any other length bolts.
NOTE: If mounting the shifter all the way forward, using the four bolt holes at the very front of the shifter's main
plate,
a bell crank kit (Lokar Part No. S-6999*, sold separately) will be required. Fig. 5
Step 9: If your vehicle does not already have an existing shifter opening, cut the opening now. If you are using a
Lokar shifter boot, the maximum opening for a round boot is 4" in diameter, and the maximum opening for a
rectangular boot is 4" wide by 5-1/2" long.
Before proceeding any further, the transmission should be installed in the vehicle, with the vehicle body, seat and
dashboard in place.
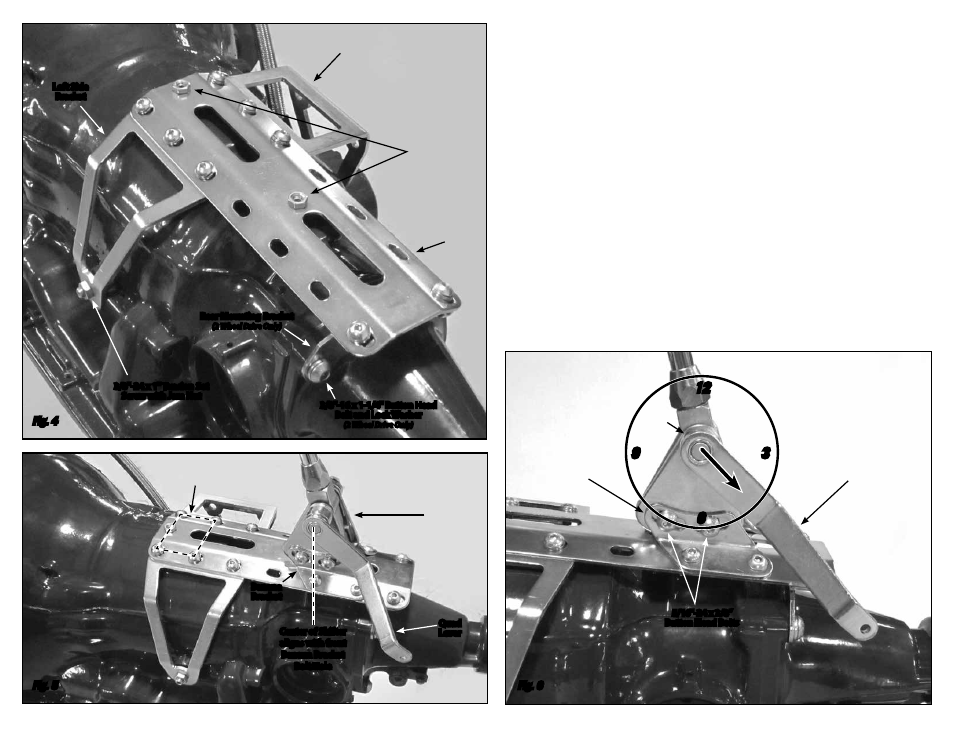
Step 10: Make sure the two 5/16"-24 x 3/8” button head bolts that attach the left side banana bracket to the shifter
assembly (in the curved, slotted holes) are tight. Before tightening the shifter assembly down to the main
plate, move the shifter through all the gear positions. Make sure that the shifter lever and knob do not come
in contact with the dash or the seat. The shifter assembly can be tilted forward or backward if needed by
loosening the 5/16"-24 x 3/8” button head bolts in the curved, slotted holes in the left side banana bracket.
Fig. 6
If you ever disassemble the shifter assembly, be sure that the 5/16"-24 x 3/8” button head bolts and lock
washers are put back into the curved, slotted holes in the banana brackets. Installing longer bolts could
prevent the shifter from operating.
NOTE: If you find after installation that the shape or length of the shifter lever is not suitable for your
application, Lokar has a number of different styles and lengths of shifter lever replacement kits available for
purchase separately through our dealer network.
Fig. 6
6
12
3
9
Fig. 5
Fig. 4
Page 3
Right Side
Bracket
Main
Plate
Shifter
Assembly
If the shifter is mounted in this
location, a Lokar Bell Crank
Kit # S-6999 will be required
Quad Lever at
approximately
4:30 position in
Park (Step 11)
Banana
Bracket
Set
Screw
5/16"-24 x 5/8"
Tension Set
Screws with
Jam Nuts
(4 Wheel Drive Only)
3/8"-16 x 1-1/4" Button Head
Bolt and Lock Washer
(2 Wheel Drive Only)
5/16"-24 x 3/8”
Button Head Bolts
3/8"-24 x 1" Tension Set
Screw with Jam Nut
Rear Mounting Bracket
(2 Wheel Drive Only)
Quad
Lever
Banana
Bracket
Center of Shifter
aligns with front
Banana Bracket
Bolt Hole
Left Side
Bracket