Ag Leader EZ-Guide Quick Reference Guide User Manual
Ag leader ez-guide, Quick reference card, Configuring the system configuration options
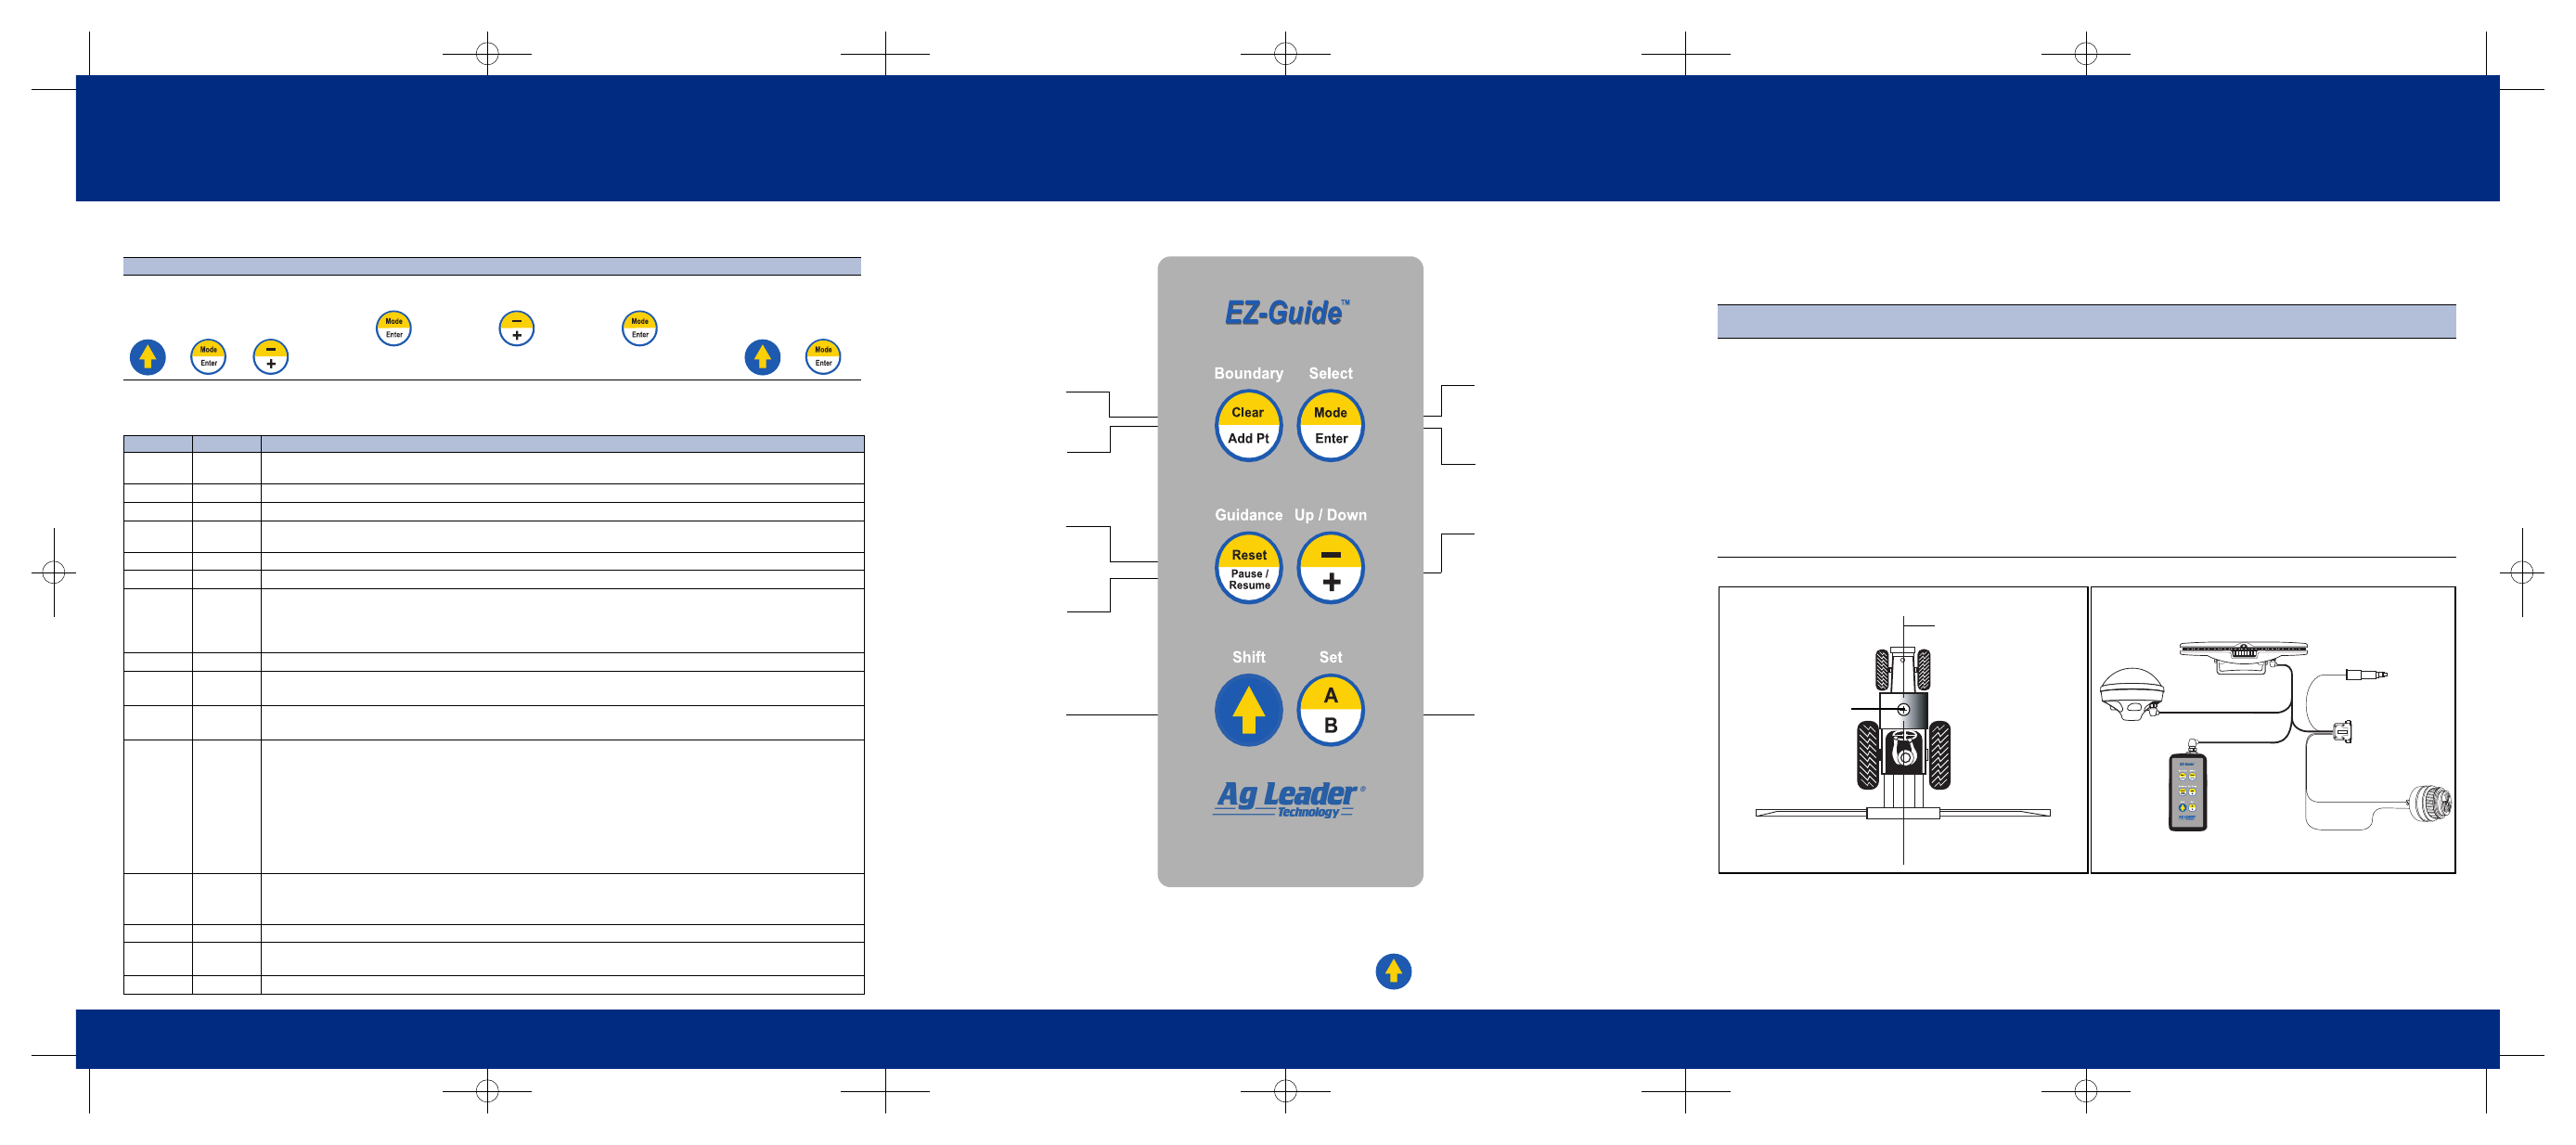
Ag Leader EZ-Guide
™
Quick Reference Card
A
CONFIGURING THE SYSTEM
CONFIGURATION OPTIONS
Step 1
Step 2
Step 3
Step 4
Step 5
Step 6
To configure
EZ-Guide, press the
following keys until
CONFIG
appears:
To select an option,
press the following
key until the option is
displayed:
To display the value,
press:
To change the value,
press:
To accept the value,
press:
Return to step 2, or
press the following
keys until
GUIDE
is
displayed:
Option
Default
Values
WIDTH
60'
Swath width – Set this to about 0.3 m (1 ft) less than your total boom width to ensure that there are no skips
between swaths.
LED
MODE
CHASE
•
CHASE
– Chase the lights to stay online
•
PULL
– Center the lights to stay online
SPACING
1'
Distance represented by one LED.
HLNDWARN
0'
Distance at which the Approach LED indicates your approach to the headland or end of swath line. It turns
orange.
XTE
WARN
0'
Distance off-swath at which the alarm sounds. Set to zero to disable the swath alarm.
BMOFFSET
0'
•
F
•
R
LK
AHEAD
1
SEC
Look ahead time in seconds. Predict your future guidance path by the number of seconds configured.
Increase this value for larger vehicles that take longer to turn.
•
0 to 8 mph – 1 second
•
8 to 15 mph – 2 seconds
•
15+ mph – 3 seconds
MOUNT
DASH
•
DASH
– Text aligned for upright dash mount
•
CEILING
– Text aligned for ceiling mount
TEXT
SWTH
&
XTE
•
SWTH
&
XTE
– Swath number and cross-track error
•
SWTH
&
SPD
– Swath number and current speed
•
HDG
&
SPD
– Current heading and speed
•
DEMO
– Sales demo mode
SNAPSWTH ON
•
ON
– Lightbar automatically guides to nearest
swath
•
OFF
– Use the –/+ keys to change swath
DIFF
SRC
WAAS
/
EGN
•
WAAS
\
EGN
–
WAAS
or
EGNOS
satellite
•
O
-
USA
C
– OmniSTAR U.S. Central satellite
•
O
-
S
.
AMER
– OmniSTAR South American satellite
•
O
-
AFRICA
– OmniSTAR African satellite
•
T
-
USA
W
– Thales U.S. Western satellite
•
T
-
USA
E
– Thales U.S. Eastern satellite
•
T
-
AFRICA
– Thales African satellite
•
T
-
AUSTRL
– Thales Australian satellite
•
O
-
USA
W
– OmniSTAR U.S. Western satellite
•
O
-
USA
E
– OmniSTAR U.S. Eastern satellite
•
O
-
EUROPE
– OmniSTAR European satellite
•
O
-
AUSTRL
– OmniSTAR Australian satellite
•
T
-
USA
C
– Thales U.S. Central satellite
•
T
-
S
.
AMER
– Thales South American satellite
•
T
-
EUROPE
– Thales European satellite
DIFF
GPS
DIFFONLY
•
AUTO
– Accept all positions including less
accurate non-differential positions
•
DIFFONLY
– Accept only DGPS positions
•
AUTOWARN
– Accept all positions, but warn if
differential corrections are lost
UNITS
US
•
US
– Feet, miles per hour, acres
•
METRIC
– Meters, kilometers per hour, hectares
LANGUAGE ENGLISH
•
ENGLISH
•
ESPANOL
•
PORTUGES
DEFAULTS
DEFAULTS
Return all configuration settings to factory defaults.
+
+
Ag Leader EZ-Guide
™
Quick Reference Card
A
KEYPAD
LIGHTBAR DISPLAY BRIGHTNESS
To change the brightness level of the lightbar display, press and hold:
.
© 2003.
T
ri
m
b
le
N
a
vi
gat
ion Limit
ed.
Al
l r
ight
s r
e
ser
v
ed.
EZ-G
uide is
a
tr
a
dem
ar
k
of
T
rimb
le Na
vigat
ion Li
m
it
ed li
censed t
o
Ag L
eader T
e
chnol
og
y.
P
a
rt
N
u
m
b
e
r
48651-40-ENG
.
Re
v.
A
(J
an
uar
y 2003).
MODE
Select Guidance, Area, or
Configuration modes.
CLEAR AREA
Clear all area points.
ADD AREA POINTS
Add an area point. The new
area is displayed briefly.
RESET GUIDANCE
Reset the guidance in
preparation for a new field.
ENTER
Select a configuration option
or accept a configuration
value.
SHIFT
•
Press to access yellow
functions on other keys.
•
Press and hold to change
the brightness of the
lightbar display.
•
When editing configuration
values, press to toggle
between increasing and
decreasing the values.
–/+
•
Increase or decrease
swath number if
SNAPSWTH is off.
•
Scroll through
configuration options.
•
Increase or decrease
configuration values.
PAUSE/RESUME
Pause or resume guidance.
SET A/SET B
Set the A or B point for
swath guidance.
Ag Leader EZ-Guide
™
Quick Reference Card
A
INSTALLATION
Step 1:
GPS antenna
Step 2:
Lightbar and remote keypad
Step 3:
Cables
Step 4:
Test your installation
a. Mount the antenna on the
highest part of the vehicle.
Ensure that there are no
obstructions in the way of
the GPS antenna.
b. Mount the antenna along the
boom centerline as shown
below.
Note – Ensure that the
vehicle with the GPS
antenna on top can safety fit
through the door of the
machine shed!
a. Attach the suction cup to the
lightbar. Mount the lightbar for
comfortable viewing inside
the cab.
Note – The lightbar can be
mounted upside down.To flip
the text, change the
MOUNT
setting to
CEILING
.
b. Mount the remote keypad for
comfortable access.
a. Attach the cables as shown
below.
b. Place the cigarette lighter
plug into the vehicle’s
cigarette lighter adaptor.
c. Optionally, connect the
Sonalert alarm.
a. Drive outside and turn on the
unit. The lightbar display
should illuminate.
Note – GPS does not work
indoors.
b. Press –/+ to change the
swath width, then press
Enter
to accept.
c. Wait for the
SET A
message
on the lightbar. EZ-Guide is
ready to use.
Mounting the antenna
Application boom
GPS antenna
Boom centerline
Lightbar
Attaching the cables
Remote
keypad
Sonalert
alarm
White +
Black –
To yield monitor
or computer
EZ-Guide cable
GPS4050
To power