SUOMY D2O User Manual
Page 20
the lower part. The internal padding comes in just one piece, including the head guard. Be very
careful when removing the entire group.
# Caution: to avoid damaging the inner lining, before removing the inner shell make sure all the
press studs have been snapped open.
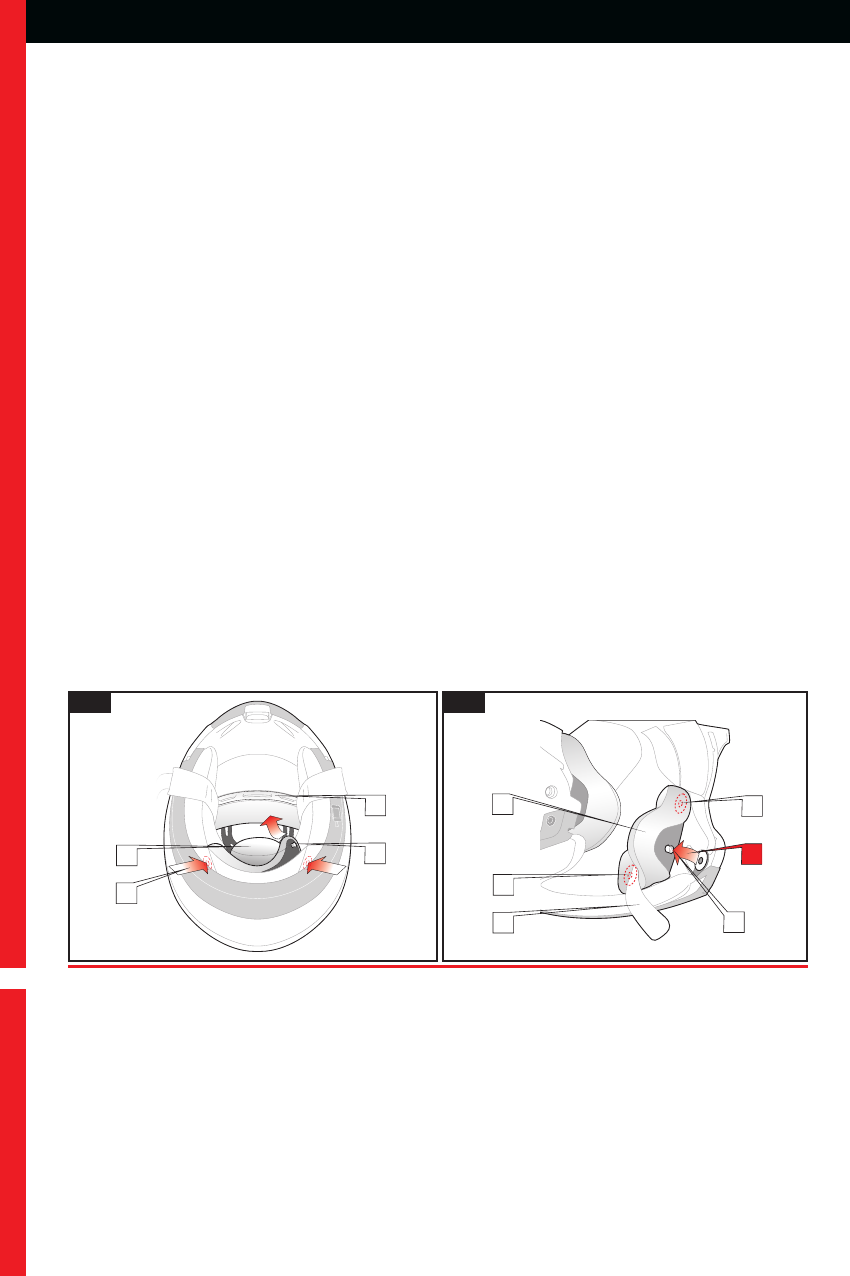
Fitting the shell
Insert the shell (A) inside the helmet checking the assembly direction. Fasten the press studs (B). Fix the front
tab (C) in the click-on seat and position the head guard in the lower part of the shell, making sure it is fixed
to the inside of the shell. After fixing the shell and cover make sure the shell is correctly positioned inside the
helmet (polystyrene padding). Put cheek pads back in.
INNER SIDE PADDING: CHEEK PADS – Assembly and disassembly
The cheek pads are fixed to the inner lining of the helmet through three press studs. Perform all assembly
and removal operations with chin guard completely open.
Removing the pads - see fig. 7
The removable cheek pads (A) are fixed to the shell through three press studs (B). Follow this procedure to
remove the pads: unfasten the three buttons (B) by slightly pulling outwards (X).After unfastening the buttons,
slide out the strap (C) from the seat inside the pad and remove it.
To remove the polystyrene part of the cheek pad follow this procedure (see fig. 7A): the polystyrene part (A)
is shaped so that the two tabs (upper and back) fit perfectly inside the seats between the polystyrene
protection and the shell (perfectly visible and identifiable).
To remove, first slide out (X) the back tab and then the upper one.
To fit, first insert the upper tab and automatically the back one.
# Before fitting the cheek pad with the lining verify that the polystyrene part is firmly fastened to the protective
polystyrene part and correctly fitted. If the proper safety conditions are not reached, do not use the helmet.
Assembly - see fig. 7B
If the polystyrene part is removed, follow the indications in the CHEEK PAD paragraph – Removal and fit the
polystyrene part. Afterwards, follow this procedure: insert (X) the strap (C) in the slot inside the cheek pad.
# Verify the correct positioning of the three press studs (B). slightly press and fasten the studs.
# Verify that the part was assembled correctly by checking that:
-
the cheek pad is firmly locked in position
-
that the strap is completely free inside the hole and was not blocked under the cheek pad during
assembly.
Only the correct assembly of the cheek pad and the correct positioning of the strap will assure the proper
operation of the retention system.
# If this doesnʼt happen and the removable cheek pads donʼt work correctly, do not use the helmet and
contact Suomy authorized personnel only.
DOUBLURES
Les doublures internes peuvent être aisément enlevées pour être lavées et/ou remplacées.
DOUBLURE INTERNE CENTRALE UNIQUE – Démontage et Remontage – voir fig. 6
La doublure interne (A) est fixée au casque par 2 boutons automatiques postérieurs (B) et fixée à la partie
antérieure par une ailette encastrée (C).
Extraction – voir fig. 6
Ôter les protège-joues amovibles. Détacher les boutons pression (B) et enlever la calotte interne (A). Faire
très attention durant l'extraction, en faisant pression sur la partie rigide du bouton et en tirant légèrement
vers l'intérieur du casque sans abîmer le bouton lui-même. Libérer, sur la partie supérieure, lʼailette encastrée
et le protège-nuque sur la partie inférieure. La doublure interne est conçue en une seule pièce, comprenant
le protège-nuque ; prendre soin de bien enlever lʼintégralité de lʼensemble.
# Attention : pour éviter tout endommagement du revêtement interne, vérifier que les 2 boutons
automatiques sont détachés avant d'extraire la doublure interne.
USERʼS INSTRUCTIONS INSTRUCTIONS DʼUTILISATION ISTRUZIO
20
FR
6
7
B
A
B
C
C
B
A
X
B
B