Accessories, Optional air blast unit ), Warning – Lincoln Electric IM10071 MAGNUM PRO THRU THE ARM ROBOTIC TORCH User Manual
Page 18
C-1
ACCESSORIES
C-1
MAGNUM® PRO THRU THE ARM ROBOTIC TORCH
Read this entire installation section before you
start installation.
SAFETY PRECAUTIONS
ELECTRIC SHOCK can kill.
• Do not touch electrically live parts
such as output terminals or inter-
nal wiring.
• Insulate yourself from the work and
ground.
• Always wear dry insulating gloves.
------------------------------------------------------------------------
(OPTIONAL AIR BLAST UNIT )
NON WIRE BRAKE ONLY
CONNECTING TORCH TO ROBOT ARM,
FANUC MODEL 100iC, 100iC/6L, 120iC OR
120iC/10L
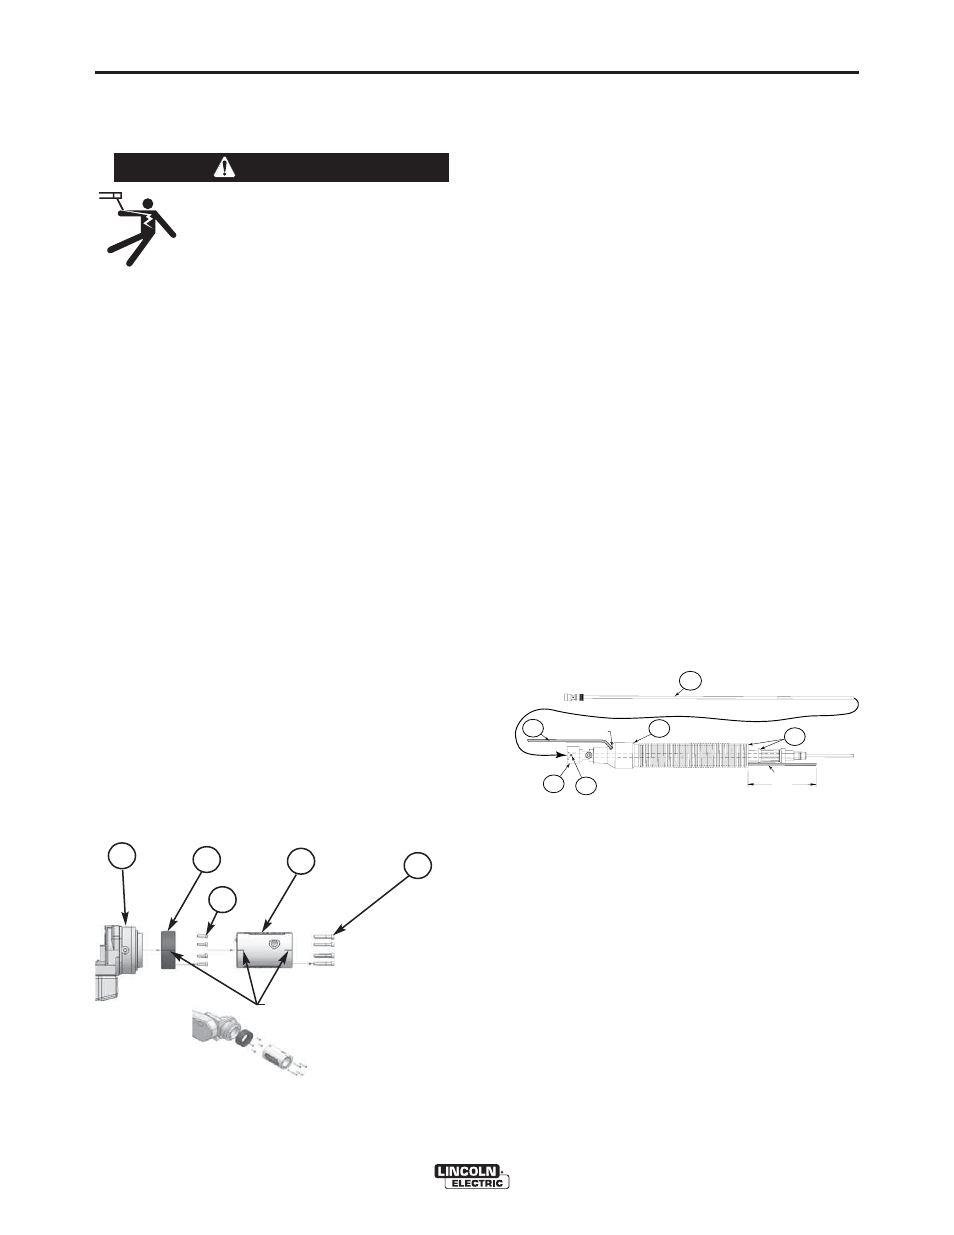
(See Figure C.1)
1.
Removing Torch Assembly from packaging
Disassemble the Torch Assembly:
• Remove the set of 4 Socket Head Cap Screws Item
1, the Housing Item 2 and the Housing to the
Breakaway Disc Item 3.
2. Assemble the Breakaway Disc to the J6 axis Item 4 of
the robot, making sure the Scribe Mark is facing up.
Secure with the (4) M4 Screws Item 5 provided.
Torque to 6-8 in-lbs (.9-1.1Nm).
3. Assemble the Housing to the Breakaway Disc. Align
Scribe Marks and secure with Long Socket Head
Caps Screws. Torque to 8-10 in-lbs (.9-1.1Nm).
WARNING
1
2
3
4
5
FIGURE C.1
Scribe Marks
CONNECTING CABLE ASSEMBLY TO
ROBOT
(See Figure C.2)
1. Remove Magnum liner ITEM 1, Cable Assembly
ITEM 2 and Air Hose ITEM 6 from packaging. Lay
items on a flat surface to be assembled.
2. Push Air Hose ITEM 6 thru access hole on Cable
Handle ITEM 4 until approximately 5 inches pro-
trudes from front. If hose does not feed freely, pro-
ceed to step 3. Otherwise, proceed to step 6.
3. Remove Feeder Connecter Assembly ITEM 5 from
Cable Handle ITEM 4. Feed air hose thru cable han-
dle access hole until approximately 5 inches pro-
trudes from front of cable cover.
4. Slide cable handle onto cable asembly; align flats
and install. If at any time hose is not free to move,
remove and rotate cable handle 180 degrees clock-
wise and reinstall.
5. Install Feeder Connector ITEM 5 and torque to 12 ft-
lbs. (16.27 N-M).
6. Trim Magnum Liner to approximately 5.5ft.(1.7m).
Insert liner into Feeder Connector Assembly and
secure with Set Screw Item 3.
5 IN.
1
2
3
4
PUSH AIR HOSE
THRU ACCESS HOLE HERE
AIR HOSE
5
6
FIGURE C.2