Installation – Lincoln Electric IM10071 MAGNUM PRO THRU THE ARM ROBOTIC TORCH User Manual
Page 16
B-5
INSTALLATION
MAGNUM® PRO THRU THE ARM ROBOTIC TORCH
B-5
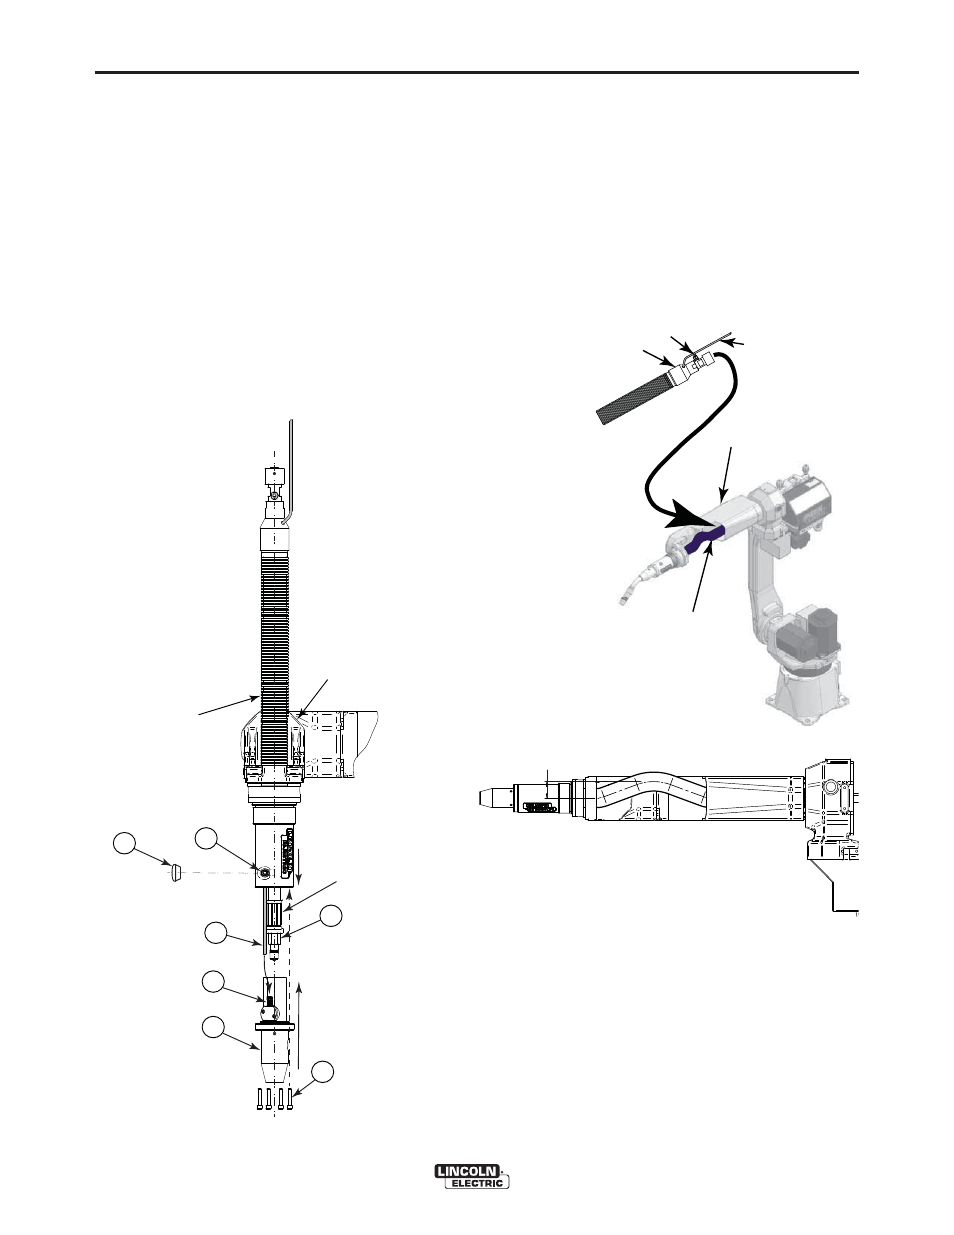
7. Remove plug cover ITEM 4. Pull back cable cover
and grip cable cable behind front hex / crimp. With
robot axis J5 rotated down 90 degrees, insert hex
thru housing until it passes thru. Push cable cover
forward until it snaps into Breakaway Disk.
8. Connect Air Hose ITEM 1 to Wire Brake ITEM 2.
9. Slide Nose Cone ITEM 3 into Torch Cable ITEM 5
until it bottoms. Secure with attached Socket Head
Cap screw ITEM 7. Reinstall plug cover ITEM 4.
Ensure that air hose is not kinked during this
process. Align scribe marks and secure nose cone
with remaining Socket Head Cap Screws ITEM 6.
Torque to 8-10 in-lbs. (0.9 - 1.1 N-m) (See Figure
B.8)
FIGURE B.8
10. Push approximately 2 inches of air hose into torch
cable on feeder connector end to ensure that air
hose is slack at all times.
11. Insert Feeder Connector and air hose thru Robot
Arm cavity; secure feeder connection. Make sure
that the cable is not twisted when installed.
Connect gas hose to gas fitting on feeder connec-
tor. (See Figure B.9) Adjust feeder location until
approximately 1-1/2 inch cable rise as shown in
robot front view below.
Cable Cover
Robot Axis J5
rotated down 90°
1
2
3
6
4
5
Hex and Crimp
7
FIGURE B.9
FEEDER CONNECTOR END
INSERT FEEDER
CONNECTOR END HERE.
MAKE SURE THE CABLE
IS NOT TWISTED.
GAS FITTING
AIR HOSE
ROBOT ARM
1-1/2 IN.
PROVIDE CABLE RISE (ROBOT FRONT VIEW)