WEATHER GUARD 237 User Manual
Page 3
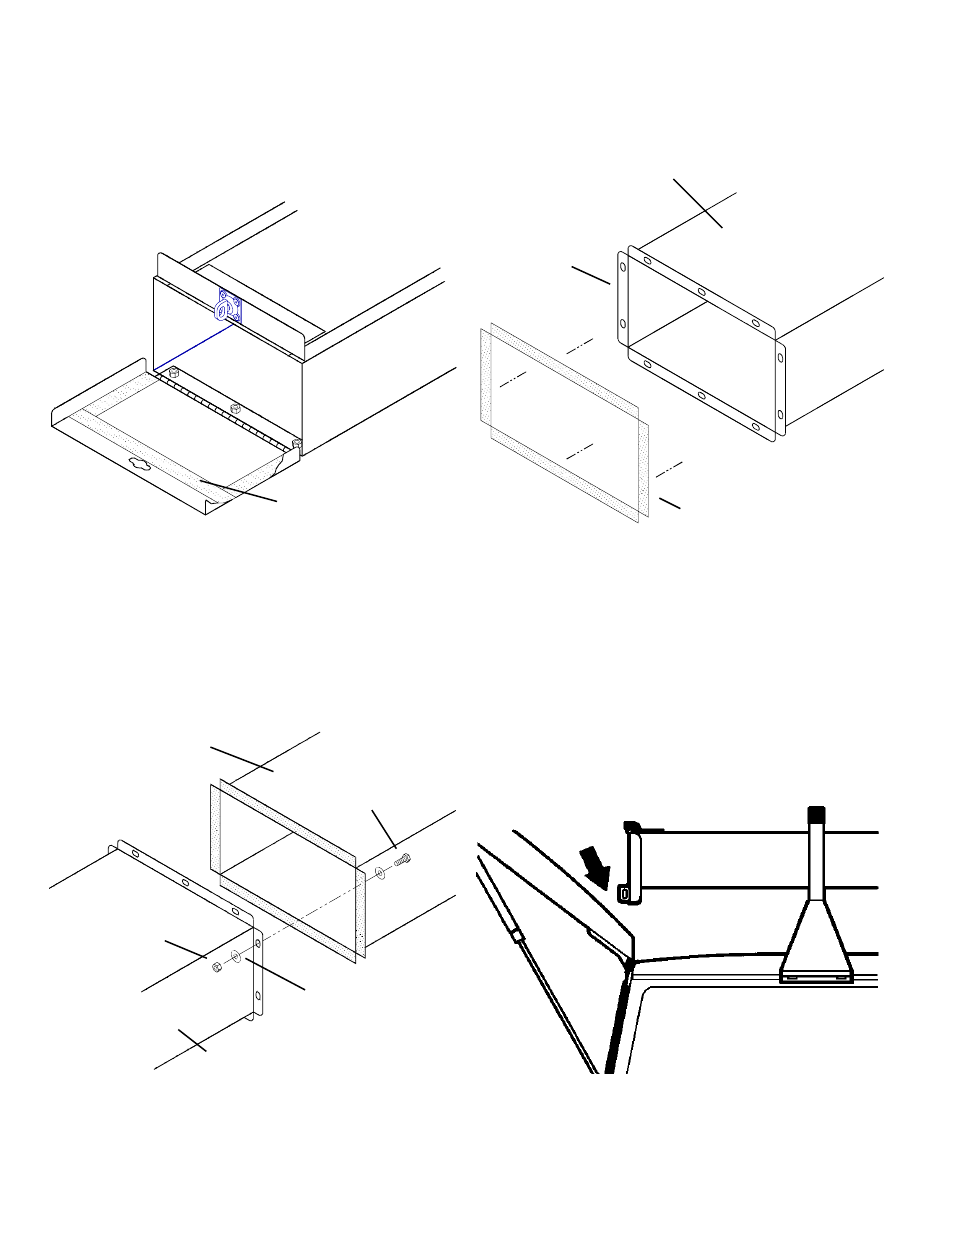
3. Open the Door, cut and adhere
Weatherstripping to fit inside the Door
where it touches the Rear Body Assem-
bly (
see Figure 4.
). Be sure you don’t
cover the latch hole.
6. Place the assembled unit on the ve-
hicle roof rack, positioning as shown in
Figure 7.
, and allowing for rear door
swing-up when installed on some mini
vans.
4. Cut and adhere Weatherstripping to
fit the attaching flanges on the Front
Body (
see Figure 5.
).
5. Fasten the Front Body to the Rear
Body Assembly (
see Figure 6.
). It will be
necessary to poke the bolts through the
adhered Weatherstripping.
Figure 4. Door Assembly Weatherstripping
Figure 5. Front Body Weatherstripping
Figure 6. Rear Body Assembly to Front Body fastening
1/4-20 Nylon
Lock Nut
(10 places)
Rear Body
Assembly
1/4" Flat
Washer
(20 places)
Front
Body
1/4-20 x 3/4"
Hex Head Bolt
(10 places)
Weatherstrip
(cut from bulk)
Weatherstrip
(cut from bulk)
Attaching
Flanges
Front
Body
Figure 7. Mini Van Door Clearance
3
- Model 1450 WEEKENDER® Ladder Rack, Horizontal (8 pages)
- Model 1285 FAST RACK® Accessory Cab Screen (3 pages)
- Model 1280 FAST RACK® Ladder Rack System (6 pages)
- Model 1345 Ladder Rack System, Steel, Compact, Short Bed (4 pages)
- Model 1259 Accessory Cab Screen (2 pages)
- Model 1245 Ladder Rack System, Steel, Short Bed (4 pages)
- Model 1225 Service Body Rack, Steel, Full (8 pages)
- 1211 (6 pages)
- 1205 (8 pages)
- 9036 Strong Box (2 pages)
- 644-X-01 through 685-X-01 (15 pages)
- 160-X-01 THRU 173-X-01 (4 pages)
- 178-X-01 through 181-X-01 (12 pages)
- 164-X-01 THRU 186-X-01 (18 pages)
- Model 524-3-02 Underbed Box, Steel, Standard, 4.5 cu ft (2 pages)
- 524-3-02 through 662-0-02 (9 pages)
- Model 364-0-02 Hi-Side Box, Aluminum, 7.9 cu ft (18 pages)
- 143-5-01 (12 pages)
- 114-X-01 THRU 156-X-01 (4 pages)
- 130-5-01 (12 pages)
- 126-5-02 (12 pages)
- Model 1904-3-02 PROTECT-A-RAIL® Cab Protector, Steel (4 pages)
- 1908 (2 pages)
- Model 1910-3-01 PROTECT-A-RAIL® Cab Protector, Steel (4 pages)
- Model 300 PACK RAT® Dividers (6 pages)
- 3100 (6 pages)
- Model 350-3-01 Transfer Tank, L-Shape, 50 gal (4 pages)
- Model 1246 Airfoil, Ford Super Duty (2 pages)
- 201 (1 page)
- 200 (2 pages)
- Model 239 Conduit Carrier Kit (2 pages)
- Model 114-0-01 Cross Box, Aluminum, Full Extra Wide, 15.3 cu ft (4 pages)
- Model 160-3-01 Pork Chop Box, Steel, Driver Side, 2.1 cu ft (4 pages)
- Model 246-3-02 Hi-Side Box, Steel, 5.6 cu ft (2 pages)
- Model 346-0-02 Hi-Side Box, Aluminum, 11.8 cu ft (2 pages)
- Model 1060-5 FAST RACK® Accessory Cross Member (1 page)
- Model 1908 PROTECT-A-RAIL® Heavy Duty Cab Protector, Steel (2 pages)
- Model 3100 BED RAT® Sliding Platform, 54 in x 22 in x 4-3/4 in (6 pages)
- Model 314-3 ITEMIZER® Drawer Unit, Lateral, 49 in x 12-1/4 in x 6-3/4 in (3 pages)
- Model 9020-3-01 Lockable Cabinet, No Shelf, 22 in x 18 in x 16 in (9 pages)
- Model 96101-3-01 Window Bulkhead, Full-Size, Ford, GM (24 pages)
- Model 96111-3-01 Mesh Bulkhead, Compact, Ford Transit Connect (12 pages)
- Model 96111-3-02 Mesh Bulkhead, Compact, 2014 Ford Transit Connect (4 pages)
- Model 96115-3-01 Mesh Bulkhead, Compact, RAM CV (4 pages)