Warning, Notice, Installation procedure using blind fasteners – WEATHER GUARD 1245 User Manual
Page 4: Step 12
- NOTICE -
Any modification or unintended use of this product shall immediately void all manufacturers warranties. Manufacturer disclaims all
liability for injuries to persons or property resulting from any modification to, or unintended use of this product.
If you have any questions, please give us a call. Call Toll Free 1-800-456-7865
WEATHER GUARD® products are protected by one or more of the following patents or trademarks:
U.S. - 4509787, 842268, 1661625, 1663369, 2228051, 2434963; Canada - 1218968, 282725; U.K. - 1400720; NZ - 296049; Aus.- 761964
KNAACK LLC
420 E. TERRA COTTA AVENUE - CRYSTAL LAKE, ILLINOIS, USA 60014 - 815-459-6020
© 2002 Knaack LLC
4
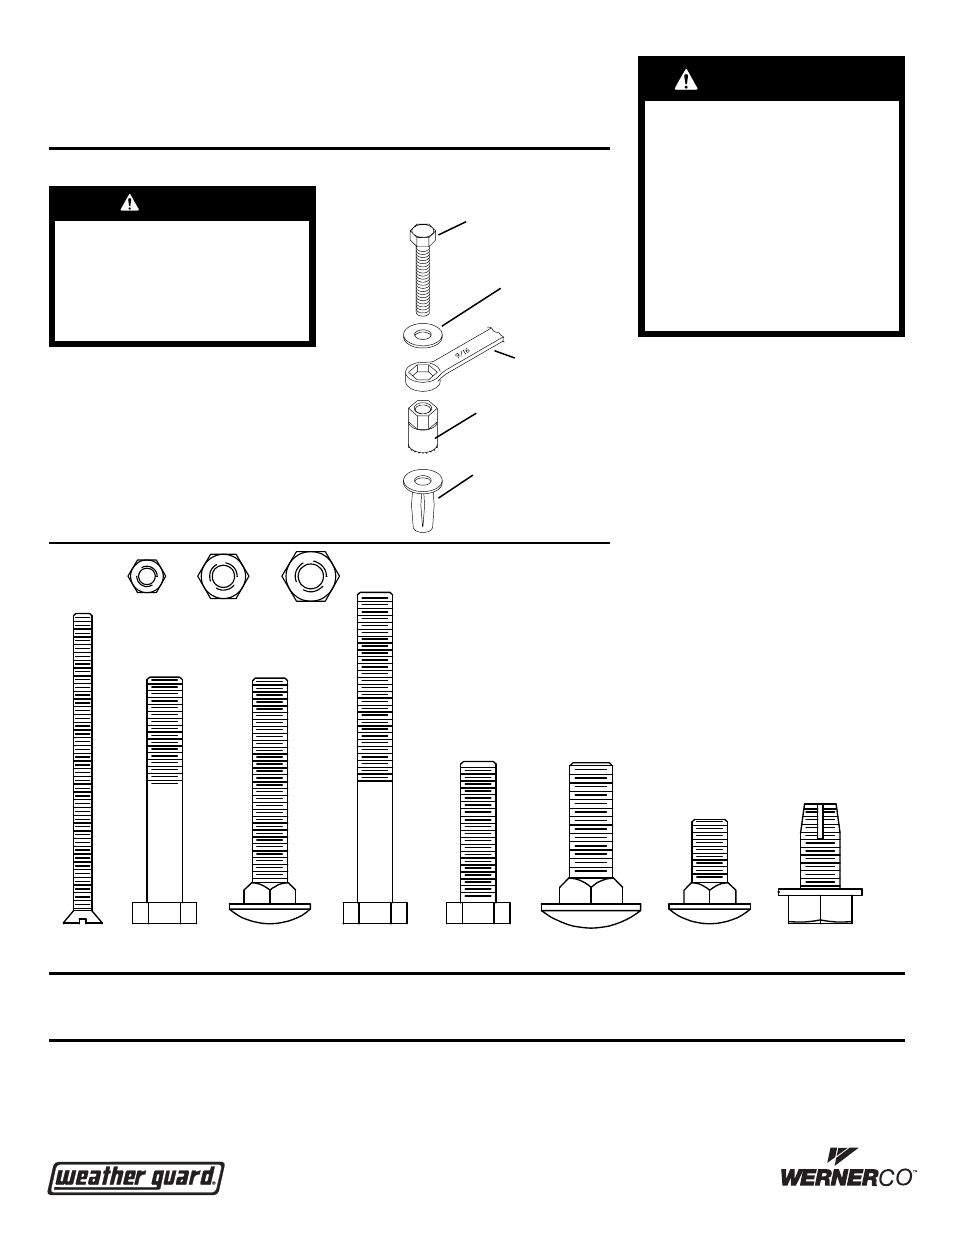
3/8-16 x 1-1/4"
Carriage Bolt
5/16-18 x 2-3/4"
Hex Hd. Bolt
5/16-18 x 2"
Hex Hd. Bolt
5/16-18 x 2"
Carriage Bolt
10-24 x 2-3/4"
F.H. Screw
5/16-18 x 1-1/4"
Hex Hd. Bolt
5/16-18 x 3/4"
Carriage Bolt
3/8-16 x 3/4"
Bolt, Thd. Cut
Nylon Lock Nuts
3/8
5/16
10-24
Bolt Size Chart
WARNING
Ladders must be secured per
ANSI standard A142.2-1990 para-
graph 8.4.4. Ladder damage will
occur from road shock and ve-
hicle vibration if the ladder is not
properly secured to the ladder
rack. Bouncing and side to side
motion of a improperly secured
ladder will cause wear and
weaken the ladder. Using a dam-
aged ladder could lead to a struc-
tural collapse and could result in
a serious injury or death.
WEATHER GUARD® PRODUCT
REFINISHING PROCEDURES
All WEATHER GUARD® products are finished
with a polyester powder coating, and it is im-
portant to follow these procedures to get
proper adhesion. As Knaack LLC cannot
control the finishing of the prod-ucts, the
warranty for WEATHER GUARD®
products on paint is not applicable on refin-
ished products.
1. Sand the surface to be painted with 180-200
grit sand paper to rough up the surface. This
should be followed by wet sanding with a 400
grit wet or dry paper.
2. Wipe down the sanded surface with ketone
based thinner. This removes the dust and soft-
ens the powder coating for better paint adhe-
sion.
3. Wipe sanded area with a tack rag to remove
loose dust and particles before painting.
NOTE: Do not use a lacquer over the
powder coating
INSTALLATION PROCEDURE USING BLIND FASTENERS
WARNING
Prior to drilling, so as not to
cut or puncture fuel tanks,
fuel lines, brake lines, electric
wires, etc., check under vehi-
cle for locations.
Black
Oxide
Bolt
Flat
Washer
9/16
Wrench
Installation
Tool
Blind
Fastener
Place a drop of oil on the black oxide bolt
before assembling as shown on right. Place
the Blind Fastener in the hole and use a
1/2 or 7/16 wrench to tighten black hex
bolt until the blind fastener is fully seated.
When setting black hex bolt, it will start out
hard. As the Blind Fastener bulbs out it
will get easier, until it bottoms out or sets.
Make sure the Blind Fastener and Installa-
tion Tool do not turn during installation.
WARRANTY WILL BE VOID IF
SEALANT IS NOT APPLIED TO
ALL SEAMS AND CREVICES
STEP 12.
Sealant.
Seal all nuts, bolts, and crossmember to
sleeve seam with sealant.
Part No. 24-0132 REV. B ECN 5315 05/13