Warning, Step 7, Step 11 – WEATHER GUARD 1245 User Manual
Page 3: Step 10, Step 9, Step 8, Step 7. option, Step 6, Step 5
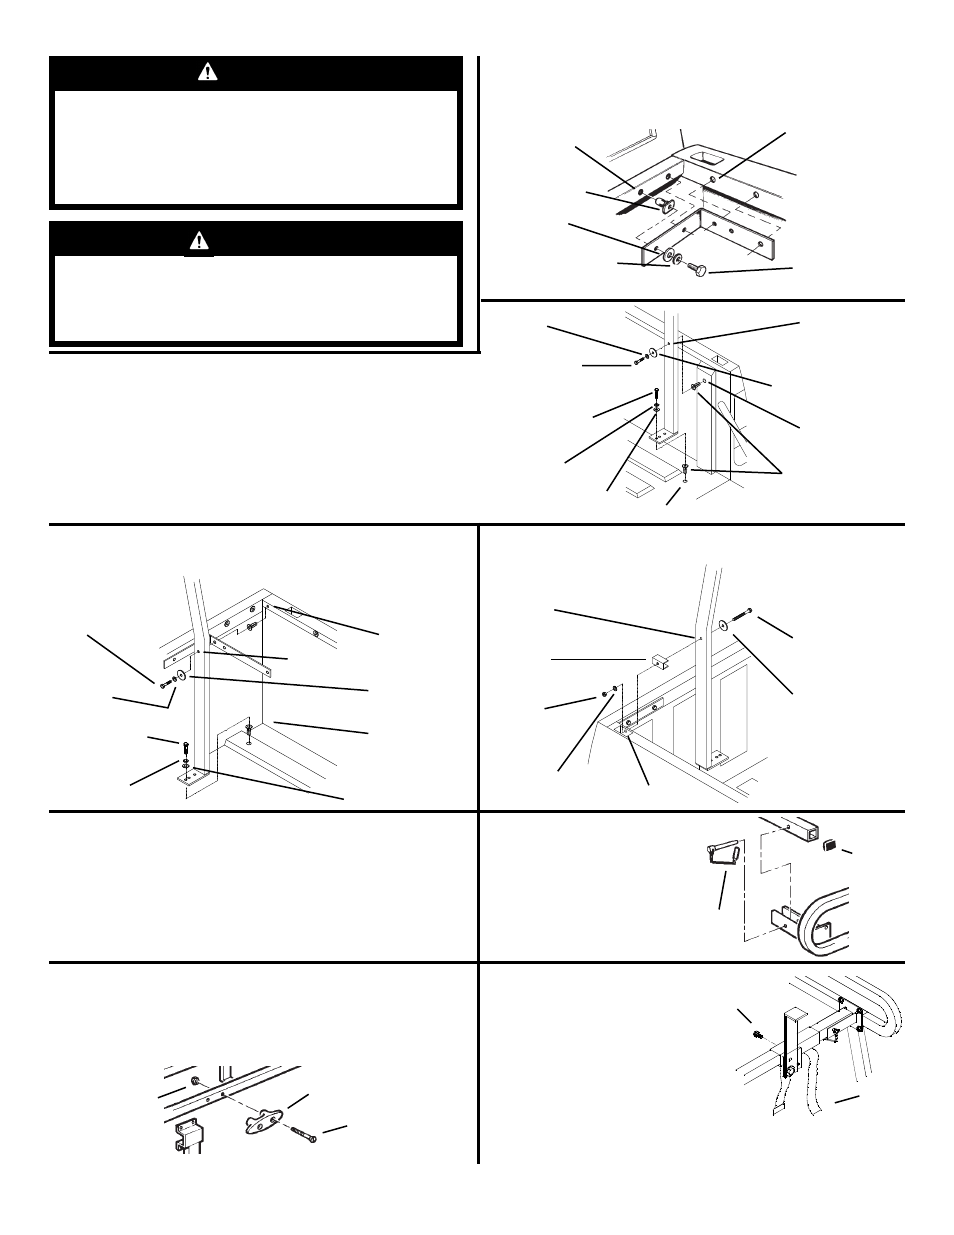
STEP 7.
Front leg installation.
(See STEP 7. Option for installation due to obstructions in the bed
floor.)
Tie Down
10-24 Nylon
Lock Nut
10-24 x 2-3/4"
Flat Head Screw
STEP 11.
Ladder Stop.
Remove rear Cross-
member and slide Ladder
Stop onto it. Install Crossmem-
ber on rack. With a Ladder on the
rack, locate the Ladder Stop inside
of the ladder and then secure. Insert a
strap through the loop on the Ladder
Stop and on the front Crossmember
Socket. Refer to the warning decal on
the Ladder Stop.
STEP 10.
Tie Downs.
Install four Tie Downs where desired. We suggest putting
sealant on the back of the tie downs and under nuts before
installing.
STEP 9.
Rear Crossmember.
Drill a 3/8" hole through the
sleeve and crossmember to
accept the insertion of the
Latch Pin. The wire loop of
the latch pin swings around
the sleeve and over the end
of the pin.
STEP 8.
Tightening fasteners.
Tighten all nuts and bolts in the following order:
First - leg bolts. Tighten evenly so crossmember sleeves stay
parallel. (Start with rear legs)
Second - top of legs to rails, center and rear. Make sure bolts
are evenly tightened.
Third - crossmembers (center and front only).
Square
Cap
Plug
Latch
Pin
3/8" Holes
3/8" Hole
5/16-18 x 2-3/4"
Hex Hd. Bolt
2" Dia. Leg
Washer
5/16-18
Nylon
Lock Nut
5/16" Flat
Washer
5/16-18 x 1-1/4"
Hex Hd. Bolt
5/16" Lock
Washer
5/16" Flat Washer
5/16-18 Blind
Fastener
5/16-18 x 2"
Hex Hd. Bolt
5/16" Lock
Washer
2" Dia. Leg
Washer
3/8" Hole
1/2" Hole
WARNING
Prior to drilling, so as not to cut or puncture fuel
tanks, fuel lines, brake lines, electric wires, etc.,
check under vehicle for locations.
STEP 7. Option -
Front Leg Spacers are provided.
STEP 6.
Rear leg installation.
For maximum strength, the rear legs must be bolted to the tailgate
stops (as shown).
A) Before drilling leg mounting holes, use a framing square to in-
sure accuracy of alignment.
B) Fasten leg to floor and leg to side.
2" Dia. Leg Washer
5/16" Lock
Washer
5/16-18 x 2"
Hex Hd. Bolt
5/16-18 Blind
Fastener
1/2" Hole
3/8" Hole
1/2" Hole
5/16" Flat Washer
5/16" Lock
Washer
5/16-18 x 1-1/4"
Hex Hd. Bolt
WARNING
All floor mounting bolts near the gas tank area
should be installed from the underside of the ve-
hicle, to guard against the gas tank being punc-
tured in the event of a collision. This would mean
not using Blind Fasteners in this area.
3
Front Leg
Spacer
Install this
bolt when using
Step 7 Option
5/16" Lock Washer
5/16-18
Blind Fastener
5/16" Flat
Washer
1/2" Hole
STEP 5.
If the manufacturers reinforcing kit is not required on
your vehicle, install two Bed Reinforcing Brackets.
See Blind Fastener instructions for installation.
5/16-18 x 1-1/4"
Hex Head Bolt
3/8-16 x 3/4"
Thread Cutting
Bolt
Strap