Hydraulic system, Adding hydraulic fluid, Rear drive transmission – Diamond Products CC6566 User Manual
Page 35: Cooling fan, Adding oil, Adjusting the rear drive chain
CC6566 - CC6566-3 Concrete Saw Manual
Hydraulic System
WARNING
Turn the engine off prior to performing
maintenance on the hydraulic system.
Lower the saw to the floor so it is level to
release the pressurized hydraulic fluid in
the hydraulic system prior to performing
maintenance on the hydraulic system.
Always place a piece of
cardboard or paper up
against hydraulic
components, or use a leak
detection fluid to check for hydraulic fluid
leaks. Keep all body parts away from leaks
and/or areas that may eject hydraulic fluid.
Pressurized hydraulic fluid can penetrate
the skin, causing serious injuries. Seek
medical attention immediately!
Adding Hydraulic Fluid
Check the hydraulic fluid level regularly and add
fluid as necessary.
1. Remove the hydraulic pump cover plate.
2. Lower the saw to the ground so it is level (to
provide an accurate fluid reading).
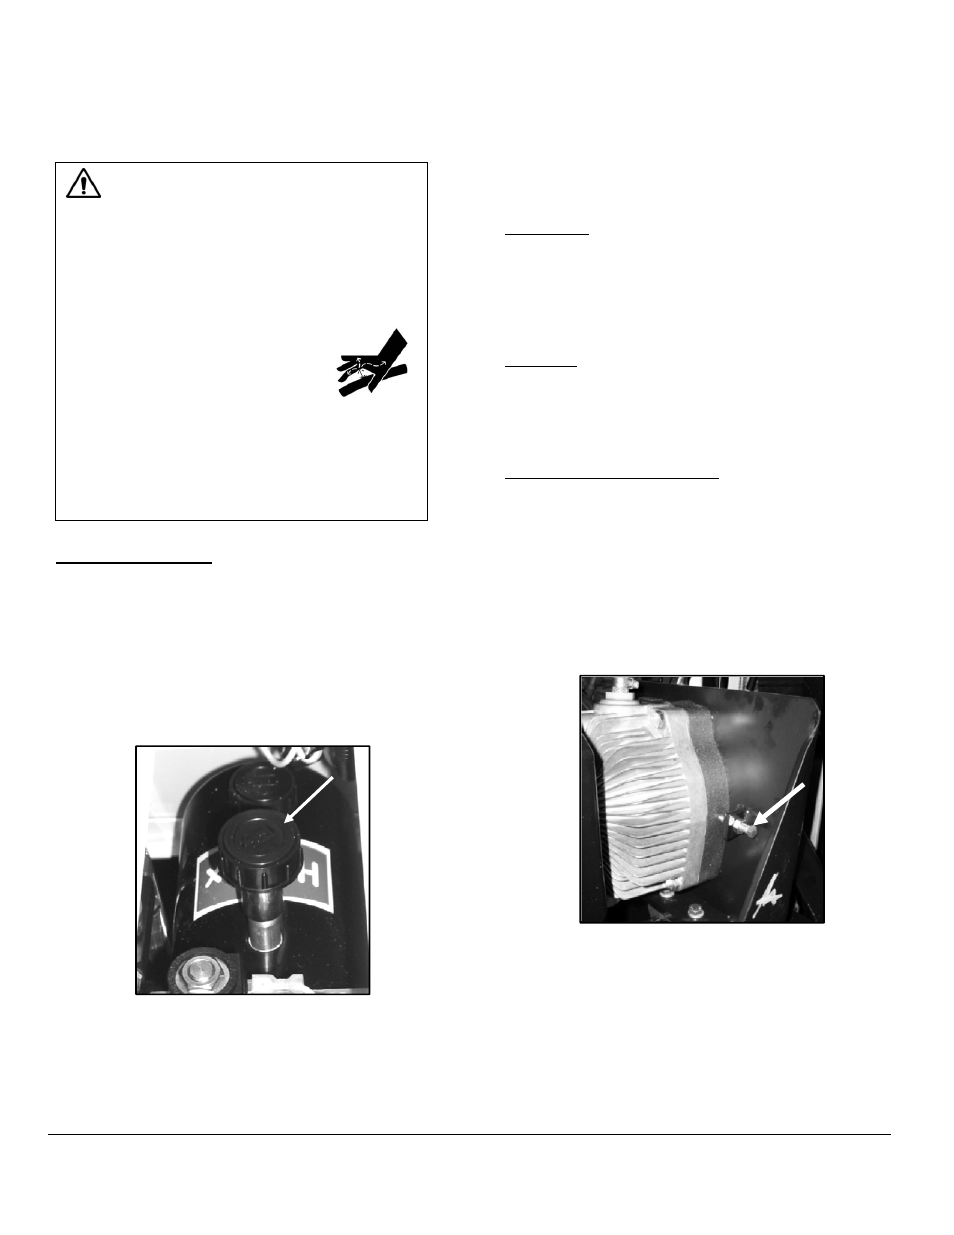
3. Remove the breather cap on the top of the
hydraulic pump unit.
Figure 54: Breather Cap
4. Add ATF as necessary. Note: Filling the oil up
to the opening of the pipe will cause fluid to leak
from the cap when lowering the saw. Fill the oil
to just below where the pipe begins to extend
out from the hydraulic pump unit to prevent
spills.
Rear Drive Transmission
Cooling Fan
Remove the fan guard and wipe down or use
compressed air to clean debris and slurry from
the transmission cooling fan. The transmission
oil will not properly cool if the fan is clogged
with concrete dust and debris.
Adding Oil
The hydraulic pump unit supplies oil to the
transmission. Check the oil level daily and/or
regularly and add ATF, according to the
instructions in the section, as necessary.
Adjusting the Rear Drive Chain
Regularly inspect the rear drive chain and tighten
as necessary. Regularly lubricate the rear drive
chain with oil to increase chain life.
1. Remove the chain guard.
2. Loosen the four transmission lock nuts securing
the transmission to the transmission platform.
3. Loosen the setscrew hex nut at the midpoint of
the transmission platform.
Figure 55: Transmission Setscrew
4. Turn the setscrew clockwise to push the
transmission forward in the platform slots.
Leave a little bit of slack in the chain, and DO
NOT over-tighten it.
5. Retighten the hex nut to secure the
transmission setscrew.
35