Attach the emergency release rope and handle, Install the single button control station, Installation step 4 – Controlled Products Systems Group 3950 User Manual
Page 8: Installation step 3, Warning
8
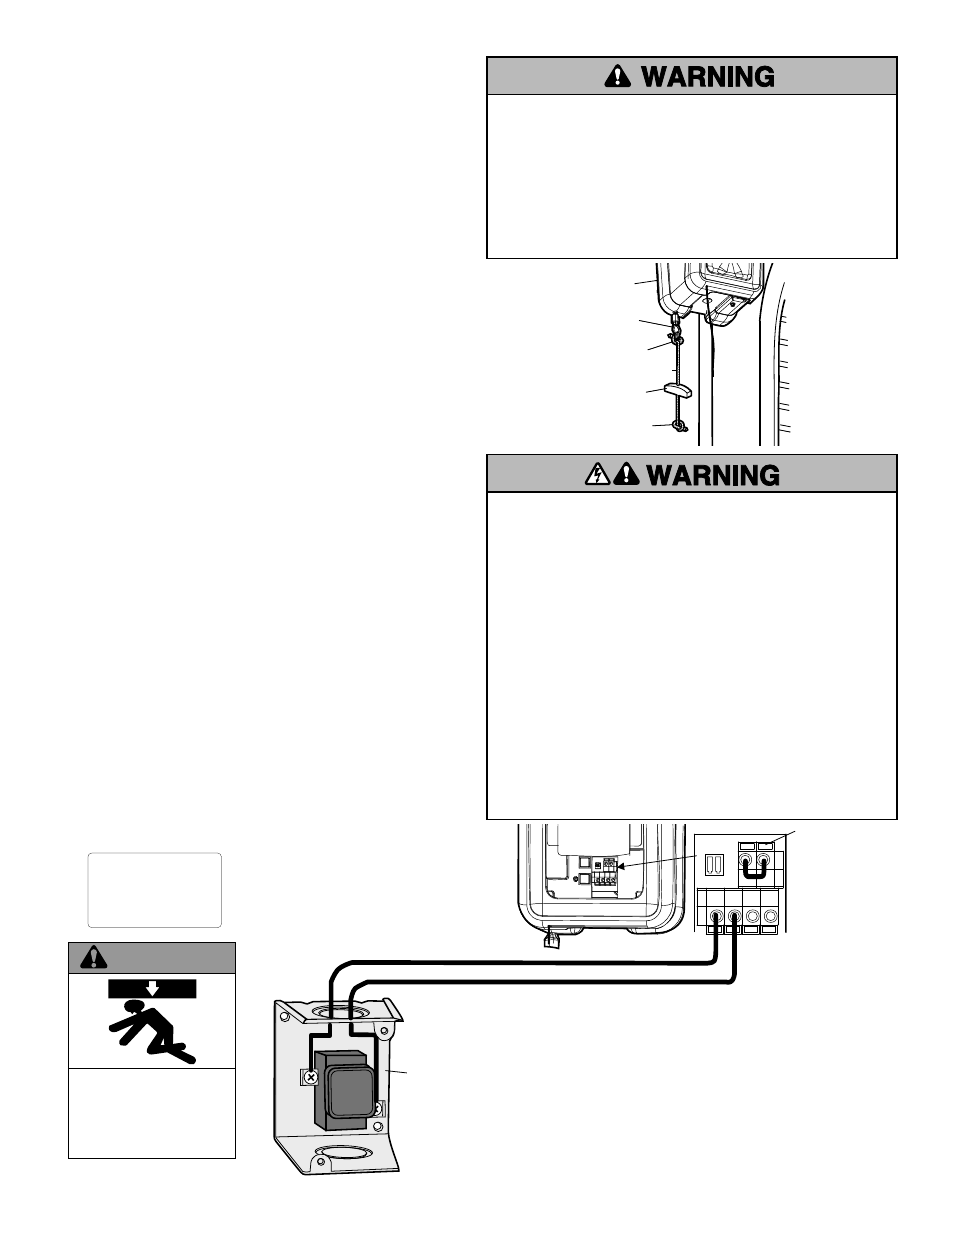
WHT/RED
WHT
Door Control
Connections
Single Button Control Station
INSTALLATION STEP 4
Install the Single Button Control Station
1. Remove the control station cover.
2. Fasten the control station to the wall at least 5 feet (1.5 m)
above the ground. The installation surface must be smooth
and flat.
3. Select appropriate knockout and run the wires to the operator.
4. Connect wires to the control station and replace the control
station cover.
5. Fasten the warning placards to the wall.
To prevent possible SERIOUS INJURY or DEATH from
electrocution:
• Be sure power is not connected BEFORE installing door
control.
• Connect ONLY to 24 VOLT low voltage wires.
To prevent possible SERIOUS INJURY or DEATH from a
closing door:
• Install door control within sight of door, out of reach of
children at a minimum height of 5 feet (1.5 m) and away
from ALL moving parts of door.
• NEVER permit children to operate or play with door control
push buttons or remote controls.
• Activate door ONLY when it can be seen clearly, is properly
adjusted and there are no obstructions to door travel.
• ALWAYS keep door in sight until completely closed. NEVER
permit anyone to cross path of closing door.
Factory installed
jumper must be in
place for proper
operation. Operator
will not function
without the jumper.
NOTI
CE
Overhand
Knot
Emergency
Release Handle
Overhand
Knot
Rope
Motor Unit
Emergency
Release Cable
To prevent possible SERIOUS INJURY or DEATH from a falling
door:
• If possible, use emergency release handle to disengage door
ONLY when door is CLOSED. Weak or broken springs or
unbalanced door could result in an open door falling rapidly
and/or unexpectedly.
• NEVER use emergency release handle unless doorway is
clear of persons and obstructions.
INSTALLATION STEP 3
Attach the Emergency Release Rope and Handle
1. Thread one end of the rope through the hole in the top of the
red handle so “NOTICE” reads right side up as shown. Secure
with an overhand knot at least 1" (2.5 cm) from the end of the
rope to prevent slipping.
2. Thread the other end of the rope through the loop in the
emergency release cable.
3. Adjust rope length so the handle is no higher than 6 feet
(1.83 m) above the floor. Secure with an overhand knot.
NOTE: If it is necessary to cut the rope, heat seal the cut end with
a match or lighter to prevent unraveling.
132A2112-2
DO NOT EXCEED 10 DOOR OPERATIONS
PER HOUR.
FASTEN LABEL ADJACENT TO DOOR.
NE PAS FAIRE FONCTIONNER LA PORTE
PLUS DE 10 FOIS PAR HEURE.
FIXER L’ÉTIQUETTE PRÈS DE LA
PORTE.
WARNING
Keep Door in Sight at all Times When Door is Moving
Moving Door Can Cause
Serious Injury or Death
Keep Clear! Door May Move at any Time
Without Prior Warning
Do Not Let Children Operate the Door or Play
in the Door Area