Controlled Products Systems Group BX3 User Manual
Model bx series, Single channel loop detectors
Model BX Operating Instructions 04-21-05
4
Reno A & E P/N 551-2900-02
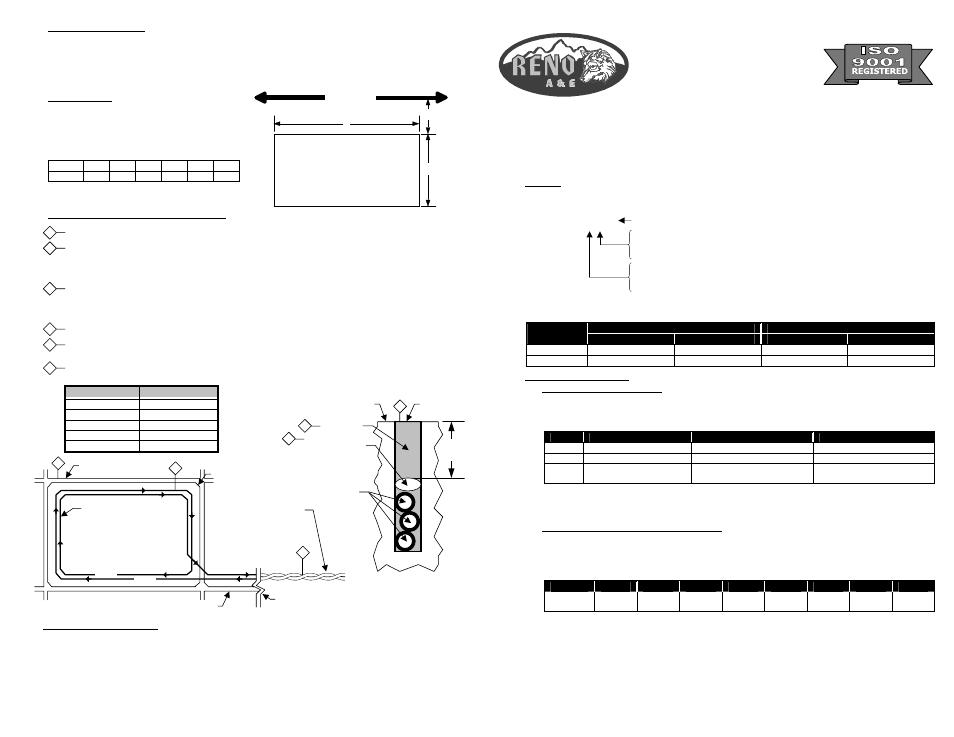
VIII. L o o p I n s t a l l a t i o n :
The vehicle detection characteristics of an inductive loop detector are greatly influenced by the loop size and
proximity to moving metal objects such as gates. Vehicles such as small motorcycles and high bed trucks can
be reliably detected if the proper size loop is selected. If the loop is placed too close to a moving metal gate, the
detector may detect the gate. The diagram below is intended as a reference for the dimensions that will
influence the detection characteristics.
General Rules:
1. The detection height of a loop is 2/3 the shortest leg
(A or B) of the loop. Example: Short leg = 6 feet,
Detection Height = 4 feet.
2. As the length of leg A is increased, distance C must
also increase.
3. For reliable detection of small motorcycles, legs A
and B should not exceed 6 feet.
L o o p I n s t a l l a t i o n - S a w C u t T y p e
1
Mark the loop layout on the pavement. Remove sharp inside corners that can damage the loop wire insulation.
2
Set the saw to cut to a depth (typically 2" to 2.5") that ensures a minimum of 1" from the top of the wire to pavement
surface. The saw cut width should be larger than the wire diameter to avoid damage to the wire insulation when placed
in the saw slot. Cut the loop and feeder slots. Remove all debris from the saw slot with compressed air. Check that the
bottom of the slot is smooth.
3
It is highly recommended that a continuous length of wire be used to form the loop and feeder to the detector. Loop
wire is typically 14, 16, 18, or 20 AWG with cross-linked polyethylene insulation. Use a wood stick or roller to insert the
wire to the bottom of the saw slot (do not use sharp objects). Wrap the wire in the loop saw slot until the desired
number of turns is reached. Each turn of wire must lay flat on top of the previous turn.
4
The wire must be twisted together a minimum of 6 twists per foot from the end of the saw slot to the detector.
5
The wire must be held firmly in the slot with 1" pieces of backer rod every 1 to 2 feet. This prevents the wire from
floating when the loop sealant is applied.
6
Apply the sealant. The sealant selected should have good adhering properties with contraction and expansion
characteristics similar to those of the pavement material.
O P E R A T I N G I N S T R U C T I O N S F O R
Model BX Series
SINGLE CHANNEL LOOP DETECTORS
I.
General:
Please verify source voltage before applying power. The model designation indicates the input power required,
output configuration, and Fail-Safe / Fail-Secure configuration for the detector as follows.
Model BX-x-xx-x
Blank = Fail-Safe, S = Fail-Secure
Blank = Conventional Outputs
RO = Reversed Outputs
E = Euro Outputs
3 = 120 VAC
4
= 12 VDC / 24 VDC / 24 VAC
8
= 240 VAC
The detector is factory configured for either Fail-Safe or Fail-Secure operation (see unit side label). The output
state of each output relay in either Fail-Safe or Fail-Secure mode is listed in the table below.
Fail-Safe
Fail-Secure
Relay
Power Failure
Loop Failure
Power Failure
Loop Failure
A
Call
Call
No Call
No Call
B
No Call
No Call
No Call
No Call
II.
Indicators and Controls:
i.
Power / Detect / Fail LEDs:
The detector has one green and two red LED indicators that are used to provide an indication of the
detector’s power status, output state, and/or loop failure conditions. The table below lists the various
indications and their meanings.
Status
PWR (Power) LED
DET (Detect) LED
FAIL LED
Off
No power or low power
Output(s) Off
Loop OK
On
Normal power to detector
Output(s) On
Open Loop
Flash
N/A
4 Hz - Two second timing
delay activated
1 Hz - Shorted Loop
3 Hz - Prior Loop Failure
Note: If the supply voltage drops below 75% of the nominal level, the PWR LED will turn off, providing a
visual indication of low supply voltage. Model BX detectors will operate with supply voltage as low as 70%
of nominal supply voltage.
ii. Front Panel Rotary Switch (Sensitivity):
The eight-position rotary switch selects one of eight (8) sensitivity levels as shown in the table
below. 0 is lowest and 7 is highest, with normal (factory default) being 3. Use the lowest sensitivity
setting that will consistently detect the smallest vehicle that must be detected. Do not use a sensitivity level
higher than necessary.
Position
0
1
2
3 *
4
5
6
7
-
∆L/L
1.28% 0.64% 0.32%
0.16%
*
0.08% 0.04% 0.02% 0.01%
* Factory default setting.
A =
6 ft
9 ft
12 ft
15 ft
18 ft
21 ft
C =
3 ft
4 ft
4.5 ft
5 ft
5.5 ft
6 ft
1
3
1/8" to 1/4" SAW SLOT
THE WIRE IS
CONTINUOUSLY WOUND
IN THE LOOP SAW SLOT
FOR THE REQUIRED
NUMBER OF TURNS (2
turns shown)
turn 2
turn 1
REMOVE SHARP
INSIDE CORNERS
FEEDER SLOT
END OF SAW CUT
4
THE WIRES MUST BE
TWISTED TOGETHER
6 TWISTS PER FOOT
FROM THE END OF
THE SAW CUT TO
THE DETECTOR
Recommended Loop Wire:
Reno LW-120 for 1/8" slots
Reno LW-116-S for 1/4" slots
ROAD SURFACE
MIN
1"
SAW SLOT
SEALANT
BACKER ROD
1" piece spaced
about every 1'
LOOP WIRE
3 TURNS
2
6
5
LOOP PERIMETER NUMBER OF TURNS
10 feet - 13 feet
5
14 feet - 26 feet
4
27 feet - 45 feet
3
46 feet - 100 feet
2
100 feet and up
1
A
B
C
A = Loop dimension parallel to the gate
B = Loop dimension perpendicular to the gate
C = Distance of the loop from the gate
SLIDE GATE
Reno A & E
4655 Aircenter Circle
Reno, NV 89502-5948 USA
Telephone: (775) 826-2020
Fax: (775) 826-9191
Website: www.renoae.com
E-mail: [email protected]