Extron Electronics ISM 182 User Manual
Page 33
3-11
Integration Scaling Matrix Switcher • Operation
Advanced Configuration menu
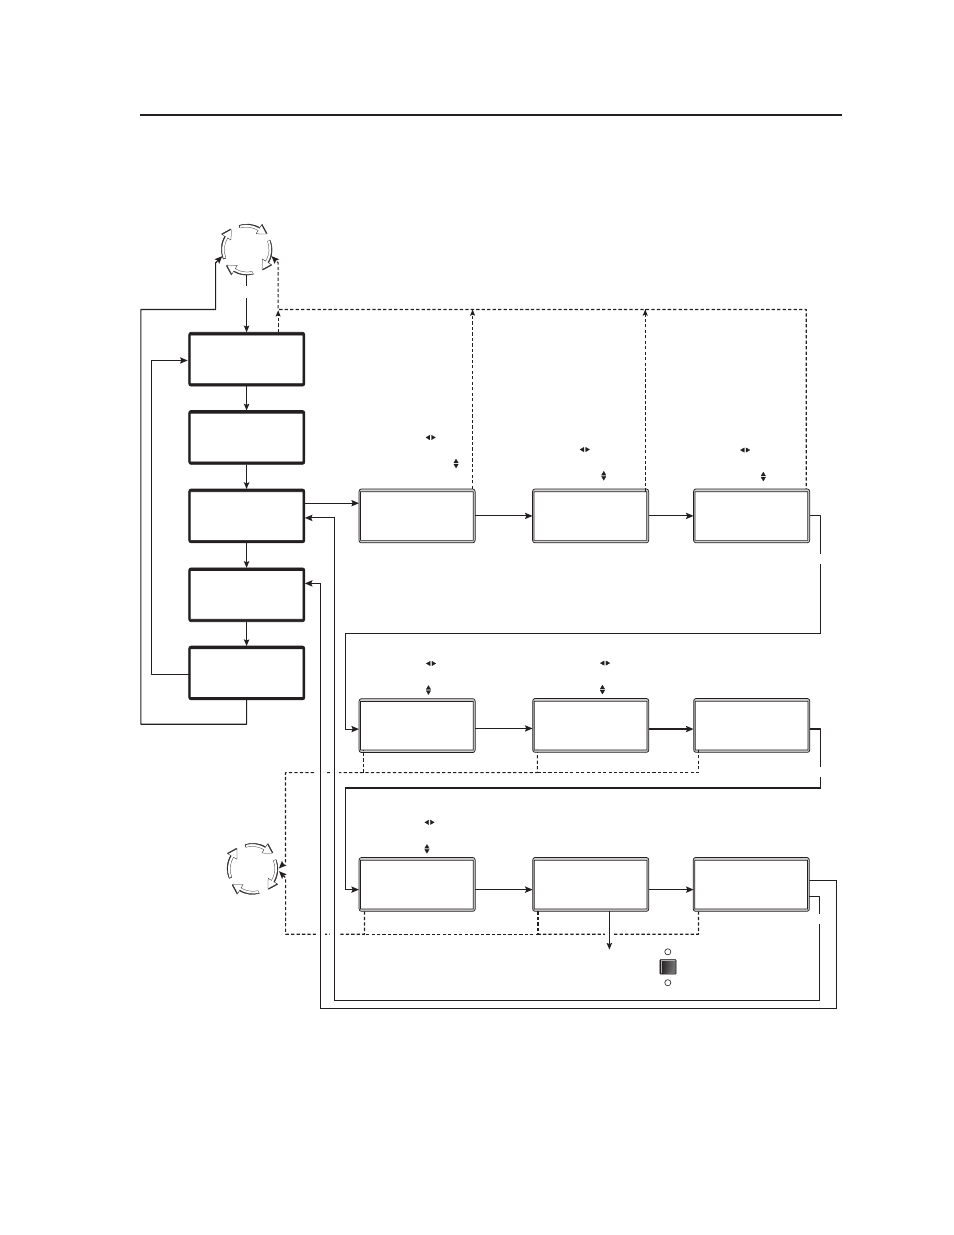
Figure 3-10 is a flowchart that shows an overview of the Advanced Configuration
menu, the submenus, and the available settings.
Default
Cycle
Default
Cycle
Menu
Menu
Next
10 sec.
10 sec.
Video & Audio
Configuration
Test Pattern
Color Bars
Out #1 Out # 2
Off Off
Blue Only Mode
Off
Edge Smoothing
Output #2
Menu
Output
Configuration
Menu
Advanced
Configuration
Menu
User Presets
Menu
Next
Exit Menu
Press Next to Exit
Menu
10 sec.
Output #1 Blanking
Top Bottom
000 000
RGB Delay
Out #1 0.
8
Seconds
Out #2 0.5 Seconds
Auto Imaging
<
Off
>
On
Auto Memories
<
Off
>
On
Enhanced Mode
<
Off
>
On
Pixel Phase
Out #1 Out # 2
000 000
Reset Unit?
Press and Hold
BLACK/MUTE
To Reset
10 sec.
Next
Set test pattern type
• Color Bars
• Crosshatch
• 4x4 crosshatch
• Grayscale
• Crop
• Alternating pixels
• Film aspect 1.78
• Film aspect 1.85
• Film aspect 2.35
• Ramp
Select the output 1 delay
with the Adjust knob.
Select the output 2 delay
with the Adjust knob.
Change this submenu
with either Adjust knob.
Select a test pattern
with the Adjust knob.
Select preview/program
off/on with the Adjust
knob.
Select blue mode with
the Adjust knob.
Select edge smoothing
with the Adjust knob.
Display blue and sync only
• Off (default), Input 1,
Input 2, Both
Edge smoothing
• Off (default), Input 1,
Input 2, Both
To reset the scaler, press and
hold the Black button until
the reset message appears.
*Adjust knobs do not affect
this submenu.
Press an output button
to select an output.
Select top blanking with
the Adjust knob.
Select bottom blanking
with the Adjust knob.
Next
Next
Next
Next
Next
Next
Next
Select auto imaging
with the Adjust knob.
Select auto presets
with the Adjust knob.
Set the output 1 pixel phase
with the Adjust knob.
Set the output 2 pixel phase
with the Adjust knob.
10 sec.
10 sec.
10 sec.
10 sec.
PAL Film Mode
Input #2
<
Off
>
On
Next
10 sec.
10 sec.
10 sec.
If necessary, select
another input and
repeat.
2
2
Select an input.
Set the PAL film mode
on or off with either
Adjust knob.
Figure 3-10 — Advanced Configuration menu flowchart