Calibration troubleshooting, Installation guide current monitoring h808 – Veris Industries H808 Install User Manual
Page 4
Z201763-0F
Page 4 of 4
©2013 Veris Industries USA 800.354.8556 or +1.503.598.4564 / [email protected] 07131
Alta Labs, Enercept, Enspector, Hawkeye, Trustat, Aerospond, Veris, and the Veris ‘V’ logo are trademarks or registered trademarks of Veris Industries, L.L.C. in the USA and/or other countries.
Other companies’ trademarks are hereby acknowledged to belong to their respective owners.
Installation Guide
Current Monitoring
H808
TM
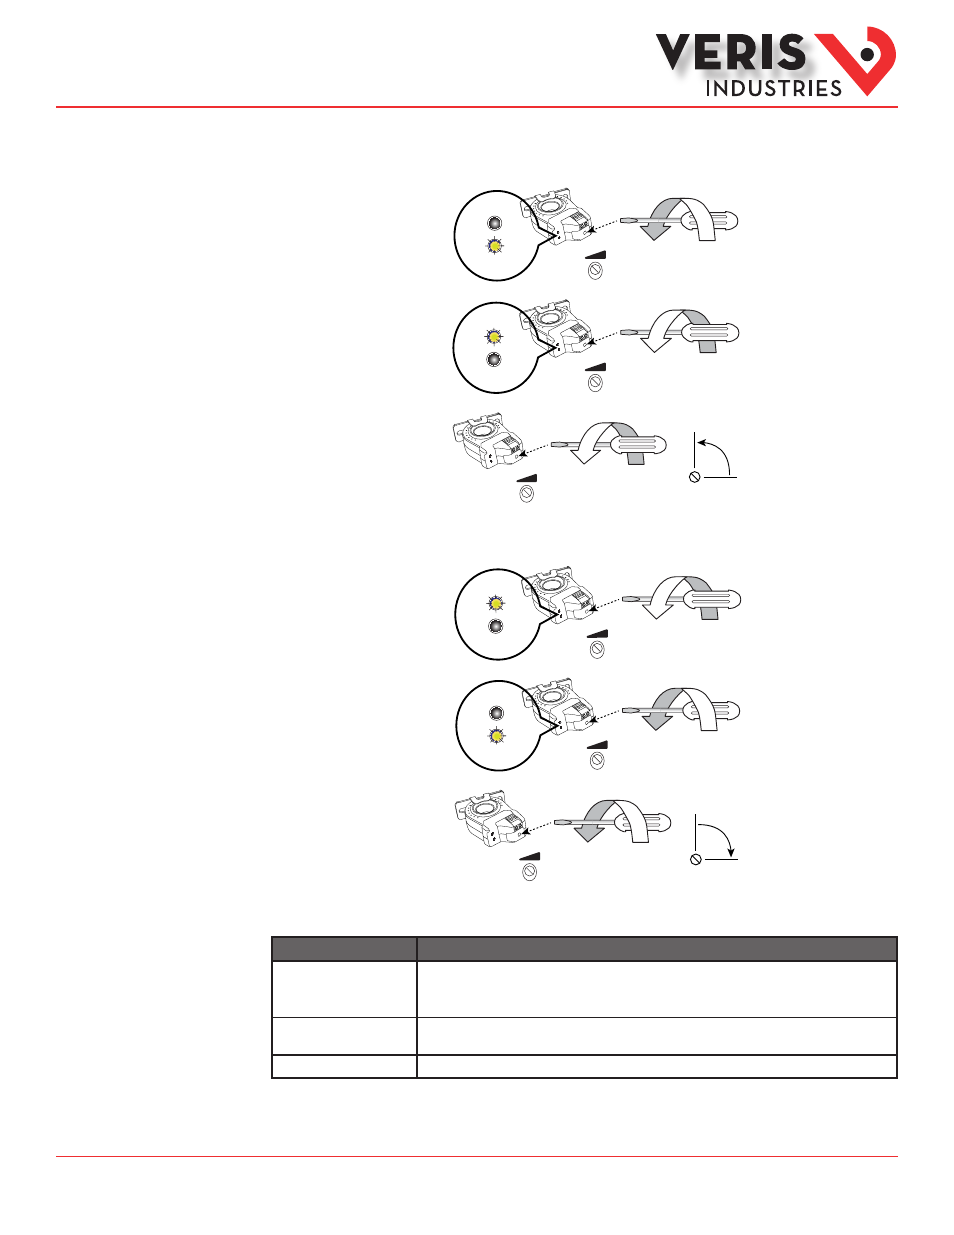
Before beginning calibration, establish normal load conditions. Then choose either A or B below.
A. To monitor under-current (belt loss, coupling shear, status)
1. Turn setpoint screw clockwise
until Status Open LED turns
on.
Status
Closed
Status
Open
Setpoint
2. Slowly turn the screw counter
clockwise until the Status
Closed LED turns on.
Status
Closed
Status
Open
Setpoint
3. Turn the screw an additional
¼ turn counter clockwise for
operational margin.
Setpoint
¼
B. To monitor over-current (mechanical problems, seized impeller)
1. Turn setpoint screw counter
clockwise until Status Closed
LED turns on.
Status
Closed
Status
Open
Setpoint
2. Slowly turn the setpoint screw
clockwise until the Status
Open LED just turns on.
Status
Closed
Status
Open
Setpoint
3. Turn the setpoint screw an
additional ¼ turn clockwise
for operational margin.
Setpoint
¼
Calibration
Troubleshooting
Problem
Solution
No Reading at Controller
• Check sensor calibration (see above)
• Check for control power at sensor (<30VDC)
• Check for amperage in monitored conductor (>0.75A)
Setpoint screw has no stops
• The setpoint screw has a slip-clutch at both ends of its travel to avoid damage. Twenty turns CCW will reset
the sensor to be most sensitive. Repeat calibration above.
Both LEDs are lit
Unit is out of calibration. Turn screw 20 turns CCW and recalibrate.