Installation guide, Test points and setup verification, Calibration-free sensor – Veris Industries HO SerieS Install User Manual
Page 3
Z201382-0X
PAGE 3
©2011 Veris Industries USA 800.354.8556 or +1(0)503.598.4564 / [email protected]
02112
Alta Labs, Enercept, Enspector, Hawkeye, Trustat, Veris, and the Veris ‘V’ logo are trademarks or registered trademarks of Veris Industries, L.L.C. in the USA and/or other countries.
TM
HO SERIES
INSTALLATION GUIDE
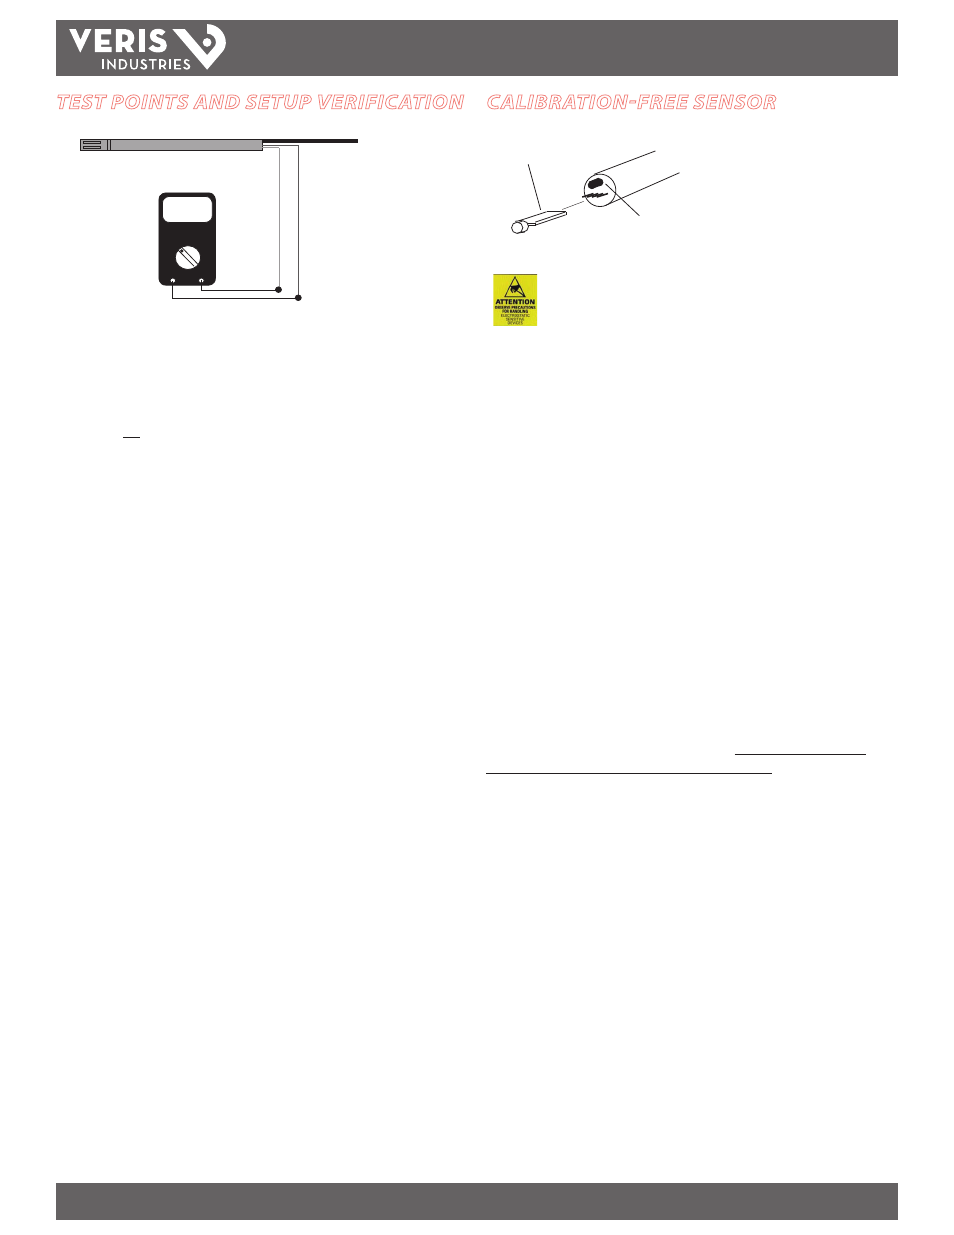
For 4–20 mA versions: Test leads output 0-1VDC corresponding to 0 to 100% RH
sensor reading. For example, a 0.42 VDC output on test points equals 42% RH sensor
reading. These test points also provide an output that verifies mother board accuracy
when the HS element is removed. CONNECT TEST POINT LEADS TO VOLTMETER ONLY.
This output is not suitable for connection to a DDC panel.
To check motherboard functionality using the test leads, remove sensor element. 1.0
VDC reading verifies motherboard functionality.
To verify sensor accuracy, de-power unit and insert a replacement HS element.
Repower unit and compare readings to original sensor. For example, if test points
read 0.40VDC (40% RH) with original sensor, and 0.45VDC (45% RH) with new
replacement sensor, the original sensor is 5% off specification. This method of
ensuring accuracy offers more precision than using slings or other devices, and it
eliminates the need to manually adjust sensors to an unstable standard.
Note: Temperature, body sweat, and breath effect humidity. Ensure that conditions
are stable to evaluate performance.
Filter may be washed using warm water and soft brush. Do not attempt to scrub HS
element.
For 0-5V/0-10V versions, use output as test point and scale accordingly.
Test leads and voltmeter
verify accuracy and sim-
plify DDC programming
1VDC
0.42
WH
ITE (
+)
GR
EY
(--)
Voltmeter shows reading of 42% RH
TEST POINTS AND SETUP VERIFICATION
Replaceable HS Element
Optional
Temp sensor
To replace HS Element
1. Disconnect power to the unit.
2. Remove probe from junction box by loosening black swage nut and sliding out.
3. Removed HS element by unscrewing probe filter tip and gently pulling sensor
board from jack. Do not attempt to remove black temperature sensor next to
board.
4. Install new HS element, observing orientation such that filter tip can be
reinstalled.
CALIBRATION-FREE SENSOR
The microprocessor-profiled
capacitive HS element can be
replaced in the field without
calibration.
Replacement HS Element Ordering Information
HS2xxx Replacement 2% HS Element, Duct
HS3xxx Replacement 3% HS Element, Duct
HS4xxx Replacement 5% HS Element, Duct
HS1Nx
Replacement 1% HS NIST Element, Duct
HS2Nx
Replacement 2% HS NIST Element, Duct
Replacement filters are provided with all elements. Order appropriate element
accuracy to match motherboard accuracy for compatability.
Observe handling precautions for static sensitive
devices to avoid damage to the circuitry which
would not be covered under the factory warranty.