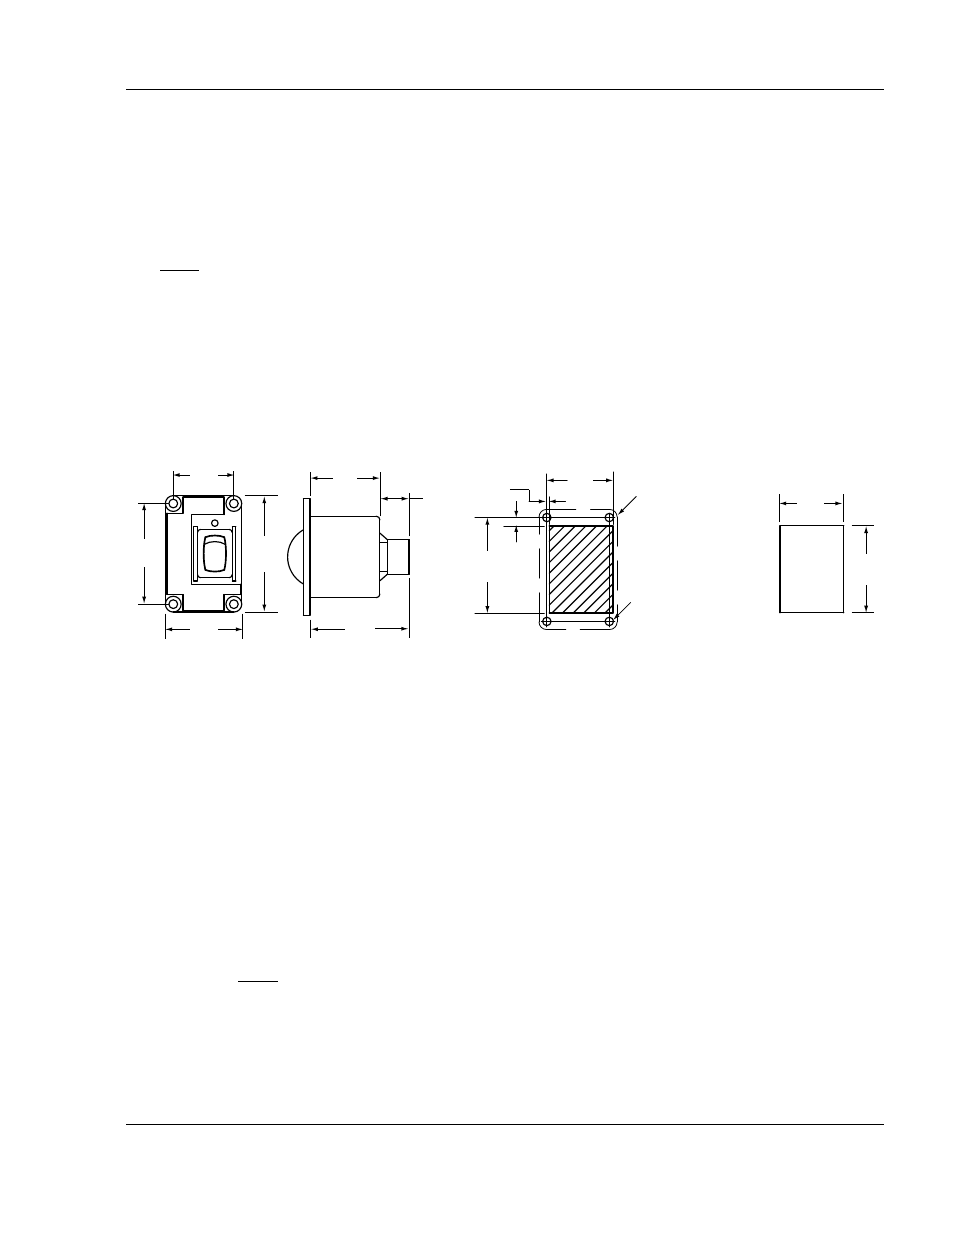
Remote switch, A. location, Figure 17. remote switch outline and dimensions – ACR&Artex ME406 Portable ELT User Manual
Page 57: B. installation
25-62-31
Page 57 of 85
JUN 25/13
ARTEX PRODUCTS / ACR ELECTRONICS, INC
DESCRIPTION, OPERATION, INSTALLATION AND MAINTENANCE MANUAL
ME406P (453-6611)
TASK 25-62-31-450-803
4. Remote Switch
SUBTASK 25-62-31-450-001
A. Location
NOTE: This procedure is applicable to the most commonly used remote switch (345-6196-04). If an
optional switch is installed in lieu of this one, the applicable installation instructions should be
consulted.
(1)
Select a suitable location for the remote switch assembly.
(2)
The switch assembly must be mounted in the cockpit where the pilot can easily reach the
switch and see the LED.
(3)
The switch assembly requires a space approximately 2.0 x 1.3 in. (51 x 33 mm) on the panel
surface and behind the panel. See Figure 17. Remote Switch Outline and Dimensions.
Figure 17. Remote Switch Outline and Dimensions
SUBTASK 25-62-31-450-002
B. Installation
(1)
Mark the cutout on the cockpit panel. See Figure 17. Remote Switch Outline and Dimensions.
(2)
Fit the switch assembly into the cutout and mark the four screw holes, then remove the
switch.
(3)
Drill the screw holes with a #28 or 3.6 mm drill.
(4)
Install the switch assembly using the hardware provided in the remote switch installation kit
(455-6196).
NOTE: Step 4 may be accomplished after wiring is completed and the harness plug has been
plugged into the switch assembly in accordance with the requirements of SUBTASK
25-62-31-450-010 on page 67. If such is the case, perform a fit check at this time.
(5)
Apply the “For Aviation Emergency Use Only/Unauthorized Use Prohibited” placard (591-
0428), provided in the installation kit, as close to the switch as practical.
1.10
(28)
0.044
(1.1)
0.140
(3.6)
1.59
(40)
OUTLINE OF REMOTE
SWITCH BODY
0.1405 (3.57) Ø
USE #28 (3.6) DRILL
(4 PLCS)
NOTE: HATCHED AREA
IS CUTOUT PATTERN
1.04
(26)
1.73
(44)
1.30
(33)
2.00
(51)
1.20
(30)
0.50
(13)
1.70
(43)
1.06
(27)
1.45
(37)
FRONT VIEW
SIDE VIEW
HOLE CUTOUT GUIDE FOR INSTALLATION
OF 345-6196-04 (FRONT VIEW)
RECOMMENDED
CUTOUT PATTERN
DIMENSIONS IN INCHES (MM)
ARTEX
ON
ARM
Press ON
Wait 1 Second
Press ARM
EMERGENCY USE ONL
Y
Test/Reset
ELT
TOLERANCE: ±0.03 (1)