Drawing boxes, Placing text at a location – Xerox 4450 User Manual
Page 76
SAMPLE FORM CREATION
Drawing boxes
Use the BOX command to construct individual, standalone boxes
or boxes that share common sides. You can also create a
shaded area or construct an invisible box to place “floating” text
such as titles conveniently.
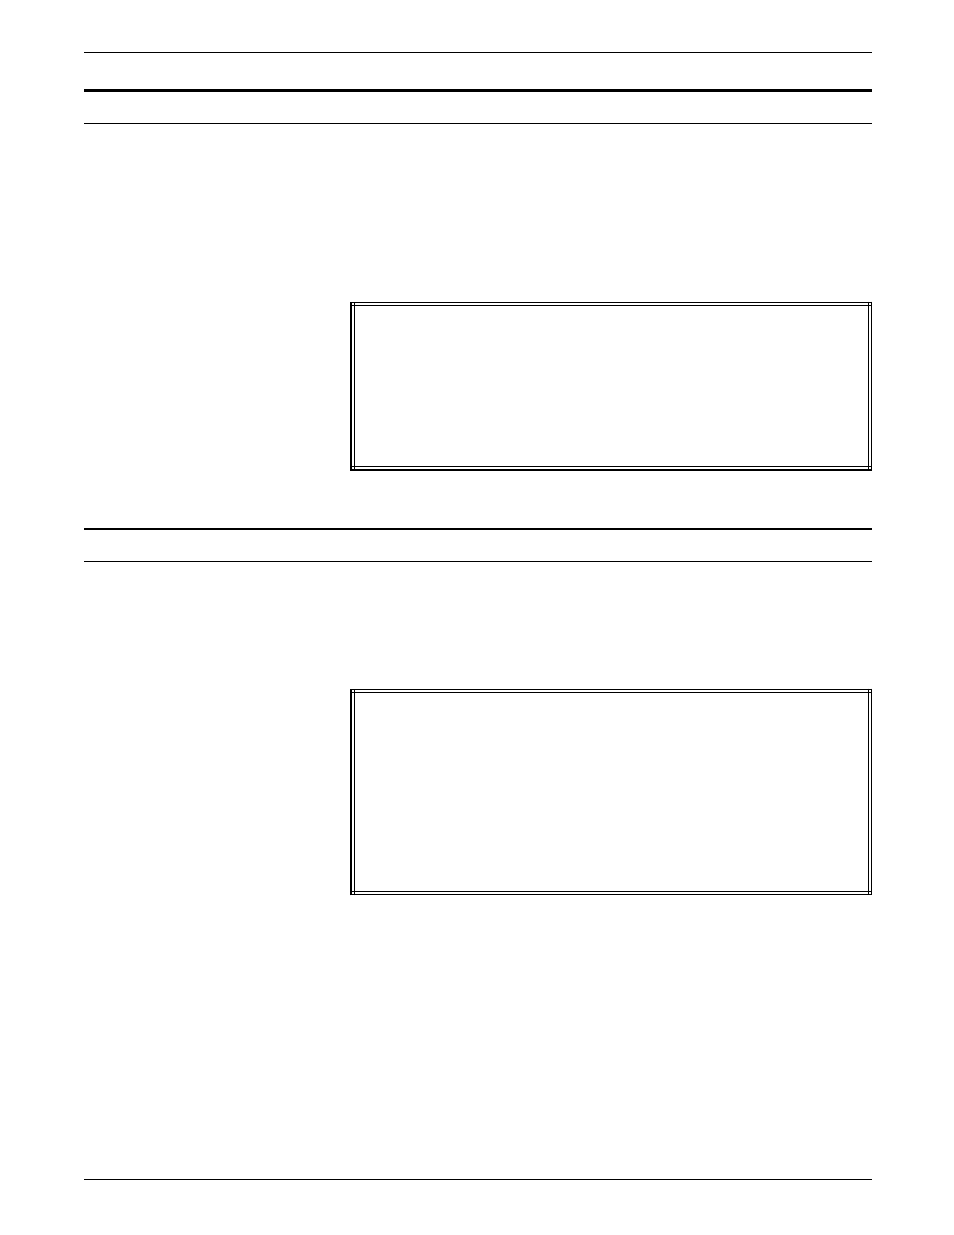
Enter the following COMMENT and BOX command, as shown in
figure C-6.
Figure C-6.
BOX command
COMMENT *** DRAW BOXES ***;
AT 2,2 DRAW BOX 35 WIDE BY 2 HIGH USI HAIRLINE;
AT 2,82 DRAW BOX 50 WIDE BY 2 HIGH USI HAI;
AT 5,0 DRAW BOX 132 WIDE BY 56 HIGH USI HAI;
AT 5.1,0 BOX 132 WIDE BY 1.8 HIGH USI SHADING;
AT 10.1,0 DRAW 9 BOXES 132 WIDE BY 2.8 HIGH USI SOL HAI
INK 'BLUE' AND FILL USING INK 'XEROX.PICTORIAL.PALE BLUE'
AND REPEAT VER EVE 6;
Placing text at a location
Use the TEXT AT command to place text at an exact location.
Enter the COMMENT and TEXT AT command, as shown in figure
C-7.
Figure C-7.
TEXT AT command
COMMENT *** TEXT AT COMMAND ***;
TEXT USING FONT 2 AT 2,2.5 'COMP.';
TEXT USING FONT 2 AT 2,11 'BR.';
TEXT USING FONT 2 AT 2,14 'DEPT.';
TEXT USING FONT 2 AT 2,22 'DATE';
TEXT USING FONT 2 AT 2,30 'PP';
TEXT USING FONT 2 AT 2,34 'PAGE';
TEXT USING FONT 1 INK 'BLUE' AT 3,47 'EARNINGS REGISTER';
TEXT USING FONT 2 AT 61,0 '7860-143-1';
VER TEXT USING FONT 3 AT 66,-5 'F8662';
C-4
XEROX 4050/4090/4450/4650 LPS FORMS CREATION GUIDE