Troubleshooting – Lochinvar ArmorX2 1.5 User Manual
Page 46
3
Troubleshooting
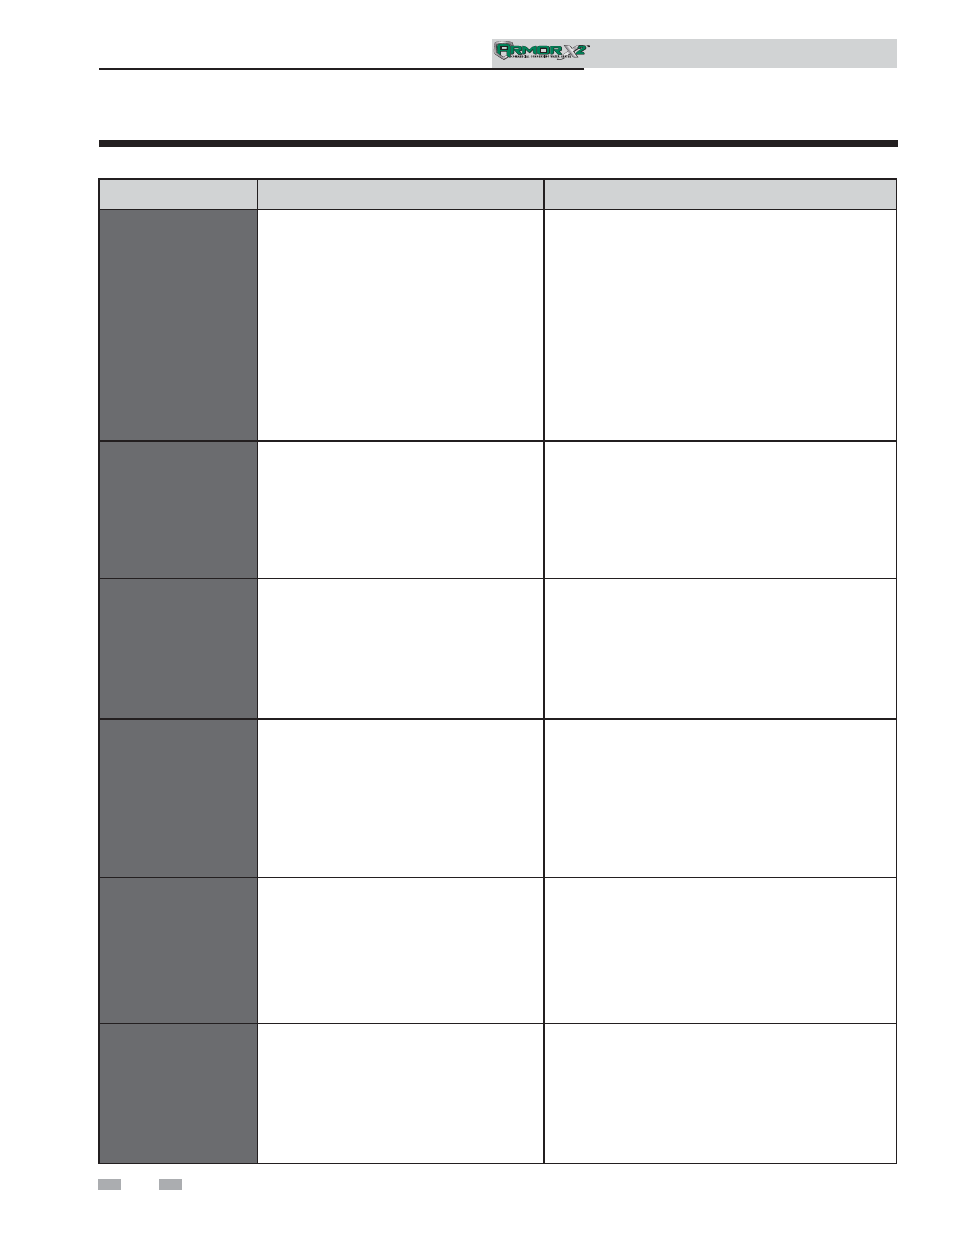
Table 3E (continued from previous page) Troubleshooting Chart - Fault Messages Displayed on Water Heater Interface
FAULT
DESCRIPTION
CORRECTIVE ACTION
Blower RPM’s
Too High
(will require a manual
reset once the condition
has been corrected. Press
the RESET button on the
display to reset.)
The actual fan rpm is 30% higher than what
is being called for.
• Vent/air intake lengths exceed the maximum allowed
lengths. Refer to Section 3 - General Venting of the
Armor X2 Installation and Operation Manual for
proper
lengths.
• Check for obstruction or blockage in the vent/air
intake pipes or at terminations.
• Check the wiring connections at the fan and at the
main control board.
• Replace the fan.
• Replace the main control board.
Sensor Open
(will require a manual
reset once the condition
has been corrected. Press
the RESET button on the
display to reset.)
Either the inlet water or outlet water
temperature sensor has been disconnected.
• Check the sensors and their associated wiring.
Repair or replace the sensor or wiring if damaged.
• Measure the resistance of the sensors and compare
the resistance to the tables on page 40 of this
manual.
• Replace the sensor if necessary.
Sensor Shorted
(will require a manual
reset once the condition
has been corrected. Press
the RESET button on the
display to reset.)
Either the inlet water or outlet water
temperature sensor has been shorted.
• Check the sensors and their associated wiring.
Repair or replace the sensor or wiring if damaged.
• Measure the resistance of the sensors and compare
the resistance to the tables on page 40 of this
manual.
• Replace the sensor if necessary.
Flue Sensor
Open / Removed
(will require a manual
reset once the condition
has been corrected. Press
the RESET button on the
display to reset.)
The flue sensor has been disconnected or
removed from the flue.
• Check the sensor and its associated wiring. Repair
or replace the sensor or wiring if damaged.
• Measure the resistance of the sensors and compare
the resistance to the tables on page 40 of this
manual.
• Replace the sensor in flue.
• Replace the sensor if necessary.
Flue Sensor
Shorted
(will require a manual
reset once the condition
has been corrected. Press
the RESET button on the
display to reset.)
The flue sensor has been shorted.
• Check the sensor and its associated wiring. Repair
or replace the sensor or wiring if damaged.
• Measure the resistance of the sensors and compare
the resistance to the tables on page 40 of this
manual.
• Replace the sensor if necessary.
Louver Proving
Switch
(will require a manual
reset once the condition
has been corrected. Press
the RESET button on the
display to reset.)
An optional remote proving switch is not
making.
• Check function of remote devices.
• Check for loose or misplaced jumper if proving switch
is not installed.
Service Manual
46