Adjusting picture quality – JVC DLA-G150CLE User Manual
Page 25
DLA-G150CLU
DLA-G150CLE
1-25
No.51931
49
Menu Operations
ENGLISH
DEUTSH
FRAN
ÇAIS
ITALIANO
ESPAÑOL
Adjusting Picture Quality
In the “Image adj.” submenu, adjust brightness, contrast, sharpness, etc. to obtain the desired picture quality. Note that the
adjustment items differ in Video menu mode and PC menu mode.
1
Press the MENU button.
The main menu appears on the screen.
2
Select “Image adj.” with the cursor button
5
5
5
5
or
∞
∞
∞
∞
, and press
3
3
3
3
or the ENTER button.
The “Image adj.” submenu appears on the screen.
Video submenu
PC submenu
3
Select the item to be adjusted with the cursor button
5
5
5
5
or
∞
∞
∞
∞
.
*“Color” and “Tint” are shown in Video submenu only.
4
Make adjustment with the cursor
2
2
2
2
or
3
3
3
3
.
*To adjust multiple items, repeat 3 and 4.
* : Factory set value
■
To perform All Reset
• In the Image adj. submenu, select “All reset” with the cursor button
5
or
∞
, and press the ENTER button. Then, the “All
reset” submenu appears on the screen.
• Press the cursor button
2
to select “Yes”, and then press the ENTER button.
• All items in the “Image adj.” submenu are reset to the factory set values and the menu returns to the previous one.
To exit the “All reset” submenu without performing All reset, select “No” with the cursor button
3
and, press the ENTER
button.
(To be continued on the next page)
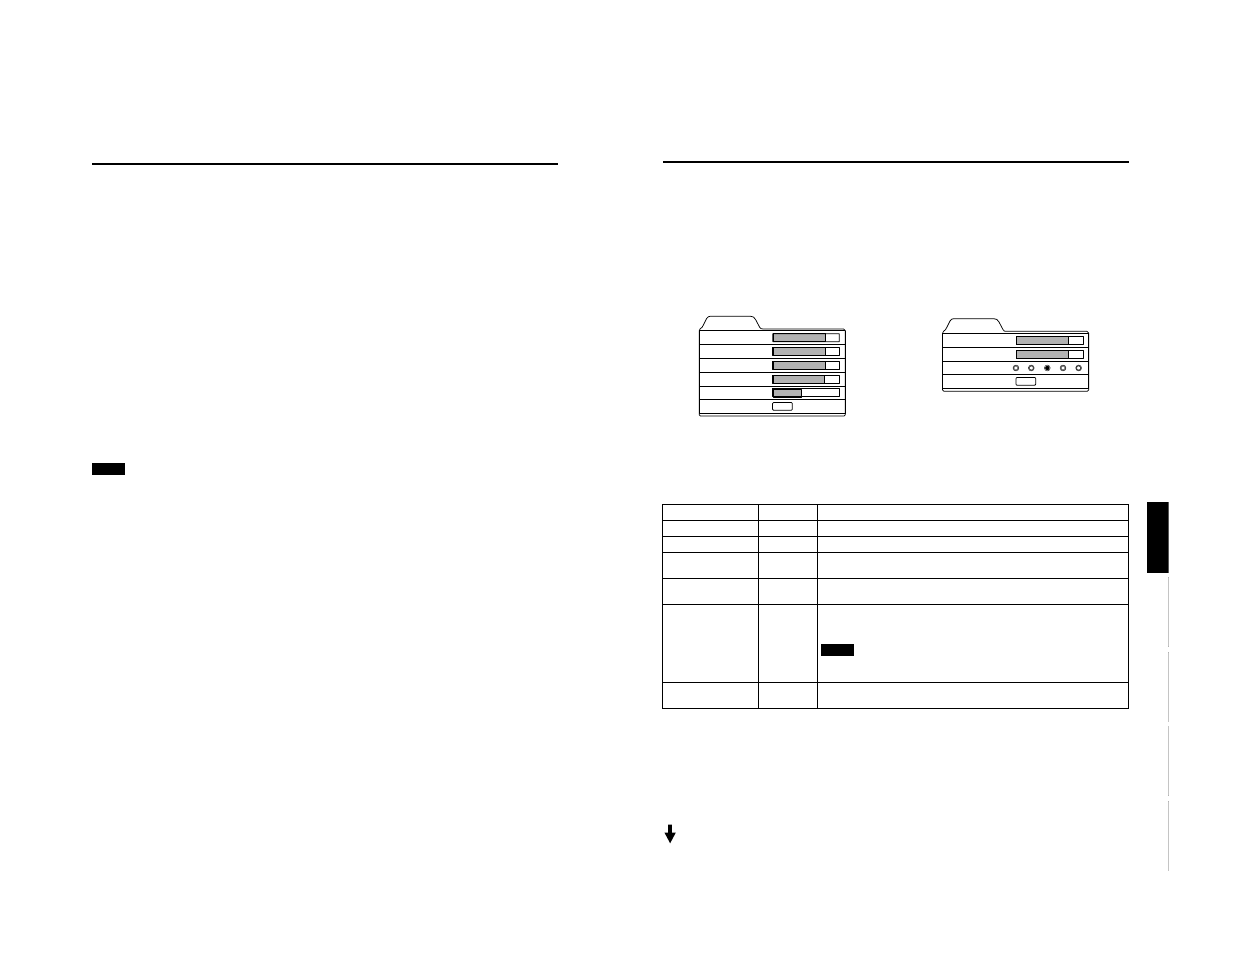
Image adj.
Contrast
Brightness
Color
Tint
Sharpness
All reset
12
12
12
12
1
ENTER
Image adj.
Contrast
Brightness
Sharpness
All reset
12
12
ENTER
1
2
3
4
5
Adjustment item
Button
Adjustment content
Contrast
2
or
3
Gets lower/higher. (–30
↔
0*
↔
+30)
Brightness
2
or
3
Gets darker/brighter. (–30
↔
0*
↔
+30)
Color
2
or
3
Gets softer/deeper. (–30
↔
0*
↔
+30)
(Video menu mode only)
Tint
2
or
3
Gets reddish/greenish. (–30
↔
0*
↔
+30)
(Video menu mode only)
Sharpness
2
or
3
Gets softer/sharper.
• Video menu mode: (–5
↔
0*
↔
+5)
• PC menu mode: (1
↔
3*
↔
5)
Note
• When in the PC menu mode, if the resize function in the PC submenu is set to
“1:1”, the image quality will not change even if the value is changed.
All reset
ENTER
Resets above items to the factory set values. How to operate is mentioned below
(next page).
48
Menu Operations
Set up for Watching Image Software (Video Menu Mode Only)
This unit has a function which allows you to project movies, which were recorded on film, in the best possible conditions.
(Function to convert 2-3 pull-down interlace scans to progressive scans)
Normally use set to AUTO.
1
Press the MENU button.
The main menu appears on the screen.
2
Select “Set up” with the cursor button
5
or
∞
, and press
3
or the ENTER button.
The “Set up 1” submenu appears on the screen.
3
Select “Set up 2” with the cursor button
5
or
∞
, and press
3
or the ENTER button.
The “Set up 2” submenu appears on the screen.
4
Select “Deinterlace” with the cursor button
5
or
∞
.
5
Select the Deinterlace function mode with the cursor button
2
or
3
.
Video: When watching images recorded with a video camera
Film:
When watching images recorded on film
AUTO: The setting is changed automatically
6
Press the EXIT button to return to the previous menu or press the MENU button to
exit the menu mode.
Note
• Operates when the signal is an NTSC or PAL interlace signal. Does not operate for other signals. (The menu is not
displayed when other signals are inputted.)