Quick reference guide for video menu mode, Menu operations – JVC DLA-G150CLE User Manual
Page 21
DLA-G150CLU
DLA-G150CLE
1-21
No.51931
41
Menu Operations
ENGLISH
DEUTSH
FRAN
ÇAIS
ITALIANO
ESPAÑOL
■
Menu Transition Diagram in PC Menu Mode
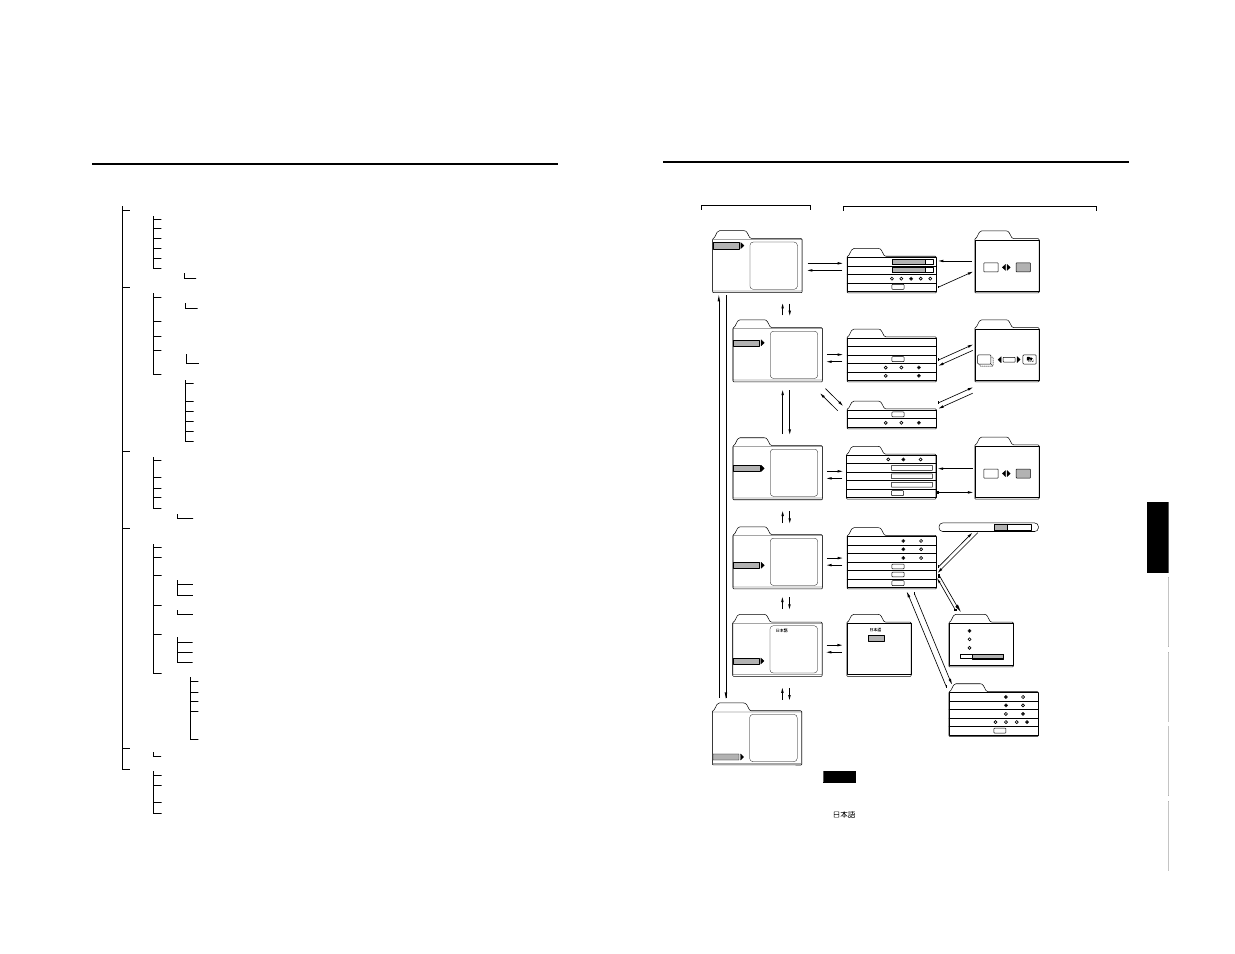
Menu
Image adj.
Set up
Color temp.
Options
Language
Information
Tracking
Phase
Position
Resize
Clamp
Menu
Image adj.
Set up
Color temp.
Options
Language
Information
Menu display
Line display
Lamp time display
Keystone
Lamp control
Yes
Image adj.
All reset?
No
ENTER
Position
Disp.Posi.
Menu
Yes
Color temp.
All reset?
No
Color temp.
Color temp.
RED
GREEN
BLUE
All reset
Color temp.
RED
GREEN
BLUE
All reset
123
123
123
ENTER
Middle
High
Low
Menu
Image adj.
Set up
Color temp.
Options
Language
Information
Menu
Image adj.
Set up
Color temp.
Options
Language
Information
English
Deutsch
Español
Italiano
Français
Menu
Image adj.
Set up
Color temp.
Options
Language
Information
Input
Switcher
Resolution
Frequency H
Frequency V
Lamp time
PC 1
CH.0
NTSC
79.9
75
123
kHz
Hz
h
Language
English
Deutsch
Español
Italiano
Français
Image adj.
Contrast
Brightness
Sharpness
All reset
12
12
ENTER
1
2
3
4
5
Menu
Image adj.
Set up
Color temp.
Options
Language
Information
Contrast
Brightness
Sharpness
All reset
Set up 1
Position
Resize
Options
Menu display
Line display
Lamp time display
Keystone
Lamp control
Page 2
ON
15sec
5sec
ENTER
ON
OFF
OFF
ENTER
ENTER
Page 2
Flip H
Flip V
RS-232C [bps]
Sleep time [min]
Page 1
OFF
OFF
9600
ENTER
ON
ON
19200
15
30
60
OFF
Keystone
0
12,12
Set up 1
Tracking
Phase
Position
Resize
Clamp
123
12
ENTER
ST
BP
1:1
Panel
Aspect
ENTER
1:1
Panel
Aspect
Lamp control
Normal
LPC
LOC
Press
5/∞ to select an item.
Press
2/3 to set or adjust the value.
3 or
ENTER
Press
5/∞ to select an item.
Press
2/3 to select Yes or No.
Then, press ENTER to execute.
Press
5/∞ to select an item.
Press
2/3 to set or adjust the value.
Press ENTER to select an item.
Press
5/∞ / 2/3 to move the
video screen/menu position.
EXIT
3 or
ENTER
EXIT
Press
5/∞ to select an item.
Press
2/3 to set or adjust the value.
Press
5/∞ to select an item.
Press
2/3 to set or adjust the value.
ENTER
EXIT
EXIT
ENTER
3 or
ENTER
EXIT
3 or
ENTER
EXIT
∞
∞
∞
5
5
5
∞
5
ENTER
EXIT
ENTER
ENTER
EXIT
ENTER
∞
5
Main menu in PC Menu Mode
Submenus in PC Menu Mode
Press
2/3 to select Yes or No.
Then, press ENTER to execute.
Press
5/∞ to
select an item.
Press
5/∞ to select an item.
Press
2/3 to set or adjust the value.
Note
• The display languages of the menus are set to “English” when the projector is
bought. The display language can be selected from the following 6 languages:
“
(Japanese)”, “English (English)”, “Deutsch (German)”, “Español
(Spanish)”, “Italiano (Italian)” and “Français (French)”. (Refer to page 46.)
The language settings in the section are explained in “English”.
You can see the information.
∞
5
40
Menu Operations
.
■
Quick Reference Guide for Video Menu Mode
* : Factory set value.
Main Menu in Video Menu Mode (While receiving video-device-related signals)
Image adj.
→
(Refer to page 49)
Contrast:
Contrast of the video image being projected can be adjusted. (–30 to +30, 0*)
Brightness:
Brightness of the video image being projected can be adjusted. (–30 to +30, 0*)
Color:
Color density of the video image being projected can be adjusted. (–30 to +30, 0*)
Tint:
Tint of the video image being projected can be adjusted. (–30 to +30, 0*)
Sharpness:
Sharpness of the video image being projected can be adjusted. (–5 to +5, 0*)
All reset:
Resets above items to the factory set values.
Yes / No
Set up 1
Position:
Video screen position and menu position can be adjusted.
→
(Refer to page 51)
Disp. Posi. / Menu
Gamma:
Image tone can be changed. Down/Cinema*/Up (Suitable for the cinema programes)
→
(Refer to
page 52)
Aspect ratio
Selectable aspect ratio, 4:3*/16:9.
→
(Refer to page 52)
Decoder:
Selectable color systems, Normally, set to AUTO.
(Refer to page 45)
(This item is displayed only when inputting VIDEO or Y/C.)
AUTO*/NTSC/NTSC4.43/PAL/SECAM
Page 2 Press ENTER to enter the “Set up 2” submenu
Tracking:
Normally, no adjustment is required. The lateral size and display area of video image can be
adjusted. (–128 to + 127)
→
(Refer to page 47)
Deinterlace: Set when watching movies which were recorded on film.
Phase:
Flickering or dim picture image can be adjusted. (0 to 31)
→
(Refer to page 47)
Screen:
Selectable screen’s aspect ratio. 4:3*/16:9
→
(Refer to page 46)
HDTV:
Selectable HDTV format. Normally, set to 1080i, 1080i*/1035i
→
(Refer to page 46)
Page 1:
Press ENTER to return to “Page 1” submenu.
Color temp.
Color temp.:
Adjustable color temperature, Low/Middle*/High.
Will be adjusted to correct reddish or blueish image.
RED:
Adjusts the red level. (0 to 255, the adjustable range varies depending on signals)
GREEN:
Adjusts the green level. (0 to 255, the adjustable range varies depending on signals)
BLUE:
Adjusts the blue level. (0 to 255, the adjustable range varies depending on signals)
All-reset:
Reset above items to the factory set values.
Yes/No
Options
→
(Refer to page 54)
Options 1
Menu display:
15sec* (Menu disappears in 15 seconds.) / ON (Menu stays on.)
Line display:
5sec* (Line display such as “VIDEO”, “Y/C”, “PC1”, or “PC2” appears on top right of the screen for
5 seconds when the VIDEO or PC button is pressed.) / OFF (Line display does not appear.)
Lamp time display:
ON*:
Displays when the lamp use time reaches 1000 hours when set in the LPC or LOC mode.
OFF:
Does not display when the lamp use time reaches 1000 hours when set in the LPC or LOC mode.
Keystone:
Press ENTER to enter the Keystone submenu.
Keystone:
Adjust to correct the trapezoidal distortion of the projected image.
(–80 to +120, 0*)
Lamp control:
Normal*:
Used as a normal lamp.
LPC:
Lamp brightness is automatically controlled with time.
LOC:
Lamp brightness is controlled in 7 levels (-6 to 0) irrespective of the time. This is set within the menu.
Page 2:
Press ENTER to enter the “Page 2” submenu.
Flip H.:
OFF* / ON (Select for upside-down hanging on the ceiling.)
Flip V:
OFF* / ON (Select for upside-down hanging on the ceiling.)
RS-232C [bps]:
Selectable baud rate (transmission speed). 9600 / 19200*
Sleep time [min]:
Selectable sleep times. If no-signal condition continues for the period of
selected time (Unite: Minutes), the projector enters the stand-by mode. 15 / 30
/ 60 / OFF*
Page 1:
Press ENTER to return to the “Page 1” submenu.
Language
Language for on-screen display.
→
(Refer to page 46)
Japanese / English* / German / Spanish / Italian / French
Information
→
(Refer to page 56)
Input:
Shows the terminal name selected by the VIDEO or PC button. (Y/C, VIDEO, COMP, PC1, PC2 or DVI)
Switcher:
Has no meaning. This display currently has no meaning, (“CH.0” is usually displayed to indicate
that it is not being used.)
Source:
Shows the projected image’s type of video signal.
Lamp time:
Accumulated used hours of the light-source lamp.