Mo vie c lip – JVC SA-DV6000 User Manual
Page 29
42
IE
OV
MC
I
P
L
mc
0
0
5
.
0a
s
f
R
PA
GE
B
A
C
K
REV
IE
W
DE
L
E
T
E
PR
O
T
E
C
T
SE
L
E
C
T
OF
F
FT
P
S
E
N
D
FT
P
S
E
N
D
IE
OV
MC
I
P
L
mc
0
0
5
.
0a
s
f
W
R/
REV
IE
W
DE
L
E
T
E
PR
O
T
E
C
T
PA
GE
B
A
C
K
SE
L
E
C
T
OF
F
FT
P
S
E
N
D
FT
P
S
E
N
D
SY
S
T
E
M
.
.
ME
N
U
REM
O
T
E
.
.
AU
D
IO
.
.
VI
D
E
O
.
.
TC
/
U
B
/
C
L
O
C
K
.
.
DI
S
P
L
A
Y
S
E
T
.
.
.
.
E
MO
V
I
C
L
I
P
.
.
N
E
TW
O
R
KP
A
C
K
C
O
N
F
IG
E
X
I
T
mc
0
0
5
.
0a
s
f
W
R/
IE
OV
MC
I
P
L
02
03
/0
2
/
09
0
0
:0
0
:
mc
0
0
6
.
0a
s
f
W
R/
02
03
/0
2
/
09
3
0
:2
5
:
mc
0
0
7
.
0a
s
f
W
R/
02
03
/0
2
/
10
1
0
:5
5
:
mc
0
0
8
.
0a
s
f
W
R/
02
03
/0
2
/
11
0
0
:0
0
:
PA
GE
B
A
CK
BR-D
V
6000
PROFESSIONAL
MENU
RESET
A.DUB
EJECT
COUNTER
A
UDIO
INPUT SELECT
MONIT
O
R
OUTPUT
REMO
TE
LOCAL
CTL
L
MIX
R
CH-1/2
MIX
CH-3/4
DV
LINE
Y/C
(CPN)
TC
UB
REW
ST
OP
FF
REC
OPERA
TE
PLA
Y
P
A
USE
DISP
SET
SEARCH+
BLANK
CUE UP
HOLD
PHONES
REC LEVEL
CH-1/3
CH-2/4
MIC
SEARCH–
Mini
MENU button
SET
button
SEARCH- (
) button
DISP
(
) button
BLANK (
) button
SEARCH+ (
) button
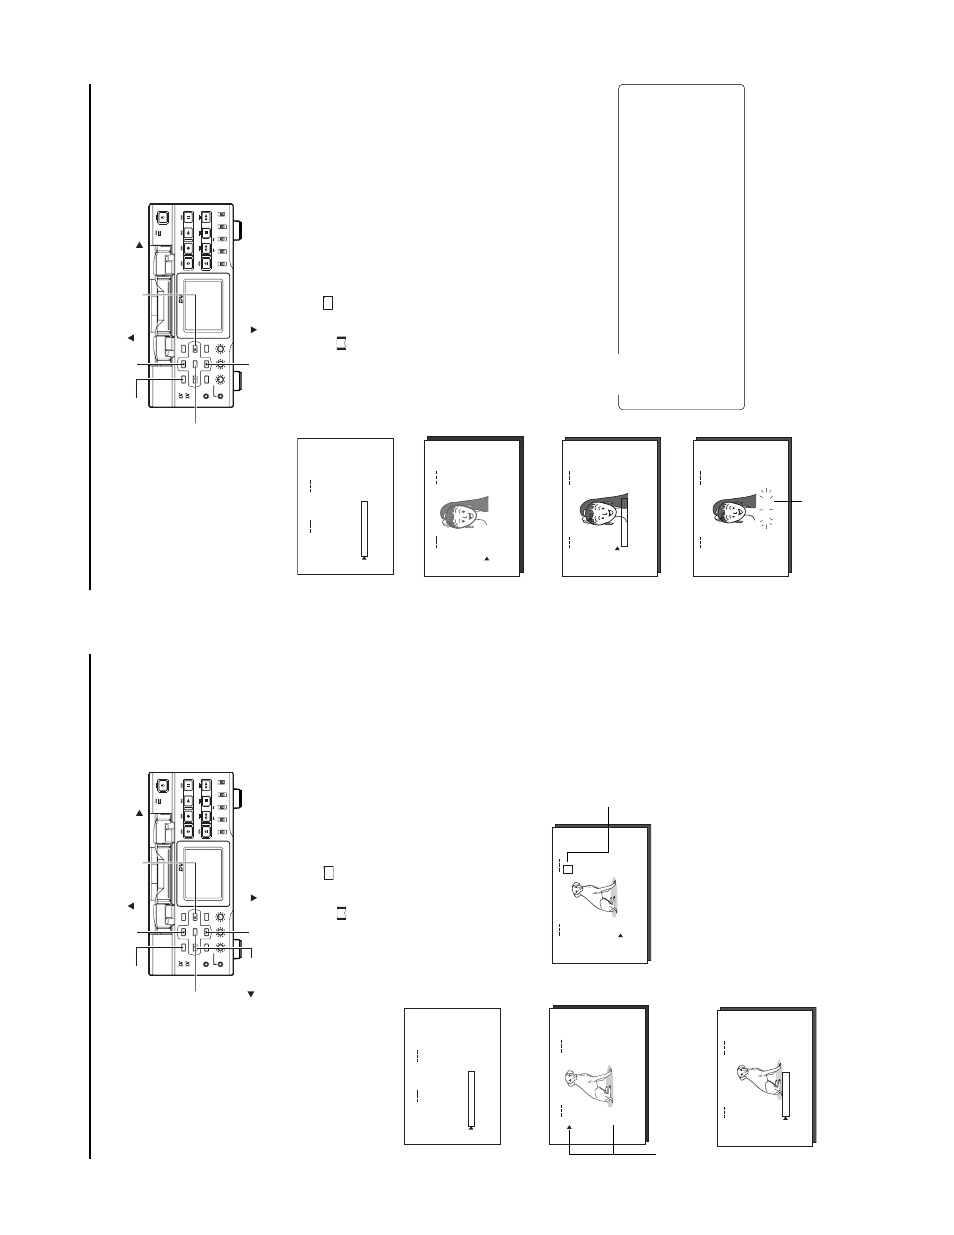
Mo
vie c
lip
Pr
otecting a c
lip file on a CF memory car
d
Clips recorded on a CF memory card can be protected using the MOVIE CLIP
screen.
1.
Insert an already recorded CF memory card.
2.
T
urn on the BR-DV6000 power
.
Check to see that the
C
F
display appears on the LCD screen. (When the power is
turned on,
display will flash during initialization.)
3.
Display the MOVIE CLIP
screen.
q
Press the MENU button to display the
T
O
P
MENU screen.
w
Press the DISP
(6
) or BLANK (
7
) button, move the cursor (
t
) to MOVIE CLIP
and press the SET button or SEARCH+ (
t
) button.
●
The latest page of the MOVIE CLIP
screen appears.
R/W display appears on the right of the clip number
.
4.
Select the clip to protect.
Press the DISP
(
6
) or BLANK (
7
) button, move the cursor (
t
) to the clip to
protect and press the SET
button.
●
The CLIP
FUNCTION screen of the selected clip appears.
5.
Press the DISP
(
6
) or BLANK (
7
) button, move the cursor to PROTECT
in the
CLIP
FUNCTION screen and press the SET
button.
6.
To
return to the MOVIE CLIP
screen after completing setting, select P
AGE BACK
and press the SET button or SEARCH– (
8
) button.
\
To
cancel the pr
otection,
select PR
O
TECT in the CLIP FUNCTION screen and
press the SET b
utton.
●
The R display will change to an R/W display and the protection on the clip will be
canceled.
●
The selected clip is protected.
The R/W display on the right of the clip
number will change to an R display
.
Protected
●
When executing FORMA
T
in the MOVIE
CLIP
SETU
P
menu screen, protected
clips will also be deleted.
●
Protected clips will not be deleted even
when executing DELETE
ALL
in the
MOVIE CLIP
SETUP
menu screen.
CLIP FUNCTION screen
TO
P
MENU screen
MOVIE CLIP
screen
CLIP FUNCTION screen
Clip number
43
mc
0
0
5
.
0a
s
f
W
R/
IE
OV
MC
I
P
L
02
03
/0
2
/
09
0
0
:0
0
:
mc
0
0
6
.
0a
s
f
W
R/
02
03
/0
2
/
09
3
0
:2
5
:
mc
0
0
7
.
0a
s
f
W
R/
02
03
/0
2
/
10
1
0
:5
5
:
mc
0
0
8
.
0a
s
f
W
R/
02
03
/0
2
/
11
0
0
:0
0
:
PA
GE
B
A
CK
SY
S
T
E
M
.
.
ME
N
U
REM
O
T
E
.
.
AU
D
IO
.
.
VI
D
E
O
.
.
TC
/
U
B
/
C
L
O
C
K
.
.
DI
S
P
L
A
Y
S
E
T
.
.
.
.
E
MO
V
I
C
L
I
P
.
.
N
E
TW
O
R
KP
A
C
K
C
O
N
F
IG
E
X
I
T
BR-D
V6000
PROFESSIONAL
MENU
RESET
A.DUB
EJECT
COUNTER
A
UDIO
INPUT SELECT
MONIT
OR
OUTPUT
R
EMO
T
E
LOCAL
CTL
L
MIX
R
CH-1/2
MIX
CH-3/4
DV
LINE
Y/C
(CPN)
TC
UB
REW
ST
OP
FF
REC
OPERA
TE
PLA
Y
P
A
U
SE
DISP
SET
SEARCH+
BLANK
CUE UP
HOLD
PHONES
REC LEVEL
CH-1/3
CH-2/4
MIC
SEARCH–
Mini
MENU button
SET
button
DISP
(
) button
BLANK (
) button
SEARCH+ (
) button
IE
OV
MC
I
P
L
mc
0
0
8
.
0a
s
f
W
R/
SE
L
E
C
T
OF
F
FT
P
S
E
N
D
FT
P
S
E
N
D
PA
G
E
B
A
CK
REV
IE
W
DE
LE
T
E
PR
O
T
E
C
T
REV
IE
W
DE
LE
T
E
IE
OV
MC
I
P
L
mc
0
0
8
.
0a
s
f
W
R/
DE
L
E
T
E
OK
?
DE
L
E
T
E.
.
PA
GE
B
A
C
K
Mo
vie c
lip
Deleting a c
lip file on a CF memory car
d
Confirmation screen
Clips recorded on a CF memory card can be deleted using the MOVIE CLIP
screen.
1.
Insert an already recorded CF memory card.
2.
T
urn on the BR-DV6000 power
.
Check to see that the
C
F
display appears on the LCD screen. (When the power is
turned on,
display will flash during initialization.)
3.
Display the MOVIE CLIP
screen.
q
Press the MENU button to display the
T
O
P
MENU screen.
w
Press the DISP
(
6
) or BLANK (
7
)
but
ton
, move the cursor (
t
) to MOVIE
CLIP and press the
SET but
to
n
or SEARCH+ (
t
) button
.
●
The latest page of the MOVIE CLIP
screen appears.
4.
Select the clip to delete.
Press the DISP
(6
) or BLANK (
7
)
button, move the cursor
(t
)
to the clip to delete
and press the S
E
T
b
u
tton.
●
The CLIP
FUNCTION screen of the selected clip appears.
5.
Press the DISP
(6
) or BLANK (
7
) button, move the cursor to DELETE in the CLIP
FUNCTION screen and press the SET
button.
●
A“
DELETE OK?” confirmation message appears. (Confirmation screen)
6.
To
delete, select
YES using the DISP
(6
) or BLANK (
7
) button and press the SET
button.
●
“DELETE . .” flashes on the screen for about 5 seconds and then the MOVIE
CLIP
screen returns.
The clip is deleted from the MOVIE CLIP
screen.
Memo
●
Protected clips cannot be deleted even when selecting DELETE.
In this case, “PROTECT!” will flash for about 2 seconds and then CLIP
FUNC-
TION screen returns.
●
After deleting a clip and there are no remaining clips left on the CF memory card,
“NO CLIP!” flashes on the screen for about 3 seconds and then the
T
O
P
MENU
screen returns.
●
To
delete all clips, use the MOVIE CLIP
SET
in the NETWORK P
ACK CONFIG
menu screen. (
☞
page 37)
TO
P
MENU screen
MOVIE CLIP
screen
CLIP FUNCTION screen
Deleting Flashing display