Men u settings, Netw ork p a ck men u screen items – JVC SA-DV6000 User Manual
Page 12
8
Men
u settings
NETW
ORK P
A
CK men
u screen items
ⅷ
indicates default factory setting.
✩
indicates items that can also be set from a PC. (
☞
page 54)
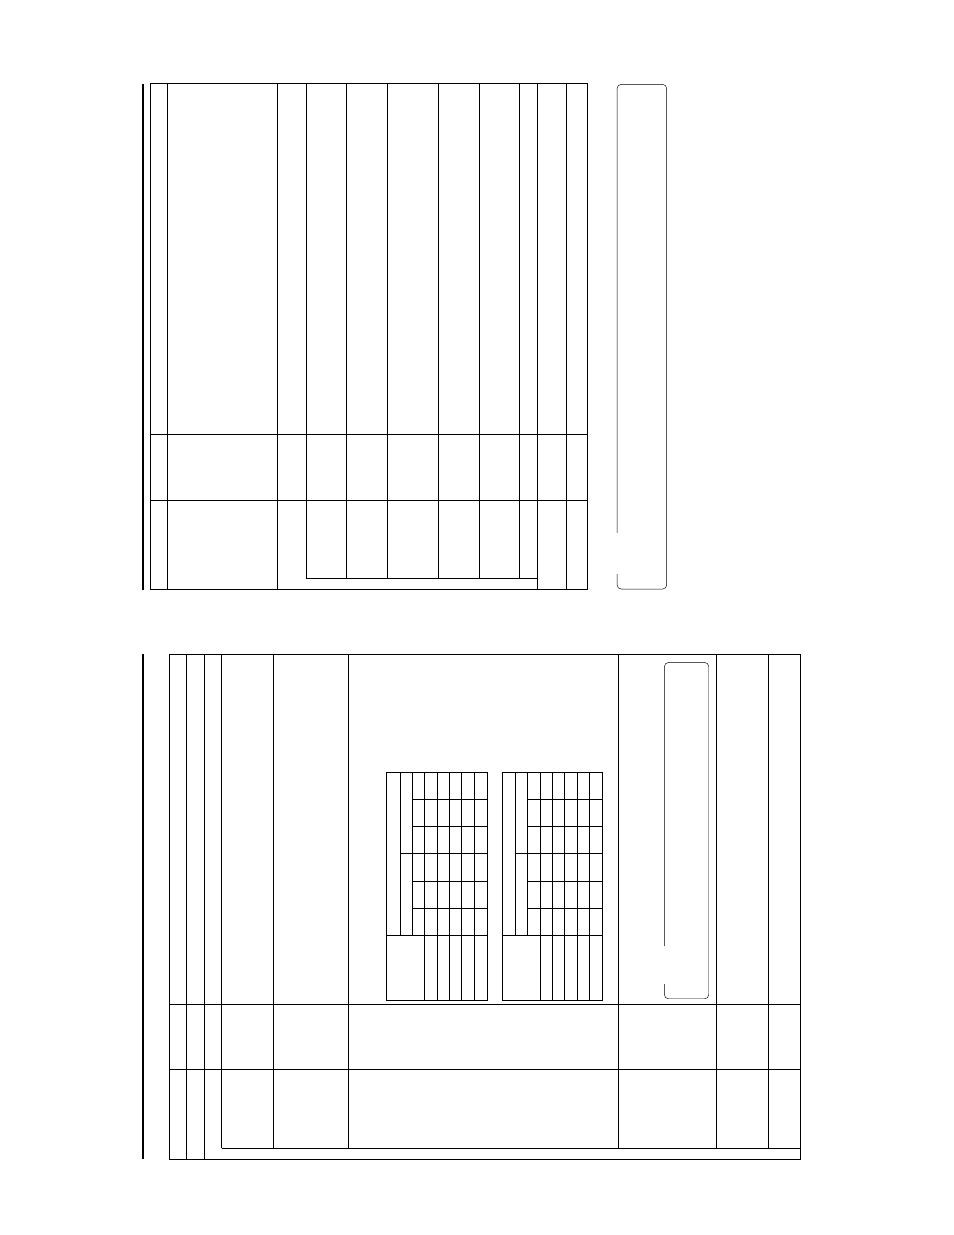
Item
NETWORK MAIN SETUP
ENCODE SETUP
FRAME SIZE
BIT
RA
TE
MAX FRAME
RA
TE
STREAM TYPE
PRE FIL
TER
P
AGE BACK
Setting
ⅷ
320
Ч
240
160
Ч
120
56K
128K
256K
ⅷ
384K
512K
MAX
ⅷ
MID
MIN
ⅷ
for WMP
for QT
ⅷ
AD1
AD2
Description
Displays menu screen for network related settings. (
☞
page 1
1
)
Displays menu screen for setting video and audio compressions.
Sets the video compression size.
320
×
240:
Sets the image size to 320
×
240 pixels. (SIF)
160
×
120:
Sets the image size to 160
×
120 pixels. (QSIF)
(1/4 image size of SIF
.)
Sets streaming speed (bps).
56K:
MPEG4
24 kbps
(G726
16 kbps for WMP) (
µ
law 64kbps for QT)
128K:
MPEG4
104 kbps
(G726
16 kbps for WMP) (
µ
law 64kbps for QT)
256K:
MPEG4
224 kbps
(G726
32 kbps for WMP) (
µ
law 64kbps for QT)
384K:
MPEG4
352 kbps
(G726
32 kbps for WMP) (
µ
law 64kbps for QT)
512K:
MPEG4
472 kbps
(G726
40 kbps for WMP) (
µ
law 64kbps for QT)
Sets the frame rate per second.
The maximum tranmitted frames per second varies
depending on the FRAME SIZE and BIT
RA
TE settings as shown below:
\
NTSC signal
\
P
A
L
signal
*
The frame rates shown in the table are not guaranteed values.
Sets the player for stream playback.
for WMP
:
Media Player
, Provided application
for QT
:
Quick
T
ime
AD1 is ef
fective for video with many still images and
AD2 is ef
fective for video with
motion.
Pressing the SET
button or SEARCH– button returns to the NETWORK P
ACK CONFIG
menu screen.
→
O
VER
FRAME SIZE
BIT
RA
TE
320
Ч
240
160
Ч
120
MAX
MID
MIN
MAX
MID
MIN
512K
15
10
7.5
30
15
10
384K
15
10
7.5
30
15
10
256K
15
7.5
5
3
0
1
5
7.5
128K
7.5
5
3
15
10
7.5
56K
3
1
1
1
0
7.5
5
FRAME SIZE
BIT
RA
TE
320
Ч
240
160
Ч
120
MAX
MID
MIN
MAX
MID
MIN
512K
12.5
5
5
25
12.5
12.5
384K
12.5
5
5
25
12.5
5
256K
12.5
5
5
25
12.5
5
128K
5
5
1
12.5
12.5
5
56K
1
1
1
12.5
5
5
Memo
•
No sound will be heard when playing back using QuickT
ime while in the WMP
mode.
•
No sound will be heard when playing back using Media Player while in the QT
mode.
• Set to WMP
mode when recording to CF memory card.
✩
✩
✩
✩
9
Memo
When setting MPEG REC to SPLIT
, the following will appear in the NETWORK P
ACK CONFIG menu screen.
CF REC: PUSH ‘SET’
Item
MPEG REC
MOVIE CLIP
SETUP
DELETE ALL
FORMA
T
PLA
Y
MODE
CAPTURE
FILE SEND
P
AGE BACK
MENU RESET
P
AGE BACK
Description
Selects the operation method for recording video data to a CF memory card or sending
data to a Client PC from a LAN card/LAN terminal.
TRIG:
Operation will start when pressing the REC and PLA
Y
buttons of BD-DV6000 at
the same time. Use this setting when simultaneously recording to a DV tape.
SPLIT
:
Use this setting when recording or transferring with CF memory card or LAN
card/LAN terminal only
. Operation starts when pressing the
SET b
utton
of BR-
DV6000.
OFF:
Recording will not be made to the CF Memory Card.
T
ransmission of streaming
data to a PC from the LAN card/LAN terminal is possible.
Displays the menu screen for CF memory card related settings such as formatting or
deleting all recorded clip files.
Selecting EXECUTE and pressing the SET
button deletes all clip files on the CF memory
card.
Protected clip files are not deleted.
Selecting EXECUTE and pressing the SET
button starts formatting the card.
All recorded clips are erased.
Caution:
All protected clip files and other files will also be erased.
Playback is performed from the specified clip file to the latest clip file and pauses at the
specified clip file.
Specified clip file is played backed 3 times.
Playback is performed 3 times from the specified clip file to the latest clip file.
When pressing the SET
button, the FILE CAPTURE screen appears.
Recording can be made to the CF memory card by specifying the range of the DV
cassette tape in the FILE CAPTURE screen settings. (
☞
page 36)
When pressing the SET
button, the clip file specified from a CF memory card can be
transferred to a specified server via FTP
.
T
ransfer will be performed via the LAN terminal. (
☞
page 46)
Pressing the SET
button returns to the NETWORK P
ACK CONFIG menu screen.
Selecting EXECUTE and pressing the SET
button returns NETWORK P
ACK CONFIG
menu screen settings to the original factory settings.
Pressing the SET
button SEARCH– button returns to the
T
O
P
MENU screen.
Men
u settings
NETW
ORK P
A
CK men
u screen items
Setting
ⅷ
TRIG
SPLIT
OFF
ⅷ
CANCEL
EXECUTE
ⅷ
CANCEL
EXECUTE
OFF
REPEA
T
1
ⅷ
REPEA
T
ⅷ
CANCEL
EXECUTE