Men u settings, Netw ork settings men u screen item, Inputting c haracter data f or netw ork settings – JVC SA-DV6000 User Manual
Page 15: Setting user names and pass w o rd s, Caution
14
Men
u settings
NETW
ORK Settings men
u screen item
SER
VER SETUP
menu screen
ⅷ
indicates default factory setting.
Item
SETUP
ON WEB
LEAP USER
NAME
LEAP
P
ASSWORD
HTTP USER
NAME
HTTP
P
ASSWORD
FTP USER NAME
FTP
P
ASSWORD
P
AGE BACK
Setting
ON
ⅷ
OFF
Description
Set to ON when changing the USER NAME and P
ASSWORD from the W
eb.
Displays the LEAP
USER NAME input screen. (4 ~ 32 alphanumerical characters)
Set when using the LEAP function.
[Default setting: leap-user]
Displays the LEAP
P
ASSWORD input screen. (4 ~ 32 alphanumerical characters)
Set when using the LEAP function.
[Default setting: sa-dv-jvc]
Displays the HTTP
USER NAME input screen. (3 ~ 8 alphanumerical characters)
Set when connecting from the W
eb browser
.
[Default setting: jvc]
Displays the HTTP
P
ASSWORD input screen. (4 ~ 8 alphanumerical characters)
Set when connecting from the W
eb browser
.
[Default setting: sa-dv6k]
Displays the FTP
USER NAME input screen. (3 ~ 8 alphanumerical characters)
Used when uploading USER P
AGE.
[Default setting: ftp-user]
Displays the FTP
P
ASSWORD input screen. (4 ~ 8 alphanumerical characters)
Used when uploading USER P
AGE.
[Default setting: sa-dv]
Pressing the SET button or SEARCH– button returns to the NETWORK MAIN SETUP menu screen.
Memo
If higher security is desired, set this function to OFF so that changes cannot be made from the
W
eb.
Setting user names and pass
w
o
rd
s
\
Changing the user name
When changing the HTTP
USER NAME or FTP
USER NAME,
“NEXT
STEP
SET
P
ASSWORD
” will appear on the screen and the
P
ASSWORD menu screen is displayed.
When input is canceled in the P
ASSWORD menu screen, the user name will also be canceled.
It is possible to change only the password.
When changing the LEAP
USER NAME setting, the P
ASSWORD menu screen will not appear automatically
.
\
Setting pass
w
o
rd
s
Set LEAP
, HTTP
and FTP
P
ASSWORD using the procedure shown below
.
1.
First, enter the currently used password when “ENTER OLD P
ASSWORD” is displayed.
(When setting the password for the first time, enter the factory set value as the OLD P
ASSWORD.)
2.
Next, enter the new password when “ENTER NEW P
ASSWORD” is displayed.
3.
Lastly
, enter the new password again when “CONFIRM NEW P
ASSWORD” is displayed.
Caution
•
Do not forget to take a memo of the password.
The password cannot be redisplayed.
•
Each character input on the P
ASSWORD menu screen is hidden using asterisks (*).
•
In case the password is forgotten, performing MENU RESET will return the unit to its factory settings.
✩
✩
✩
✩
15
Men
u settings
Inputting c
haracter data f
or netw
ork settings
Network related settings are made in the individual input setting screens.
Here, HTTP
USER NAME is set as an example. Other settings are also made in the same manner
.
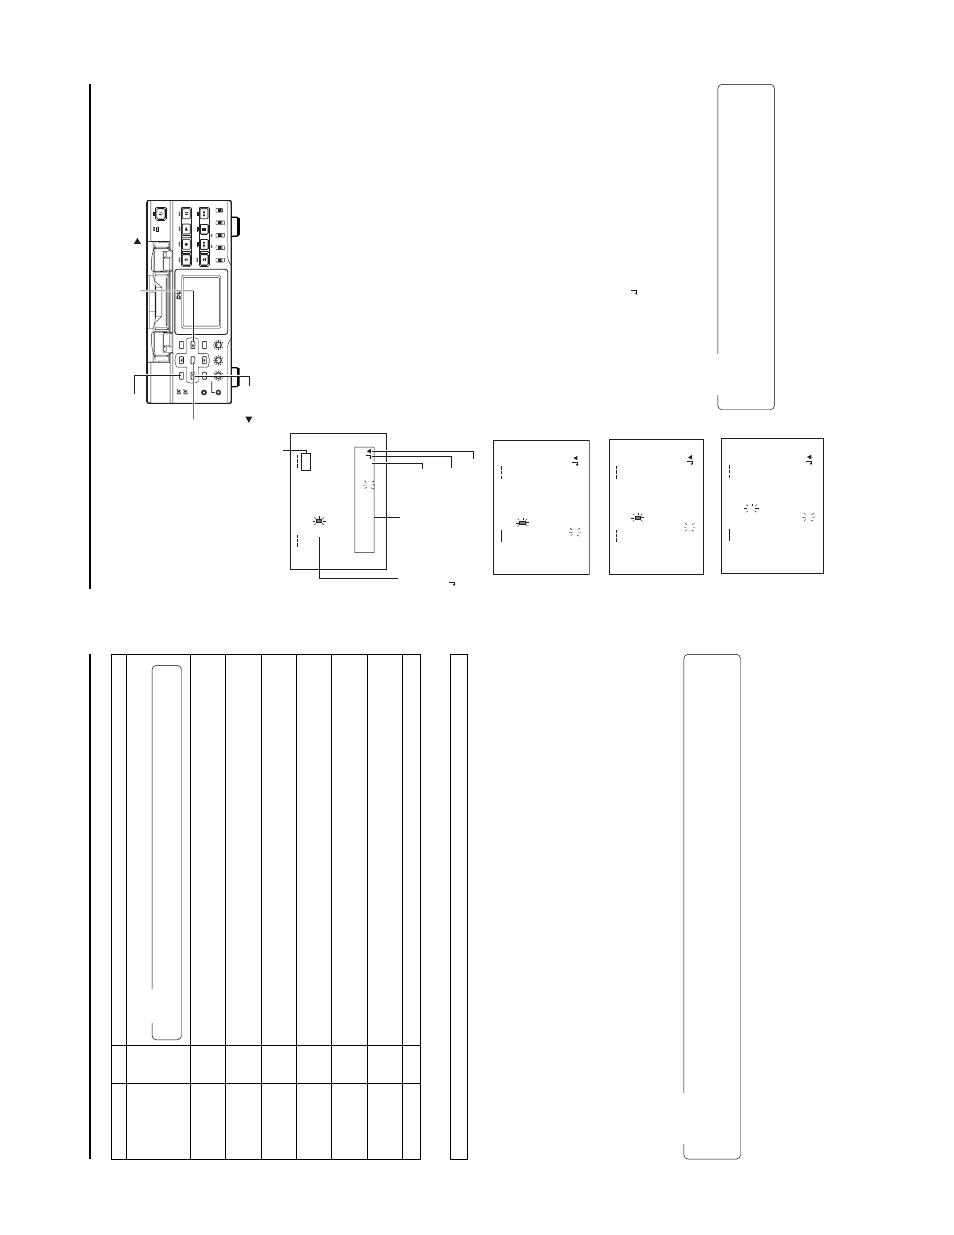
Example: Changing HTTP USER NAME from jvc to jvc-1234
\
Select HTTP USER NAME in the SER
VER SETUP men
u screen and press the
SET b
utton.
●
The USER NAME input setting screen appears.
1.
Characters are selected from the character selection area on the bottom of the
screen.
Press the SEARCH+ (
t
) or the SEARCH– (
8
) button to flash “_” in the character
selection area and press the SET button.
●
The setting changes to “jvc_” and the following digit of the setting area flashes.
2.
Press the SEARCH+ (
t
) or the SEARCH– (
8
) button to select “1” in the charac-
ter selection area and press the SET button.
●
The setting changes to “jvc_1” and the following digit of the setting area flashes.
3.
Repeat the above step to set “jvc_1234” in the setting area.
\
To
delete or edit set characters, select “BS” within the character selection area and
press the SET
button.
The previous character will be deleted.
The character on the left will be deleted each
time this operation is repeated.
\
When pressing the SEARCH+ (
t
) or the SEARCH– (
8
) button while holding down
the ST
OP
button, the cursor will move 5 characters at a time.
\
The currently inputted number of characters and the maximum number of characters
are displayed on the upper right of the screen.
\
To
cancel a setting, select the “
6
” within the character selection area and press the
SET
button.
The unit will return to the previous screen (SER
VER SETUP
menu screen).
4.
When completed, select “
” within the character selection area and press the SET
button.
●
When changing the HTTP
USER NAME or FTP
USER NAME, “NEXT
STEP
SET
P
ASSWORD” will appear on the screen and the P
ASSWORD menu screen
is displayed . Set the password using the procedure shown above.
Memo
When setting is completed for items other than HTTP
USER NAME and FTP
USER
NAME, the unit will return to the previous screen (NETWORK MAIN SETUP
or
SER
VER SETUP
menu screen).
4
/
8
R
SE
UN
A
E
M
jv
c
ab
c
d
e
f
g
hi
j
k
l
m
n
opq
r
s
t
u
v
wx
y
z
0
1
2
34
5
6
7
8
9
_
_
./@
BSA
¯
TC
0
0:0
0:
0
0
0.0
5
/
8
R
SE
UN
A
E
M
jv
c
1
ab
c
d
e
f
g
hi
j
k
l
m
n
opq
r
s
t
u
v
wx
y
z
0
1
2
34
5
6
7
8
9
_
_
./@
BSA
¯
TC
0
0:0
0:
0
00
.0
3
/
8
R
SE
U
jv
c
ab
c
d
e
f
g
h
ijk
l
m
n
o
p
q
r
s
t
u
v
wx
y
z
0
1
2
34
5
6
7
8
9
_
./@
BSA
¯
NAM
E
TTP
H
TC
0
0:0
0:
0
0
0.0
8
/
8
R
SE
UN
A
E
M
jv
c
1
2
3
4
ab
c
d
e
f
g
hi
j
k
lm
n
opq
r
s
t
u
v
wx
y
z
0
1
2
34
5
6
7
8
9
_
_
./@
BSA
¯
TC
0
0:0
0:
0
0
0.0
HTTP USER NAME input setting screen
:
The set text is confirmed and
returns to the previous screen.
Currently inputted number of characters/
max.number of characters
Setting area
Character
selection area
BS:
Backspace (
delete previous character
)
A:
Alternates between uppercase and
lowercase.
6
:The set text is canceled and
returns to the previous screen.
BR-D
V6000
PROFESSIONAL
MENU
RESET
A.DUB
EJECT
COUNTER
A
UDIO
INPUT SELECT
MONIT
O
R
OUTPUT
REMO
TE
LOCAL
CTL
L
MIX
R
CH-1/2
MIX
CH-3/4
DV
LINE
Y/C
(CPN)
TC
UB
REW
ST
OP
FF
REC
OPERA
TE
PLA
Y
P
A
USE
DISP
SET
SEARCH+
BLANK
C
UE UP
HOLD
PHONES
REC LEVEL
CH-1/3
CH-2/4
MIC
SEARCH–
Mini
MENU button
SET
button
SEARCH– (
) button
SEARCH+ (
) button