Enjoying multichannel playback, How to connect, How to set up – Integra DTR-10.5 User Manual
Page 64
64
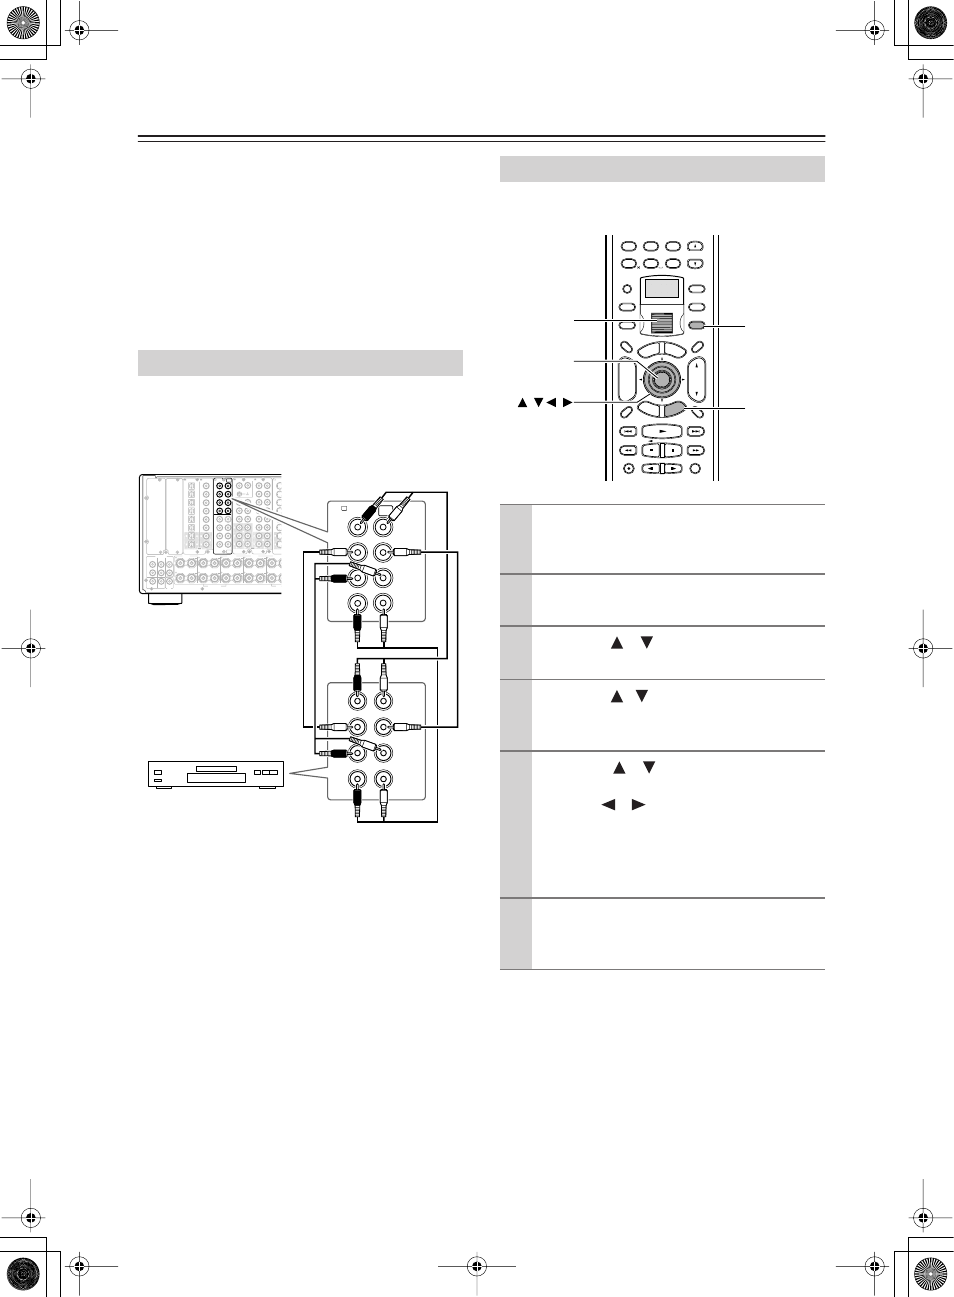
Enjoying Multichannel Playback
For USA and Canadian models, multichannel
playback is available when the multichannel
terminal board [E] is installed.
To the DTR-10.5, you can be connected up to two
devices, such as a DVD player, that deal with multi-
channel sounds (5.1-7.1 channels).
To use multichannel connections, you need to specify
settings on the Input Setup menu. In addition, you can
set listening modes as you prefer. Enjoy multichannel
playback in the main room.
Use three or four audio connection cables or a multi-
channel connection cable to connect the multichannel
output jack on the connected device to the MULTI-CH
IN 1/2 jack on the DTR-10.5.
Specify the input source type. At default, DVD is “1,”
CD is “2,” and others are “No.”
How to Connect
E
GND
“Net-Tune”
is a trademark of
Onkyo Corporation.
ETHERNET
(Net-Tune)
A
A
L
R
FRONT
SURR
SURR
BACK
CENTER
SUB
WOOFER
SUB
WOOFER
FRONT L
CENTER
FRONT R
SURR R
FRONT R (BTL)
FRON
PRE OUT A
PRE
OUT B
2
2
1
6
6
5
5
4
4
3
3
2
2
1
1
OPTICAL
COAXIAL
AUDIO IN
1
3
2
1
PH
2
3
9
8
7
6
5
4
4
5
R
L
L
R
L
R
R
L
G
S VIDEO
IN
3
2
1
6
5
4
2
1
B
SURR BACK R (ASSIGNABLE)
DIGITAL IN
DIGITAL IN
L
R
S VIDE
C
D
OUT
OUT
F
H
1
SBR
SBL
SR
SL
SUB
C
FR
FL
SBR
SBL
SR
SL
SUB
C
FR
FL
MULTI
- CH
IN 1
MULTI
- CH
IN 2
B
R
L
FRONT
SUB
SURR
SURR
BACK
CENTER
R
L
SBR
SBL
SR
SL
SUB
C
FR
FL
E
MULTI
- CH
IN 1
How to Set Up
1
Press the [Input] button, and then roll the
scroll wheel to select the input source to
be set.
2
Press the scroll wheel, and then press the
[Setup] button to display the Main menu.
3
Press the [
]/[
] buttons to select “Input
Setup,” and then press the [Enter] button.
4
Press the [
/[
] buttons to select “Audio
Assign,” and then press the [Enter] but-
ton.
5
Press the [
]/[
] buttons to select
“Multichannel,” and then select a setting
with the [
]/[
] buttons.
Select “1” when connected to MULTI-CH
IN 1, or “2” when connected to MULTI-CH
IN 2.
6
Press the [Setup] button.
Setting is completed, and the menu screen disap-
pears.
PQRS
TUV
WXYZ
GHI
JKL
MNO
--/---
Direct Tuning
#
Custom
Display
Dimmer
T V
Input
Sleep
Random
Main A Main B
Muting
T V VOL
Exit
Gu
ide
Rec
Prev
CH
Set
up
Retu
rn
+10
0
Clear
7
8
9
To
p M
enu
Men
u
VOL
CH
Disc
+
-
Zone 3
Zone 2
Input
Mode
Macro
Se
rve
r
Aud
io
A
D
J
Enter
Input
Setup
Enter
/
/
/
Scroll
wheel