Marantz SR8002 User Manual
Page 10
ENGLISH
7
OPERATION OF REMOTE CONTROLLER
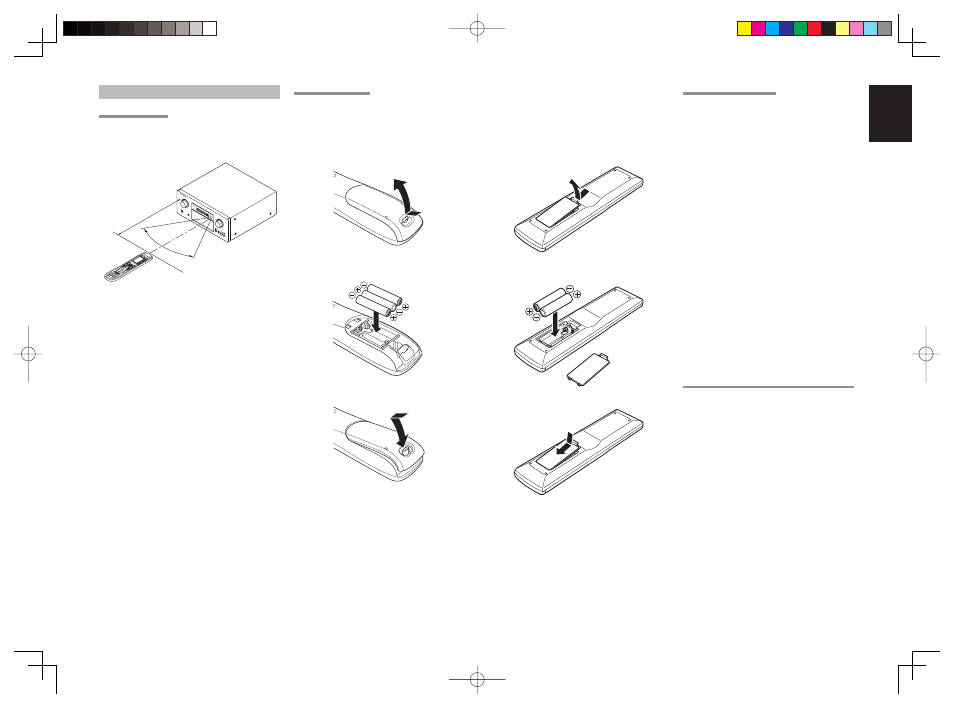
REMOTE CONTROL
Operate the remote controller within a distance of
approx. 5m from the infrared receptor window on the
front of the unit.
Remote controller
SR7002/8002
AV S
UR
RO
UN
D R
EC
EIV
ER
SR
800
1
PHO
NES
ST
ANDBY
L
C
R
SL
S
SR
LFE
DIG
ITAL
SUR
ROU
ND
DIS
P
MU
LTI
AUT
O
TU
NE
D
ST
SP
KR
A B
V-O
FF
NIG
HT
PE
AK
AN
AL
OG
DIG
ITA
L
AT
T
SL
EE
P
SU
RR
DIR
EC
T
AU
TO
DIS
C 6
.1
MT
X 6
.1
PCM
AA
C
AU
X 1
IN
PU
T
AU
DIO
S-V
ID
EO
DIG
ITA
L
VID
EO
L
R
EN
TE
R
DO
W
N
U
P
VO
LU
M
E
PO
W
ER
O
N/O
FF
INP
U
T SE
LE
CT
O
R
2
3
1
5
6
4
8
0
9
7
ME
MO
CLE
AR
DS
S
AM
P
AU
X2
AU
X1
TA
PE
TUN
ER
CD
CD
-R
M
D
VC
R
DVD
TV
SO
UR
CE
OFF
ON/O
FF
PO
WE
R
ON
D
4
D
5
D
2
M
D
1
D
3
D
5
OK
VO
L
CH
PR
EV
MU
TE
MEN
U
EXIT
GUID
E
TE
ST
CH
.SE
L
SU
RR
7.1
CH
AT
T
SP
K-A
B
DIS
P
O
SD
SLE
EP
1
2
LIGH
T
Le
arni
ng R
em
ote Co
ntroller
RC14
00
60°
Appro
x. 5 m
Caution:
• Do not allow direct sunlight, an inverter fl uorescent
light or other strong source of light to shine onto
the player’s infrared receptor window. Otherwise,
the operation of the remote controller may be
disabled.
• Bear in mind that operating the remote controller
may cause other devices operated by infrared rays
to be operated by mistake.
• The remote controller cannot be operated if the
space between the controller and the player’s
infrared receptor window is obstructed.
• Do not place any objects on top of the remote
controller.
Doing so may cause one or more buttons to be
held down which will cause the batteries to run
down.
LOADING BATTERIES
Before using the remote controller for the fi rst time,
load the batteries in the remote controller. The
batteries provided are used to verify the operations
of the remote controller only.
1.
Remove the back cover.
2.
Insert the new batteries (AAA type) with correct
ª and · polarity.
3.
Close the battery cover until it clicks shut.
1.
Remove the battery cover.
2.
Insert the new batteries (AAA type) with correct
ª and · polarity.
3.
Close the battery cover until it clicks shut.
CAUTIONS ON BATTERIES
• Use “AAA” type batteries in this remote controller.
• We recommend that you use alkali batteries.
• The life of the batteries used with the remote
controller is about 4 months with normal use.
• If the remote controller does not operate from
close to the unit, replace the batteries with new
ones, even if less then a year has passed.
• The included battery is only for verifying operation.
Replace it with a new battery as soon as possible.
• When inserting the batteries, be careful to do so in
the proper direction, following the + and - marks in
the remote controller’s battery compartment.
• To prevent damage or battery fl uid leakage:
- Do not use a new battery with an old one.
- Do not use two different types of batteries.
- Do not short-circuit, disassemble, heat or
dispose of batteries in fl ames.
• Remove the batteries when not planning to use the
remote controller for a long period of time.
• If the batteries should leak, carefully wipe off the
fl uid from the inside of the battery compartment,
then insert new batteries.
• When disposing of used batteries, please comply
with governmental regulations or environmental
public instruction’s rules that apply in your country
or area.
BATTERY REPLACEMENT INTERVAL (RC8001SR)
When the batteries wear out, a battery mark is
displayed on the LCD. Although the remote control
can still be used when the battery mark is displayed,
the batteries should be replaced as soon as possible.
The LCD eventually starts to fl ash when buttons are
pressed, the remote control will be unable to transmit
signals or learn codes.
• This remote control uses non-volatile memory so
that the learned codes and macro programs are
retained even if the batteries are removed.
• Reset the clock after replacing the batteries.