About home-theater control systems, Setting up tv inputs, continued, Controlling a/v receiver sound volume – MITSUBISHI ELECTRIC WD-65735 User Manual
Page 8
14
2. TV Setup
2. TV Setup
15
About Home-Theater Control Systems
This summary outlines the control methods available using the
TV’s remote control. You may wish to use one or
more of these methods for your home theater.
Case 1: The source device you want to control is connected directly to the TV
If the source device has CEC capability:
•
a. Check the device’s owner’s guide and enable the device’s CEC functionality
before connecting to the TV’s HDMI input. Wait for the TV to recognize the
device and switch to it.
b. Experiment with the TV’s remote control (slide switch set to
TV) to deter-
mine which device functions it can operate. See “NetCommand for HDMI
Devices” on page 28.
TV
CEC-Enabled
Source Device
HDMI
Cable
If the TV is a 736 or 835 series model (any connection type):
•
Set up NetCommand IR control of the source device’s keys as desired. See “IR
Emitter Placement,” page 52, and “Initial NetCommand Setup for Most Devices,”
page 53.
TV
Source
Device
Any Connec-
tion Type
For any TV model (any connection type):
•
Program the remote control to operate the source device. To control the device,
set the slide switch to the correct position for the device type. See Appendix C,
“Programming the Remote Control.”
Case 2: The source device you want to control is con-
nected to an A/V receiver connected to the TV
If the A/V receiver has CEC capability:
•
a. Check the A/V receiver’s owner’s guide and enable the A/V receiver’s CEC
functionality before connecting to the TV’s HDMI input. Wait for the TV to
recognize the device and switch to it.
b. Try using the TV’s remote control to operate volume and mute functions.
See “NetCommand for HDMI Devices” on page 28.
c. If the connected source device has CEC capability:
i) Enable the device’s CEC functionality before connecting to the A/V
receiver’s HDMI input. Wait for the TV to recognize the device and switch
to it.
ii) Test using the TV’s remote control to determine which device functions it
can operate.
Note: If the source device is connected to the A/V receiver by another con-
nection type (e.g., component video, S-video), see the alternative control
methods below.
TV
CEC-Enabled
Source Device
CEC-Enabled
A/V Receiver
HDMI
Cable
HDMI
Cable
If the TV is a 736 or 835 series model (any connection type):
•
a. Set up NetCommand IR control of the
A/V receiver’s keys as desired. See
“IR Emitter Placement,” page 52, and “Setting Up NetCommand Control of
an A/V Receiver,” page 57.
b. Set up NetCommand IR control of the
source device’s keys as desired.
See “Initial NetCommand Setup for Most Devices,” page 53.
For the special case of NetCommand IR control of a device connected to an
HDMI A/V receiver, see “NetCommand IR Control of a Device Connected to an
A/V Receiver with HDMI Output,” page 61.
TV
Source
Device
A/V Receiver
Any Connec-
tion Type
Any Connec-
tion Type
For any TV model (any connection type)
•
a. See Appendix C, “Programming the Remote Control.”
b. Program the remote control to operate the
A/V receiver. To control the A/V
receiver, set the slide switch to
AUDIO.
c. Program the remote control to operate the
source device. To control the
device, set the slide switch to the correct position for the device type.
Setup Procedure
Connect your devices to the TV, making note
1.
of which TV input is used for each device. See
chapter 3, “TV Connections.” The TV and the
devices can be either on or off when connecting.
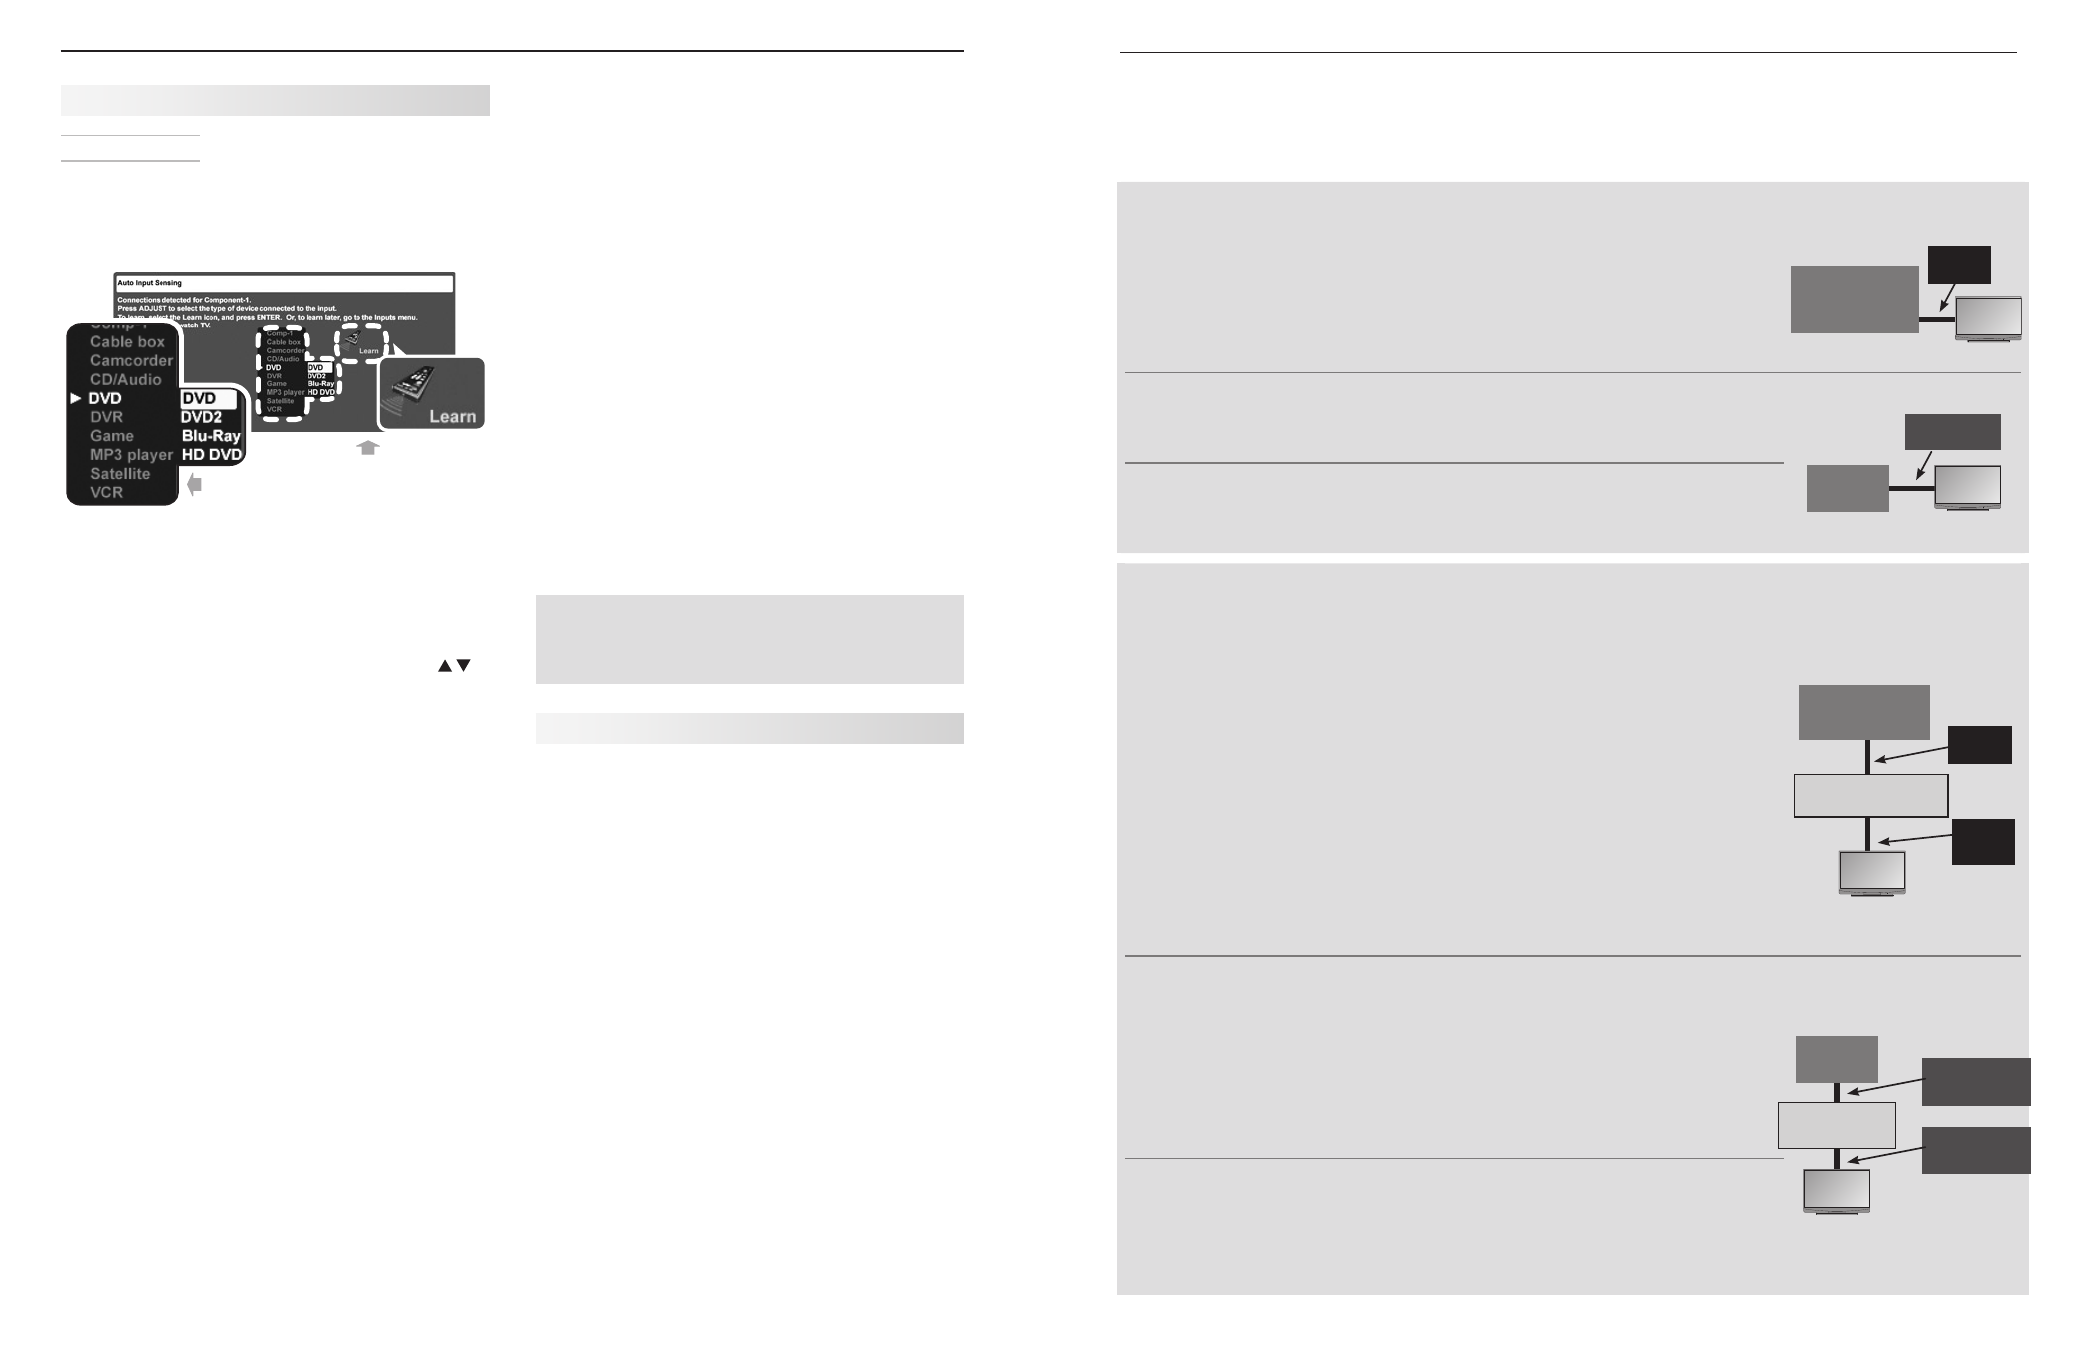
First select a
device type.
Next perform
IR “learning” (if
available).
Sample Auto Input Sensing screen
Power on the TV if not already on. When the TV
2.
detects a connection, the
Auto Input Sensing screen
opens.
• Most Device Types: Specify the device type.
a. In the
Auto Input Sensing screen, press
to move through the device list to select the
device type connected to the input. The device
type you select here will appear as an icon in the
Input Selection menu.
b.
736 and 835 Series Models: To perform
NetCommand “learning” after selecting the
device type, highlight the Learn icon and press
ENTER. See chapter “Initial NetCommand Setup
for Most Devices,” page 53.
•
A/V Receiver: The TV can detect audio connections
on the
DIGITAL AUDIO OUTPUT jack and the right
(red) analog
AVR AUDIO OUTPUT jack.
736 and 835 Series Models: To perform NetCom-
mand “learning” now, highlight the Learn icon in
the
Auto Output Sensing screen and press ENTER.
See “Setting Up NetCommand Control of an A/V
Receiver,” page 57.
•
HDMI Devices Compatible with the TV’s
NetCommand for HDMI Feature (all models):
Compatible HDMI devices with CEC enabled are
often recognized automatically by the TV. After con-
necting the device, you may briefly see the standard
Auto Input Sensing screen shown above before
the TV recognizes the device type. The TV’s remote
control may operate some device functions without
further setup. To add control over more functions:
All Models:
-
Program the TV’s remote
control to operate the device.
Setting Up TV Inputs, continued
7
-
36 and 835 Series Models: Perform
NetCommand IR “learning” to add functions.
Press
3.
EXIT to close the Auto Input Sensing screen. The
TV will then display the
Auto Input Sensing screen for
the next connection it finds.
More About Auto Input Sensing
• Choose a different name for each input.
• Antenna inputs (
ANT 1/ANT 2) are never detected,
although you can turn off unused antenna inputs in the
Inputs > Name menu.
• You can change the device type at a later time using the
Inputs > Name menu (page 47). Any “learned” NetCom-
mand IR codes will be erased, however.
Changing Devices on an HDMI Input:
Disconnect the HDMI device.
1.
Turn off the HDMI input in the
2.
Inputs > Name menu.
Connect the new device and the
3.
Auto Input
Sensing screen will display. If you want the device
under NetCommand IR control, perform NetCom-
mand “learning” for the new device.
Note for Analog A/V Receivers
When you disconnect an analog A/V receiver, be
sure to manually change the Speakers setting to
TV
to hear sound from the TV speakers.
Controlling A/V Receiver Sound Volume
Although the TV detects when you connect an A/V receiver,
you must use one of the methods below to control sound
volume from the A/V receiver.
With a Standard TV Setup (all models)
•
Recommended Method: Program the TV’s remote
control for your A/V receiver and enable the Audio Lock
feature. See Appendix C, page 65.
• Program the TV’s remote control for your A/V receiver
and set the TV remote’s slide switch to the
AUDIO posi-
tion to control A/V receiver volume. Set the switch back
to the
TV position to control the TV.
• Use the remote control that came with the A/V receiver.
With an HDMI CEC-enabled A/V Receiver (all models)
The TV’s remote control may control some or all functions
of the A/V receiver without further setup. Connect the A/V
receiver to the TV with an HDMI cable and test the TV’s
remote control with the slide switch in the
TV position.
With NetCommand Control of an A/V Receiver (736 and
835 series models)
• Set up NetCommand control of the A/V receiver’s volume
functions in the
Inputs > AVR menu. The TV’s remote
will then automatically control A/V receiver volume. See
page 57.
• Use any of the methods described for the standard
TV setup.