Status display, Channelview channel listings, Netcommand for hdmi devices – MITSUBISHI ELECTRIC WD-65735 User Manual
Page 15
28
4. TV Operation and Features
4. TV Operation and Features
29
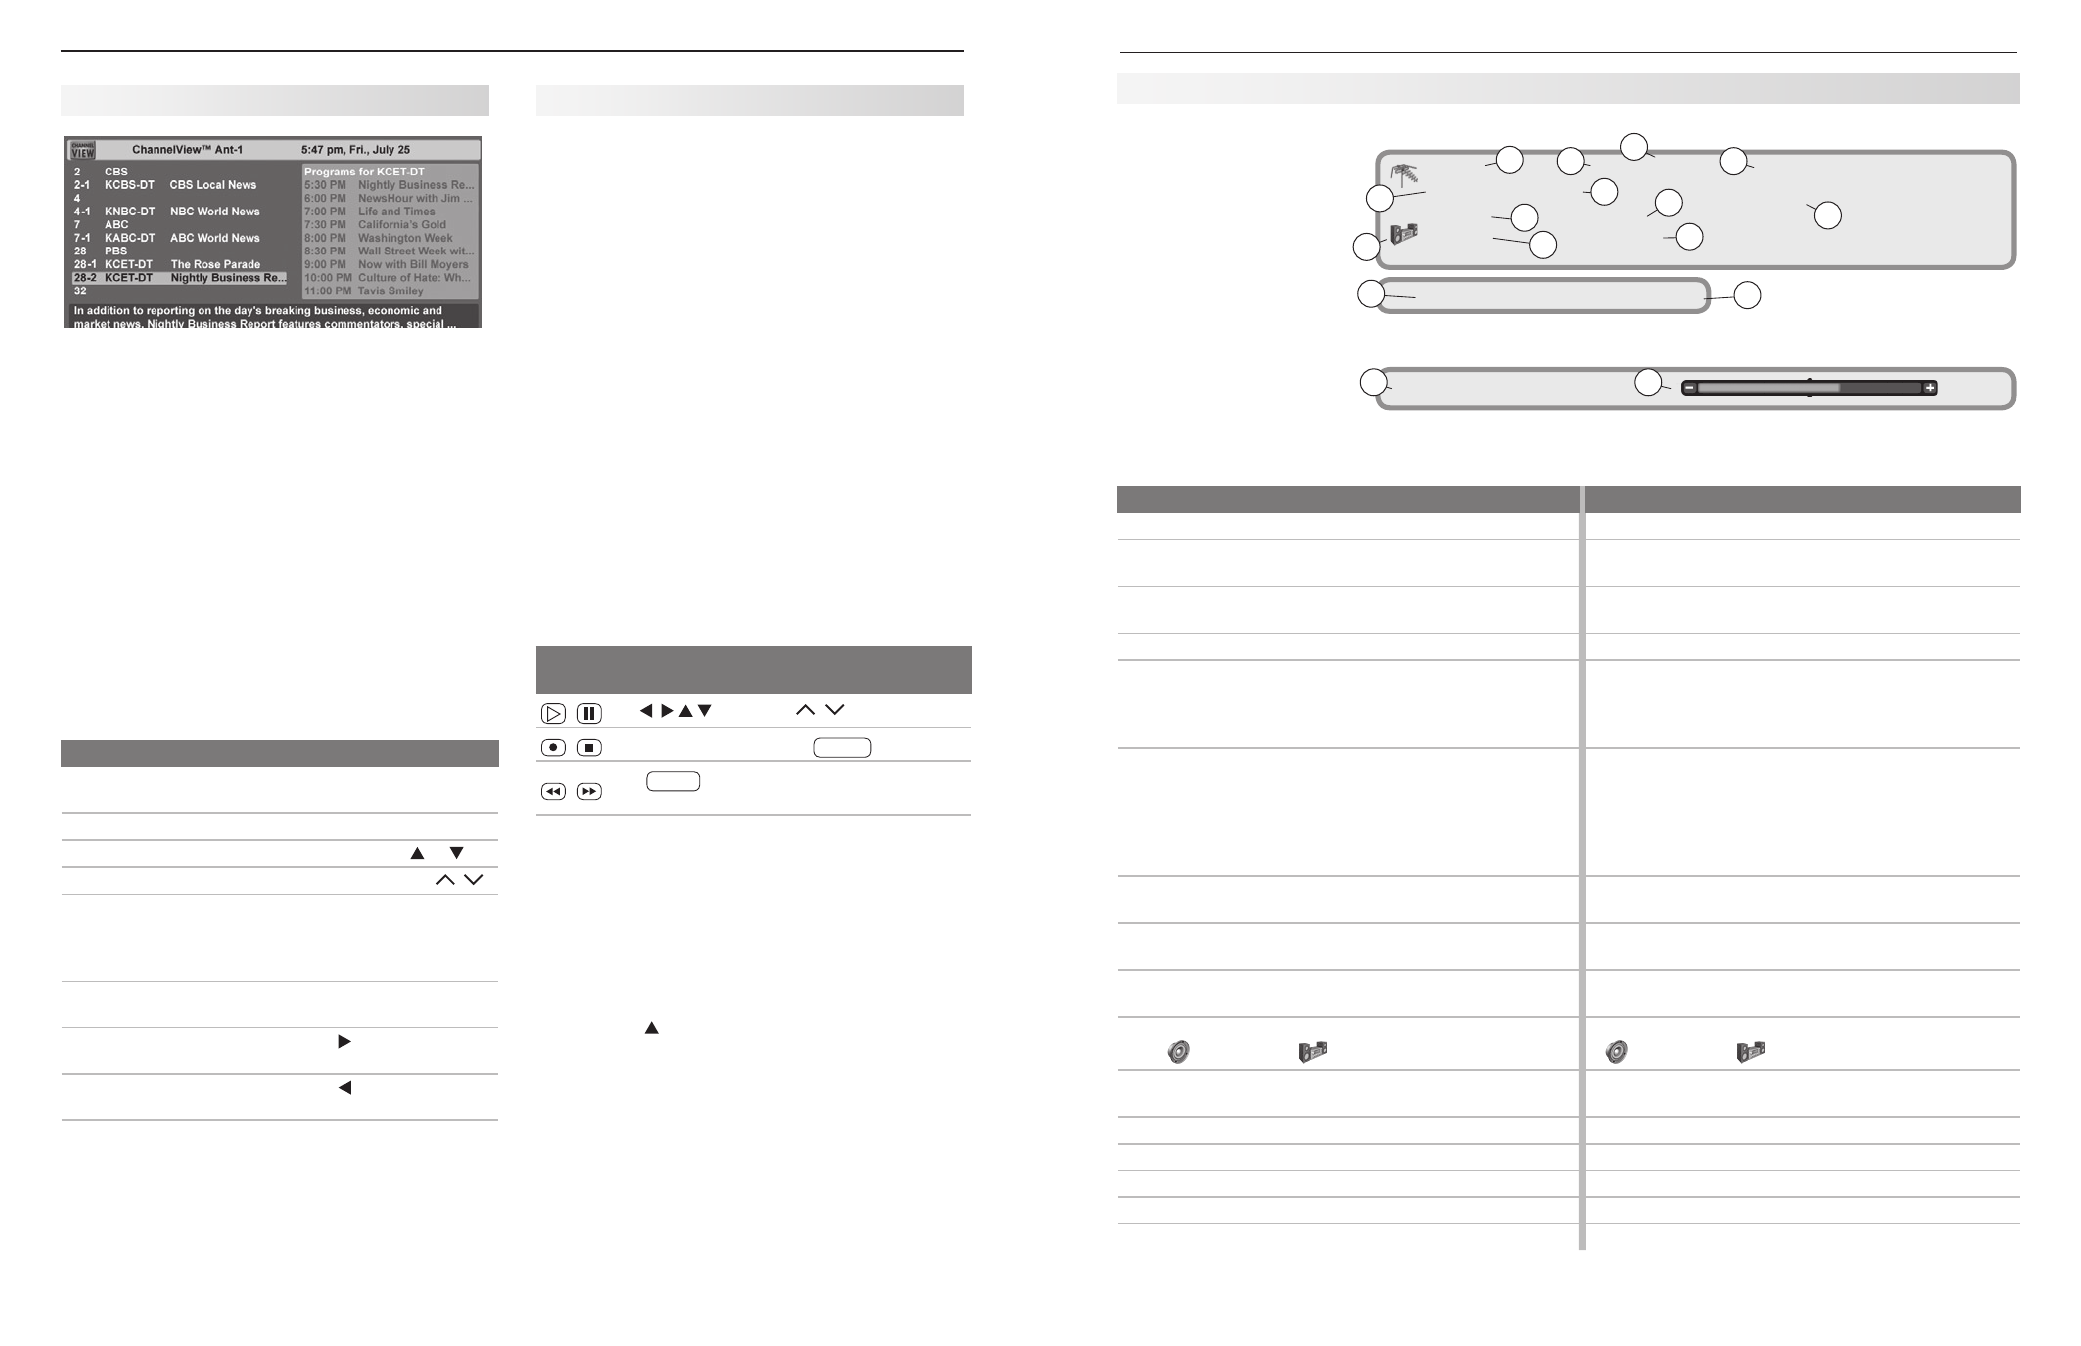
Press the
INFO key to see the
on-screen status display.
The most common displays
are shown here. You will
rarely, if ever, see all status
indicators at the same time.
Status Display
Tuesday 9:10 PM
Sleep 30 min
14
13
MUTE
Signal Strength 16
15
On-screen status display
sample information
8
Ant 1
7-1 KABC-HD
Monday Night Football
HD 16:9 Standard
St. Louis vs. Tampa Bay
TV-PG
Fav1
Stereo
English
6
9
12
1
3
4
2
11
5
7
8
10
Analog Sources
Digital Sources
1.
Source antenna or input
Source antenna or input
2.
Analog channel being received (antenna sources only)
Digital major and sub-channel numbers (antenna
sources only)
3.
Analog channel name (if named in the
Setup > Edit
menu); antenna sources only.
Digital Channel Name (if broadcast or if named in the
Setup menu > Edit options; antenna sources only)
4.
(Does not apply)
Program name (if broadcast)
5.
Signal Type Being Received. Possible:
On antenna sources or
VIDEO composite or
S-VIDEO jacks: 480i
On component jacks: 480i, 480p, 720p, 1080i
Signal Type Being Received. Possible:
On antenna sources: SD 4:3, SD 16:9, HD
On HDMI: 480i, 480p, 720p, 1080i, 1080p, all
supported PC resolutions
6.
Screen Format in use. Possible:
Analog 480i /480p signals: Standard, Expand,
Zoom, Stretch, Stretch Plus, Narrow
720p/1080i signals: Standard, Wide Expand,
Zoom
Screen Format in Use. Possible:
SD 4:3, 480i, or 480p: Standard, Expand, Zoom,
Stretch, Stretch Plus, Narrow
SD 16:9 or HD 16:9, 720p, or 1080i: Standard,
Wide Expand, Zoom
1080p: Standard, Wide Expand, Zoom
7.
Current Fav bank number of channel (antenna
sources only)
Current Fav bank number of channel (antenna
sources only)
8.
(Does not apply)
Program description (if broadcast); antenna sources
only)
9.
V-Chip rating (antenna sources or
VIDEO composite
and
S-VIDEO jacks only)
V-Chip rating (antenna sources
only)
10. Audio Source. Possible:
TV speakers,
external sound system
Audio Source. Possible:
TV speakers,
external sound system
11. Listen To indicator. Possible: Stereo, Stereo SAP,
SAP (antenna sources only))
Listen To indicator. Possible: Stereo, Surround 3.1,
Surround 5.1, Surround 7.1, Dual Mono
12. (Does not apply)
Current language (antenna sources only)
13. Day and time
Day and time
14. Sleep Timer remaining time
Sleep Timer remaining time
15. Mute indicator
Mute indicator
16. (Does not apply)
Signal strength indicator (antenna sources only)
ChannelView Channel Listings
ChannelView screen
ChannelView™ shows memorized channels on
ANT
1 or ANT 2. It displays channel names and program
information as sent by broadcasters or your local cable
service provider and may be incomplete
. No program
information is displayed for analog channels. An analog
channel name is displayed only if you assigned a name
in the
Setup > Edit menu (page 43).
To receive ChannelView updates:
Keep the Energy Mode set to
•
Fast Power On
Set the TV clock
•
Leave the TV powered off for a while each day
•
to receive updates.
Note: Whenever you watch a digital channel, listings
are updated for the channel you are watching.
Using ChannelView
Feature
Press Key
See ChannelView listings
from
ANT 1 or ANT 2.
Press
GUIDE.
Close ChannelView
Press
GUIDE or EXIT.
Scan channels one by one. Press and hold or .
Scan channels quickly.
Press and hold
PAGE / .
Jump to listings for a spe-
cific channel.
1. Enter the channel
number (see numbers
in upper left of screen).
2. Press
ENTER.
See more of the program
description (if available).
Press
INFO.
Move navigation to the
program listings.
Press .
Move navigation to the
channel listings.
Press .
Tune to the highlighted
channel.
Press
ENTER.
NetCommand for HDMI Devices
Available for all TV models. The TV’s remote may
operate some functions of compatible CEC devices
without any additional setup. See the your devices’
owner’s guides for instructions on enabling the devices’
CEC capabilities.
If you have a CEC-enabled A/V receiver, CEC-enabled
devices connected to the A/V receiver with an HDMI
cable may also be controllable. They can be selected
from the TV’s
Input Selection menu. See “A/V
Receiver with HDMI Output,” page 23, and the
Inputs >
Name menu, page 47.
Test your equipment with the TV’s remote control to
find out which commands are supported. See below
for commands that may be available, depending on the
individual device.
As an example of using NetCommand for HDMI
devices, you would press
PLAY on the device itself to:
Turn on the TV if not already on
•
Switch to the device (no need to display the
•
Input
Selection menu)
Begin play of the device
•
CEC-enabled VCR, DVD, and DVR functions that
may be available:
Record/
Playback
Menu
Navigation
Channel Tuning
Other
CH /
GUIDE
ENTER
Digits
0–9,
—
CANCEL
F1 (content)
*
—
CANCEL
(to cancel)
ENTER
MENU
*
The
F1 key defaults to work like the devices’s LIST
key.
CEC-enabled A/V receiver functions that may be
available:
Try the
•
VOL, MUTE, and menu-navigation keys.
To open the A/V receiver menu, follow these steps:
•
1.
While watching TV, press
AUDIO.
2.
Press repeatedly until the
Speakers option
displays.
3.
While
Speakers is still displayed, press MENU.
736 and 835 series models: You can add commands
in addition to those supported by CEC. Use NetCom-
mand IR “learning” after connecting and placing IR
emitters for the devices. See “Initial NetCommand
Setup for Most Devices,” page 53, and “Setting Up
NetCommand Control of an A/V Receiver,” page 57.