Operating netcommand-controlled devices, continued, Setting up netcommand control of an a/v receiver – MITSUBISHI ELECTRIC WD-65735 User Manual
Page 29
56
6. NetCommand IR Control (736 and 835 Series TVs)
6. NetCommand IR Control (736 and 835 Series TVs)
57
Key Name in
Learning Screen
Special Operation Description and Setup
How to Use
Guide
Displaying the Disc Menu (DVD or high-defini-
tion disc format)
“Learn” the
DISC MENU, TOP MENU, or other key as
named on the original remote in the
Guide learn-
ing position.
While watching the device, press
GUIDE to display the
disc menu.
Displaying the On-Screen Program Guide
(cable box or satellite receiver)
“Learn” the
1.
GUIDE key on the original remote in
the
Guide learning position.
Learn the
2.
PAGE and PAGE keys of the
original remote in the
Page Up and Page Dn
learning positions.
While watching the device, press
1.
GUIDE to
display the guide.
Press
2.
CH/PAGE / to send the Page Up/Dn
commands for the guide.
Page Up
Page Dn
Using Page Up/Down
If the device’s original remote control has separate
keys for
Channel Up/Dn and Page Up/Dn, the TV
remote control’s
CH/PAGE / key can work like
the two separate keys.
“Learn”
1.
CHANNEL / in the Channel Up/Dn
positions.
“Learn”
2.
PAGE / in the Page Up/Dn posi-
tions.
Inside the Guide
•
Press
CH/PAGE / to send the Page Up/Dn
commands.
Outside the Guide
•
Press
CH/PAGE / to send the Channel Up/
Dn signal.
Enter
Enter Functions (cable boxes, satellite receivers, etc.)
Some devices have two keys that have “enter” functions. One key is for menus and is often labelled
SELECT or OK. A second key is for use with number keys for direct channel selection. NetCommand uses
the same
ENTER key for both operations.
When
ENTER has a menu or guide function or when
the original remote control uses the same key for
menus and channel selection:
Learn the
ENTER, SELECT, or OK key in the
NetCommand
Enter learning position.
Press
1.
MENU or GUIDE to display the device’s menu
or guide.
Press
2.
ENTER within the menu and NetCommand
will send the
Enter signal for menus.
Enter (digits) When ENTER is for channel changes, i.e., the original
remote control has a separate
ENTER key for this
function):
Learn the
ENTER key for channel selection in the
NetCommand
Enter (digits) learning position.
Use this learning position only if the original
remote control has separate keys for
Enter in
menus and
Enter for channel selection.
Press digit key(s) and then press
ENTER.
NetCommand will send the
Enter signal for channel
selection.
Cancel
CANCEL as the Cancel or Exit Function
“Learn” the
Cancel or Exit function in the
NetCommand
Cancel learning position
Press
1.
MENU or GUIDE to display the menu or guide.
Press
2.
—
CANCEL and NetCommand will send the
Cancel or Exit signal.
—
(separator)
The symbol “—” can serve as the separator
between a digital channel’s main and sub-
channel digits, e.g., digital channel 12-1 (main
channel is 12, sub-channel is 1).
“Learn” the channel separator function in the
NetCommand
– (separator) learning position.
Press digit key(s) and press
—
CANCEL . NetCommand
will send the channel-separator signal.
Operating NetCommand-Controlled Devices, continued
Several varieties of A/V receiver control are described
here using the
Inputs > AV Receiver menu, shown on
this page.
Controlling power and volume is described on this
•
page.
For most equipment setups, see “A/V Receiver
•
Control: Automatic Audio Switching” on the next
page.
If your A/V receiver has an HDMI output, you have
•
the option of sending both audio and video through
the A/V receiver over a single HDMI cable to the TV.
See “A/V Receiver Control: Automatic Video and
Audio Switching via HDMI,” page 60.
Note: To set up control of other device types, see
“Initial NetCommand Setup for Most Devices,”
page 53.
control at the TV and press
ENTER to begin learning
for
Power On.
AV Receiver screen.
Perform NetCommand
IR “learning” for A/V
receiver power and
volume keys.
When the
3.
Power On text starts flashing, aim the
A/V receiver’s remote control at the TV and press
and hold the
POWER or POWER ON key until a check mark
appears next to
Power On.
If the text stops flashing before the check mark
•
appears, repeat this step.
To remove the key from NetCommand control,
•
press the
CANCEL key while the key name is
highlighted.
Setting Up NetCommand Control of an A/V Receiver
A/V Receiver Control: Power and Volume
Perform this setup to operate the A/V receiver’s power
and volume functions with the TV’s remote control.
To perform this setup you need:
The remote controls for both the TV and the
•
A/V receiver.
The IR emitter cable supplied with the TV.
•
Before You Begin
Connect your A/V receiver to the TV and any addi-
1.
tional devices. See chapter 3, “TV Connections,”
for suggestions.
Important: You must connect the
A/V receiver to the TV’s audio output; use the TV’s
AVR AUDIO OUTPUT or DIGITAL AUDIO OUTPUT
jack.
Connect the IR emitter cable to the TV and position
2.
the IR emitter where it can send signals to the A/V
receiver. See “IR Emitter Placement,” page 52.
Set the
3.
TV’s remote control slide switch to the TV
position and power on the TV if not already on.
Setup to Control A/V Receiver Power and Volume
Open the
1.
AV Receiver screen in one of two ways:
If using the
•
Auto Output Sensing screen for
the A/V receiver, highlight the
Learn icon and
press
ENTER to open the AV Receiver screen.
If performing NetCommand setup at any time
•
after the A/V receiver has been recognized
through Auto Output Sensing:
Press
MENU, highlight Inputs, and highlight AV
Receiver to open the AV Receiver screen.
The first function highlighted in the
2.
AV Receiver
screen is always
Power On. Aim the TV’s remote
1
2
3
4
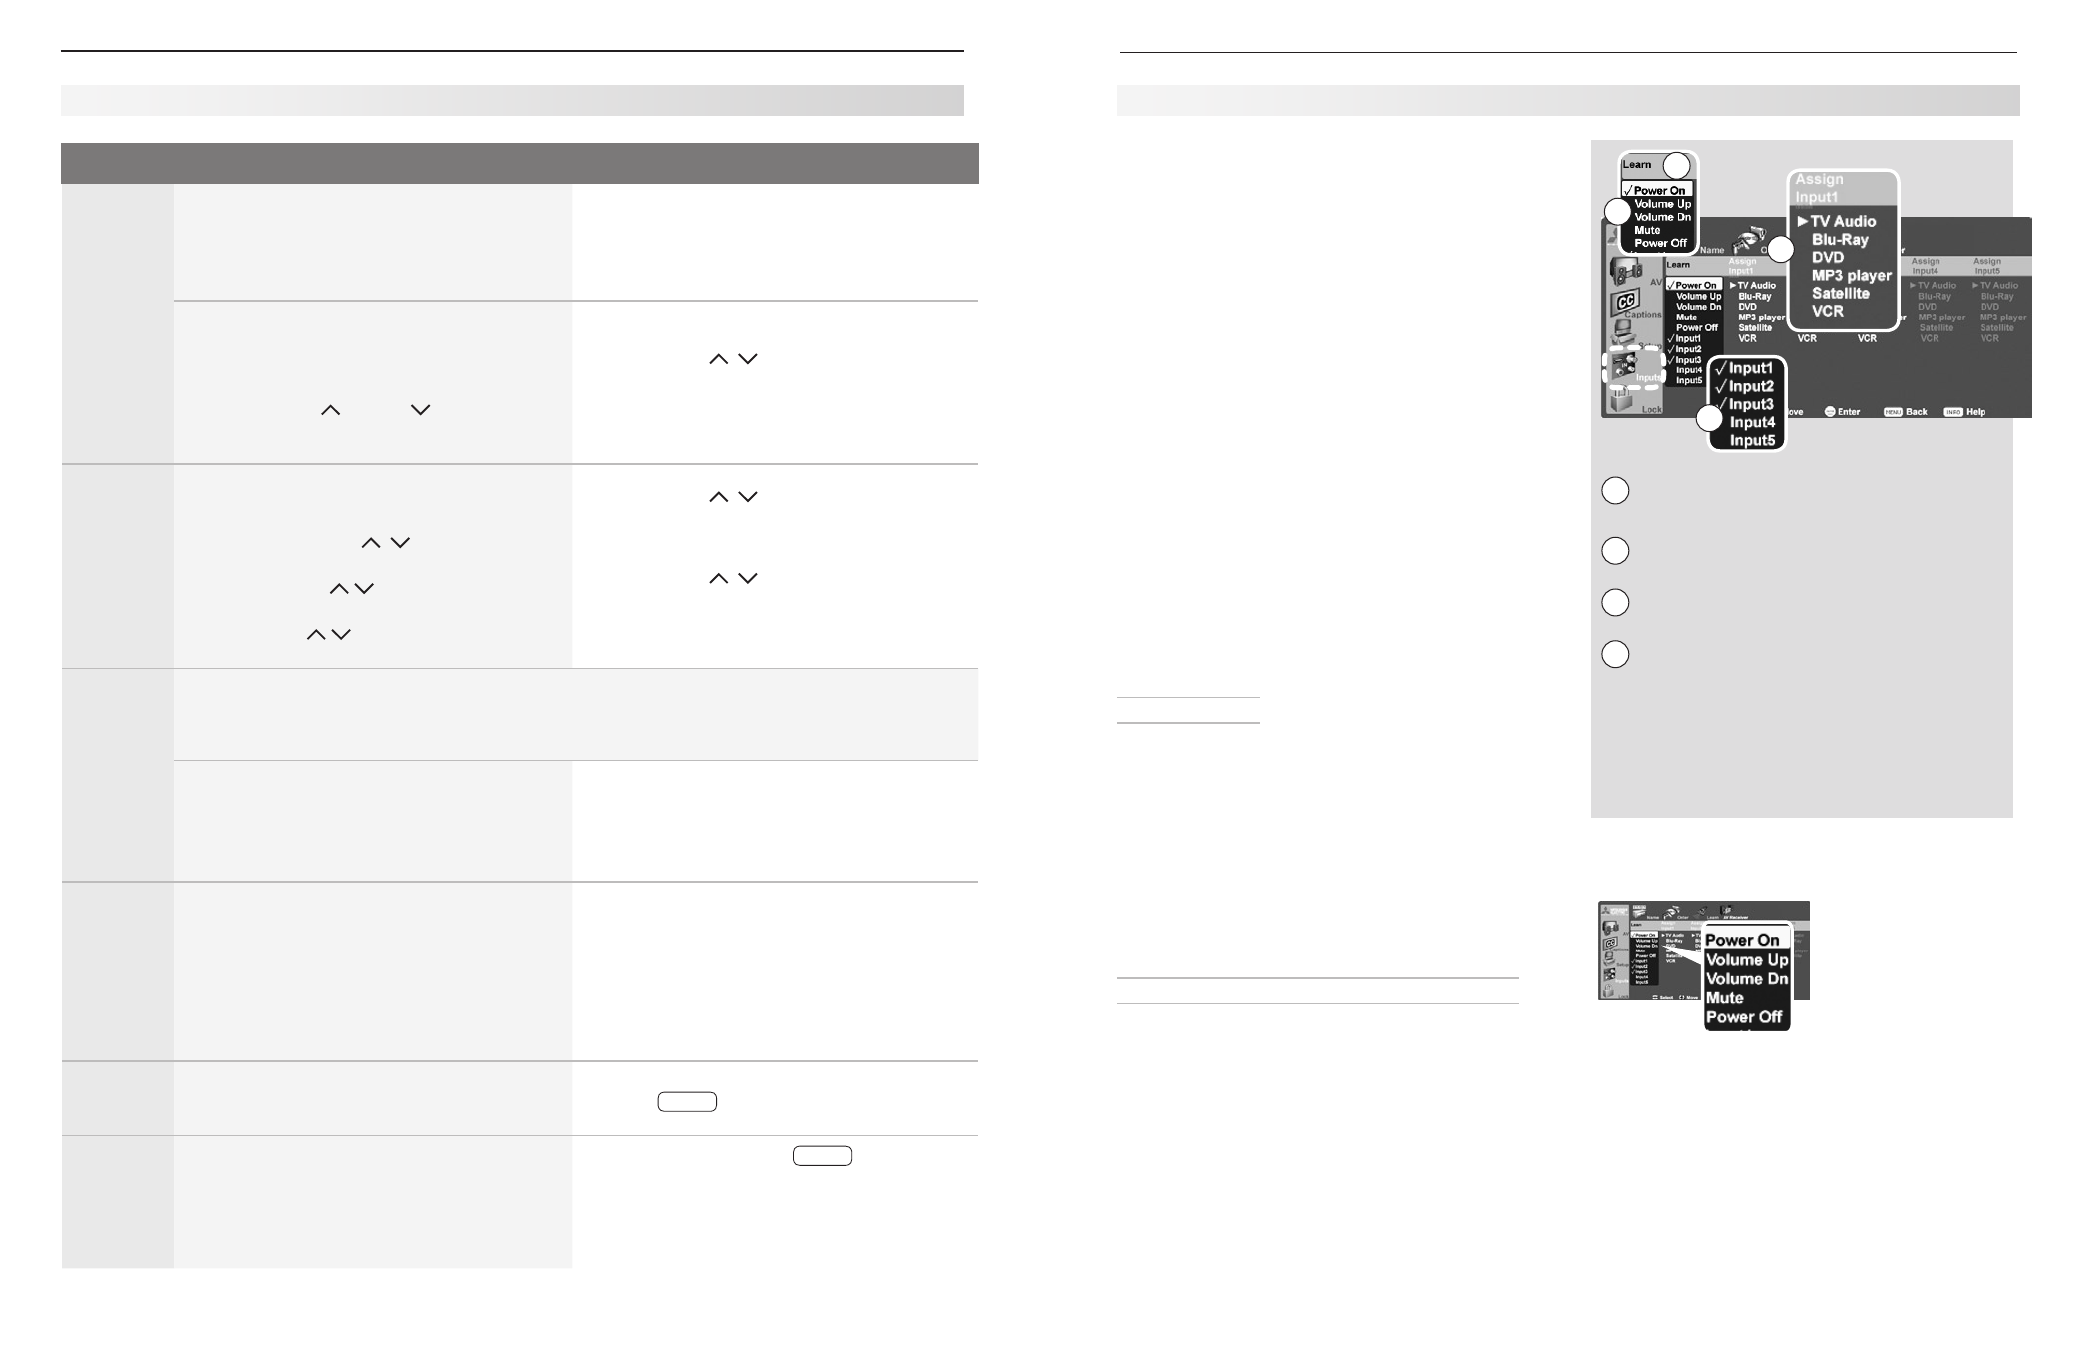
AV Receiver menu overview
1 The Learn column lists “learnable” keys on the
A/V receiver’s remote control.
2 A check mark next to a key name indicates it
has been “learned” by NetCommand.
3 Input1 through Input5 are arbitrary names the
TV uses to uniquely identify A/V receiver inputs.
4 After “learning” IR codes for A/V receiver inputs,
use the
Assign Input column to identify the device
connected to the associated A/V receiver input.
For example, if you “learned” the A/V receiver’s
TV audio input as
Input1, select TV Audio from
the
Assign Input1 column. Likewise, if you
“learned” the A/V receiver’s DVD input as
Input2,
select
DVD in the Assign Input2 column.