Tv operation and features, Camcorder, Audio-only device – MITSUBISHI ELECTRIC WD-65735 User Manual
Page 13: Choosing a viewing source, Sleep timer, A: y pb pr component video connection, B: composite video connection, C: hdmi connection, Tv tips
24
3. TV Connections
25
A: Y Pb Pr Component Video Connection
Required: Component video and analog stereo audio
cables supplied with the camcorder.
Connect component video cables from
1.
VIDEO OUT
on the camcorder to the TV’s
Y Pb Pr component
jacks on the front panel.
Connect left (white) and right (red) audio cables
2.
from
AUDIO OUT on the camcorder to AUDIO L and
R on the TV.
L-AUDIO-R
VIDEO/Y
Pb
Pr
USB
HDMI 4
DVI AUDIO
I
N
P
U
T
4
L-AUDIO-R
HDMI 4
DVI AUDIO
HDMI 4
VIDEO/Y
Pb
Pr
L-AUDIO-R
VIDEO/Y
Pb
Pr
L-AUDIO-R
VIDEO/Y
"$PNQPOFOU
WJEFPQMVTBVEJP
#$PNQPTJUFWJEFP
QMVTBVEJP
$)%.*BVEJPWJEFP
)%.*PGGFSFEPO
BOETFSJFTNPEFMT
57GSPOUQBOFM
57
4UFSFPBVEJPDBCMF
)%.*UP%7*DBCMF
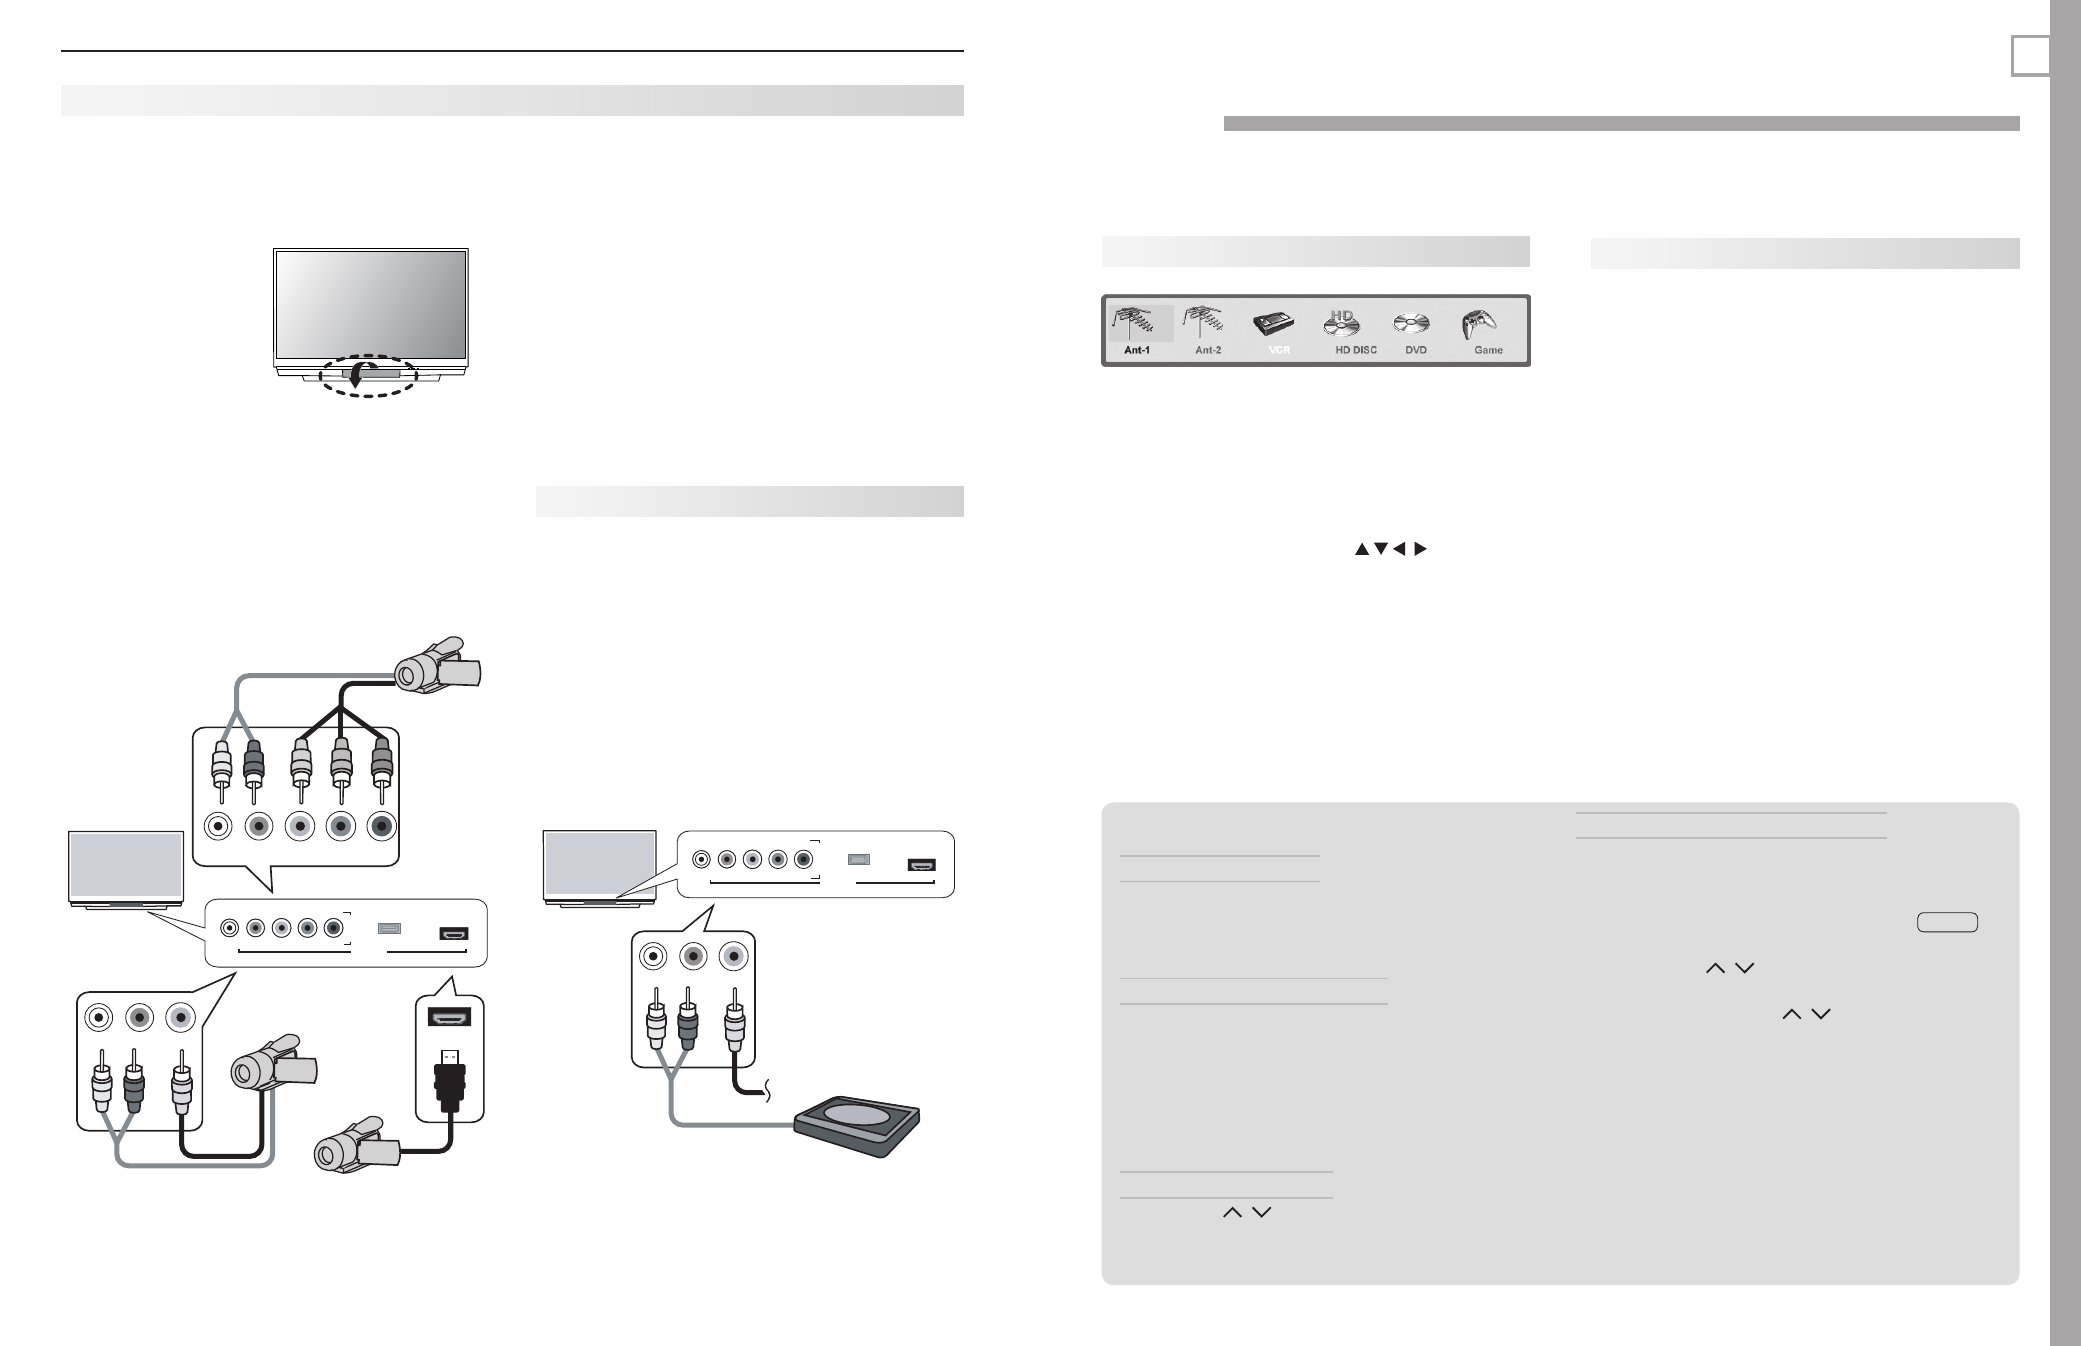
Figure 13. INPUT 4 on the front of the TV offers up to 3
connection options for a camcorder.
B: Composite Video Connection
Required: Composite video and analog stereo audio
cables supplied with the camcorder.
Connect the composite video cable from
1.
VIDEO
OUT on the camcorder to VIDEO/Y on the front of
the TV.
Connect left (white) and right (red) audio cables
2.
from
AUDIO OUT on the camcorder to AUDIO L and
R on the front of the TV.
C: HDMI Connection
Required: HDMI cable supplied with the camcorder.
736 and 835 series models. Connect the camcorder to
the TV’s
HDMI jack on the front panel.
Camcorder
Inputs on the front of the TV (
INPUT 4) offer the most
convenient way to connect a camcorder, although you
can use jacks located on the back panel instead. Three
different connection options are described on this
page.
Use jacks on the TV
front panel to connect a
camcorder
Audio-Only Device
If you wish to connect an audio-only device to the TV,
such as an audio CD player or an MP3 player, follow
these instructions. The front panel offers the most
convenient jacks for this purpose, but you can use the
rear-panel jacks as well.
Insert an unused RCA-style connector into the
1.
VIDEO/Y jack. The presence of this connector acti-
vates the TV’s auto input sensing feature.
Connect left (white) and right (red) audio cables
2.
from
AUDIO OUT on the device to AUDIO L and R on
the TV.
Keep the connector in the
3.
VIDEO/Y jack while using
the audio-only device.
L-AUDIO-R
VIDEO/Y
Pb
Pr
USB
HDMI 4
DVI AUDIO
I
N
P
U
T
4
L-AUDIO-R
VIDEO/Y
L-AUDIO-R
VIDEO/Y
I
N
P
U
T
4
"VEJPPOMZEFWJDF
57GSPOUQBOFM
57
Figure 14. First insert an unused RCA-type connector
into the
VIDEO/Y jack on the TV front or back panel
before connecting audio cables.
TV Operation and Features
4
Choosing a Viewing Source
Input Selection menu
Choose a viewing source from the
Input Selection
menu. The current TV input appears as a full-color icon
in this menu.
Press
1.
INPUT to display the Input Selection menu. If
there are only two inputs to the TV,
INPUT switches
between them without displaying the menu.
Highlight an input icon using
2.
.
Press
3.
ENTER to switch to the input and close the
menu.
More About the Input Selection Menu
• To assign meaningful names to the icons, see the
Inputs > Name menu, page 47.
• To rearrange the icons, see the
Inputs > Order
menu, page 47.
Sleep Timer
The Sleep Timer turns the TV off after the length of time
you set. To set the TV to turn on at a certain time, see
the
Setup > Timer menu on page 45.
Setting the Sleep Timer
Press
1.
SLEEP on the remote control.
Press
2.
SLEEP additional times to increase the time in
30-minute increments up to the maximum of 120
minutes.
Press
3.
EXIT or wait five seconds without pressing any
keys for the message to disappear.
Press
4.
SLEEP to view the time remaining before the
sleep timer turns off the TV.
Cancelling the Sleep Timer
Press
1.
SLEEP to display the on-screen message.
Press
2.
SLEEP repeatedly until OFF is displayed.
Note: After five seconds of inactivity, the message box
will disappear.
TV Tips
Turning the TV On or Off
To turn the TV on or off, point the remote control at the
front of the TV and press the
POWER button. Alterna-
tively, press the
POWER button on the control panel of the
TV.
If You Turn Off the TV by Mistake
Press
1.
POWER again within about 60 seconds (while
the lamp is still hot) to have the TV come back on
immediately.
If the
2.
LAMP indicator starts blinking (about 60
seconds after you shut off power),
wait a few
moments for the LAMP indicator to stop blinking
and press POWER to turn the TV on again.
Controlling Sound Volume
Press
•
VOL / to adjust the sound level.
See also “Controlling A/V Receiver Sound Volume” on
•
page 14.
Changing Channels (antenna sources)
To change channels:
Enter the channel number using the number keys
•
on the remote control and press
ENTER. For a two-
part digital channel, such as 3-1, press
3
—
CANCEL 1
to enter a dash (separator).
Press
•
CH/PAGE / to change channels one
channel at a time.
Press and hold
•
CH/PAGE / to move quickly
through channels.
Press
•
QV (QuickView) to switch back to the previ-
ously tuned channel.
Press
•
GUIDE to display ChannelView channel listings,
highlight a channel, and press
ENTER to select.
Use the Fav (Favorites) feature to set up lists of
•
favorite channels and tune to them with the
FAV key.
See
Setup > Edit > Fav 1–Fav 6 on page 43.
NOTE: Perform channel memorization to make finding
channels easier. See
Setup > Scan, page 42.