Setup menu, Setup menu, continued – MITSUBISHI ELECTRIC WD-65735 User Manual
Page 22
42
5. TV Menus
5. TV Menus
43
Setup Menu Options
Language
English
Spanish
Display on-screen menus in either English or Spanish.
Note: To listen to audio in other languages (when available), see the section
on the
AV menu, Audio submenu, and refer to either Listen To > SAP (analog
signal) or Language (digital signal).
Scan
Ant-1 Air
Ant-1 Cable
Ant-2 Air
Ant-2 Cable
Scan memorizes broadcast channels to make them easier to find. To start
channel memorization:
1. Highlight one of the input selections based on your connection to
ANT 1
or
ANT 2:
•
Air when connected to an indoor or outdoor antenna.
•
Cable when connected to direct cable (no cable box)
2. Press to highlight
START.
3. Press ENTER to start channel memorization for the selected input.
Setup Menu
Setup menu, Scan option
Use the
Setup menu to:
• Select English or Spanish for menus and on-screen
text.
• Scan the channels available for the antenna or cable
service connected to the
ANT 1 or ANT 2 jacks.
• Edit channel options, including channel locking.
• Set the TV’s internal clock.
• Set the TV Timer to turn on the TV automatically at
a designated time.
• Set the energy mode for power consumption when
the TV is powered off.
• Set the TV Lamp Mode.
• Turn 3D mode on and off.
Setup Menu Options
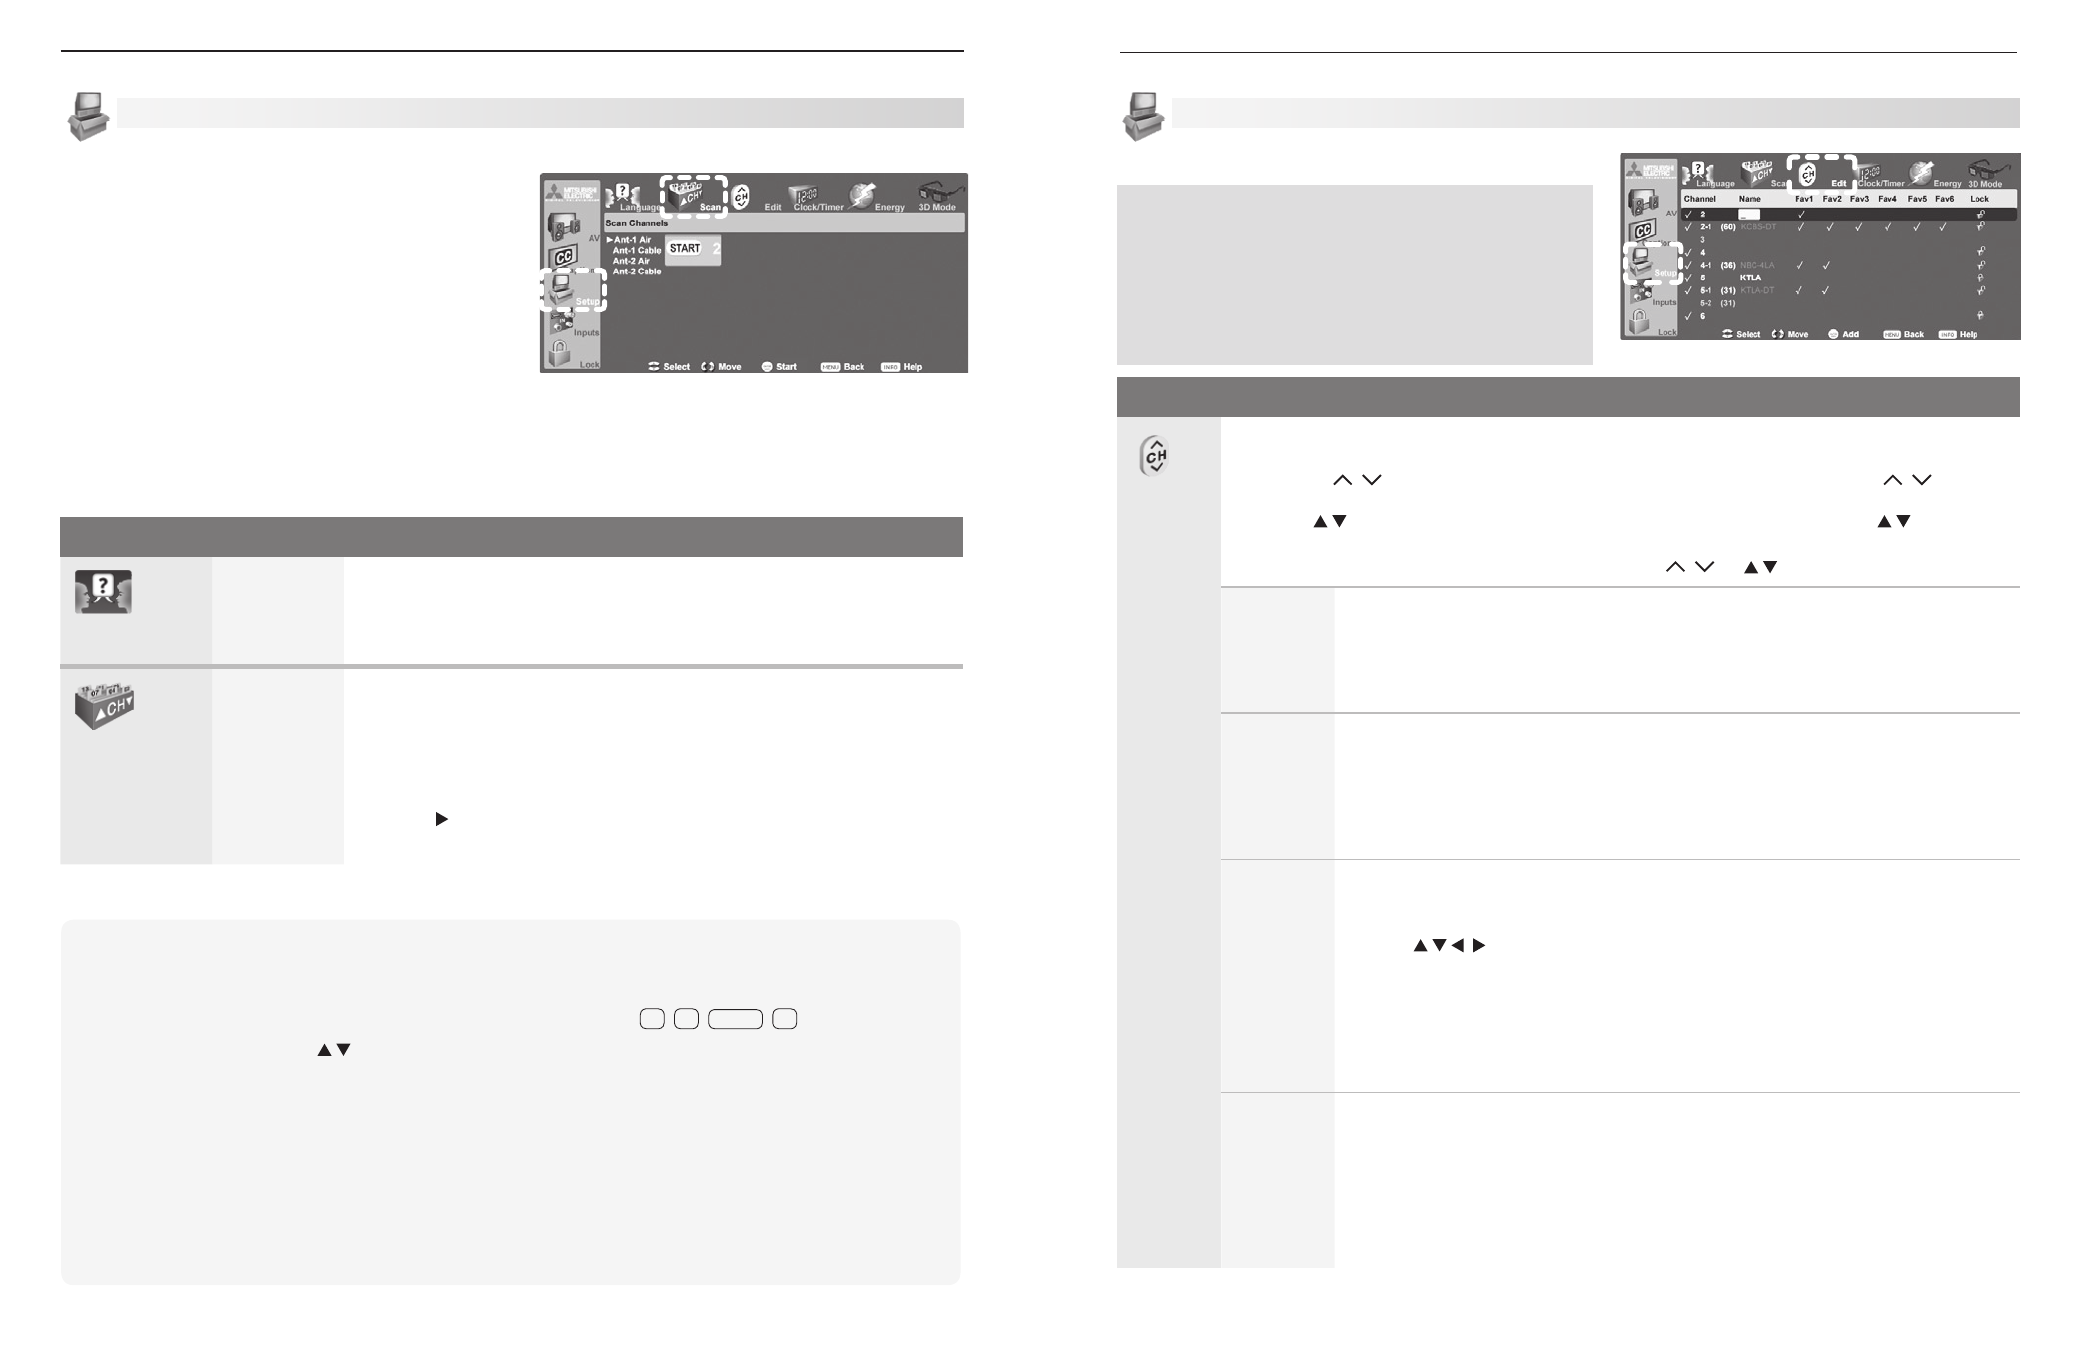
Edit
Use the
Edit menu to edit channel options when ANT 1 or ANT 2 is the current source,
To highlight a channel number to edit:
• Press
CH / to jump to the next page of channel numbers. Press and hold CH / to speed
through pages.
• Press to move through all channel numbers, one at a time. Press and hold to speed
through channel numbers.
The TV tunes to the highlighted channel on release of
CH / or .
Channel
Channels marked with a check are in memory. To add or delete a channel from
memory, highlight the channel number and press
ENTER. To add a single digital channel
not in the list, see the notes under
Scan on the opposite page.
Digital channels are listed by virtual channel number with the physical channel number
shown in parentheses.
Name
Assign a custom name up to six characters long to memorized channels. You can
name analog channels and digital channels if broadcast without pre-assigned names.
1. With the cursor in the
Name field, press a number key repeatedly to cycle through
the characters associated with the key, including !, &, blank (
1 key) and /, *, - (0 key).
2. Press
ENTER to set the letter and move to the next letter position. To delete the
current character and move back one position, press
CANCEL.
Fav1–Fav6
Use the six Fav channel banks to store groups of your favorite channels. For example,
you can set up a Fav channel bank for each of your favorite program types (e.g., sports,
news, children’s programs) or set up a bank for each TV user.
• Use to move the highlight through the
Fav area of the screen.
• Press
ENTER to insert a check mark to add the highlighted channel to one of the Fav
banks.
• The same channel can be added to multiple Fav banks
• To remove a channel from a Fav bank, highlight the check mark and press
ENTER.
Note: To set up Fav channel banks without using this menu, see “Fav (Favorite Chan-
nels)” on page 30.
Lock
Lock channels so that a pass code is required to view them. When you rememorize
channels, all lock settings are cleared.
Highlight the
Lock column and enter a pass code when prompted. If you previously
set a pass code to open the main
Lock menu, use the same pass code. See “Lock
Menu,” page 48 for more on pass codes.
To lock or unlock a channel, highlight the lock icon for the channel and press
ENTER to
switch between the locked and unlocked versions of the icon
.
Setup Menu, continued
Edit
Setup menu, Edit channel options
Virtual Channel Number (digital channels only). A channel
number sent by a local broadcaster. Usually the virtual
number is associated with the corresponding analog
channel number. For example, a broadcaster may associ-
ate digital channel 2-1 with their analog channel 2.
Physical Digital Channel Number. The channel number
officially assigned to the actual broadcast frequency; shown
on screen in parentheses.
Notes on Scan and channel memorization:
• Channel memorization may take up to 15 minutes
to complete.
• To stop channel memorization before completion,
press
CANCEL.
• When watching TV, press
CH to move through
memorized channels.
• To add a digital channel that does not appear in
the
Edit menu without repeating channel memori-
zation:
1. Look up the physical channel number
for the new digital channel. The website
www.antennaweb.org can help you find the
physical channel number.
2. Tune to any channel on the
ANT 1 or ANT 2
input your antenna is connected to.
3. Use the number keys and
CANCEL key to enter the physical channel
number followed by “-1” and
ENTER. For
example, for physical channel 36, press
3 6
—
CANCEL 1 ENTER.
The TV will search for a digital channel on the
channel 36 frequency. When it finds the channel,
it will:
a. Add the channel to memory.
b. Change the channel number to the virtual
channel number sent by the broadcaster.
c. Add to memory any associated sub-
channels.
Rememorize channels if you move the TV to a
•
different geographic area with a different channel
line-up.